0x01
随着问题逐渐变复杂,发现debug才是世界硬通货,而刚好可以写一个,毕竟折磨了自己很久
0x02
首先这里是VSCODE+小皮+xdebug
vscode
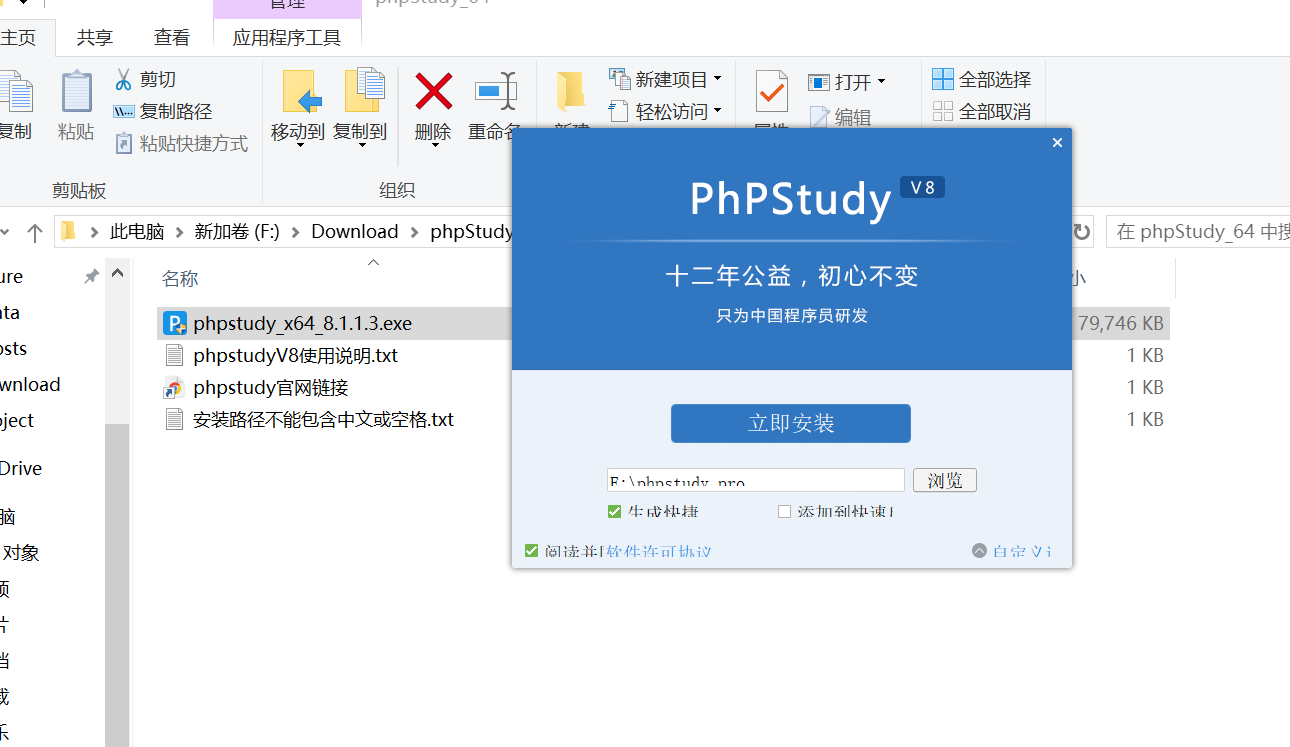
首先这里先安装小皮一路战到底即可
小皮进去选择64位的就可以了,看了一下使用说明唯一的就是说不能使用有空格路径或者是中文路径,这里选择一个比较大的盘(不知道自己以后会建多少个站),然后安转即可,一路站到底除了路径
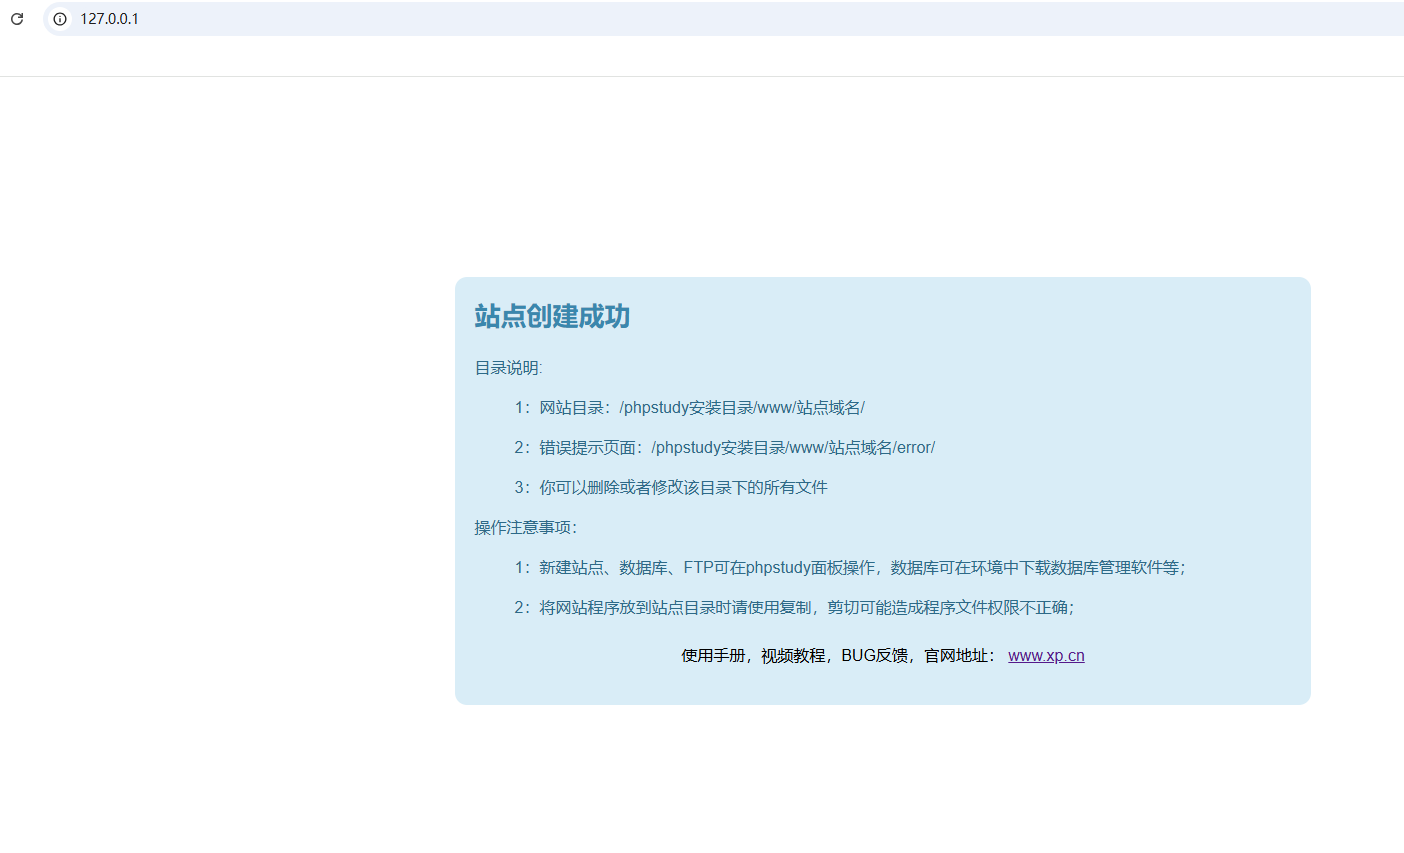
安装好之后打开nginx,打开浏览器输入127.0.0.1,看看是否会成功
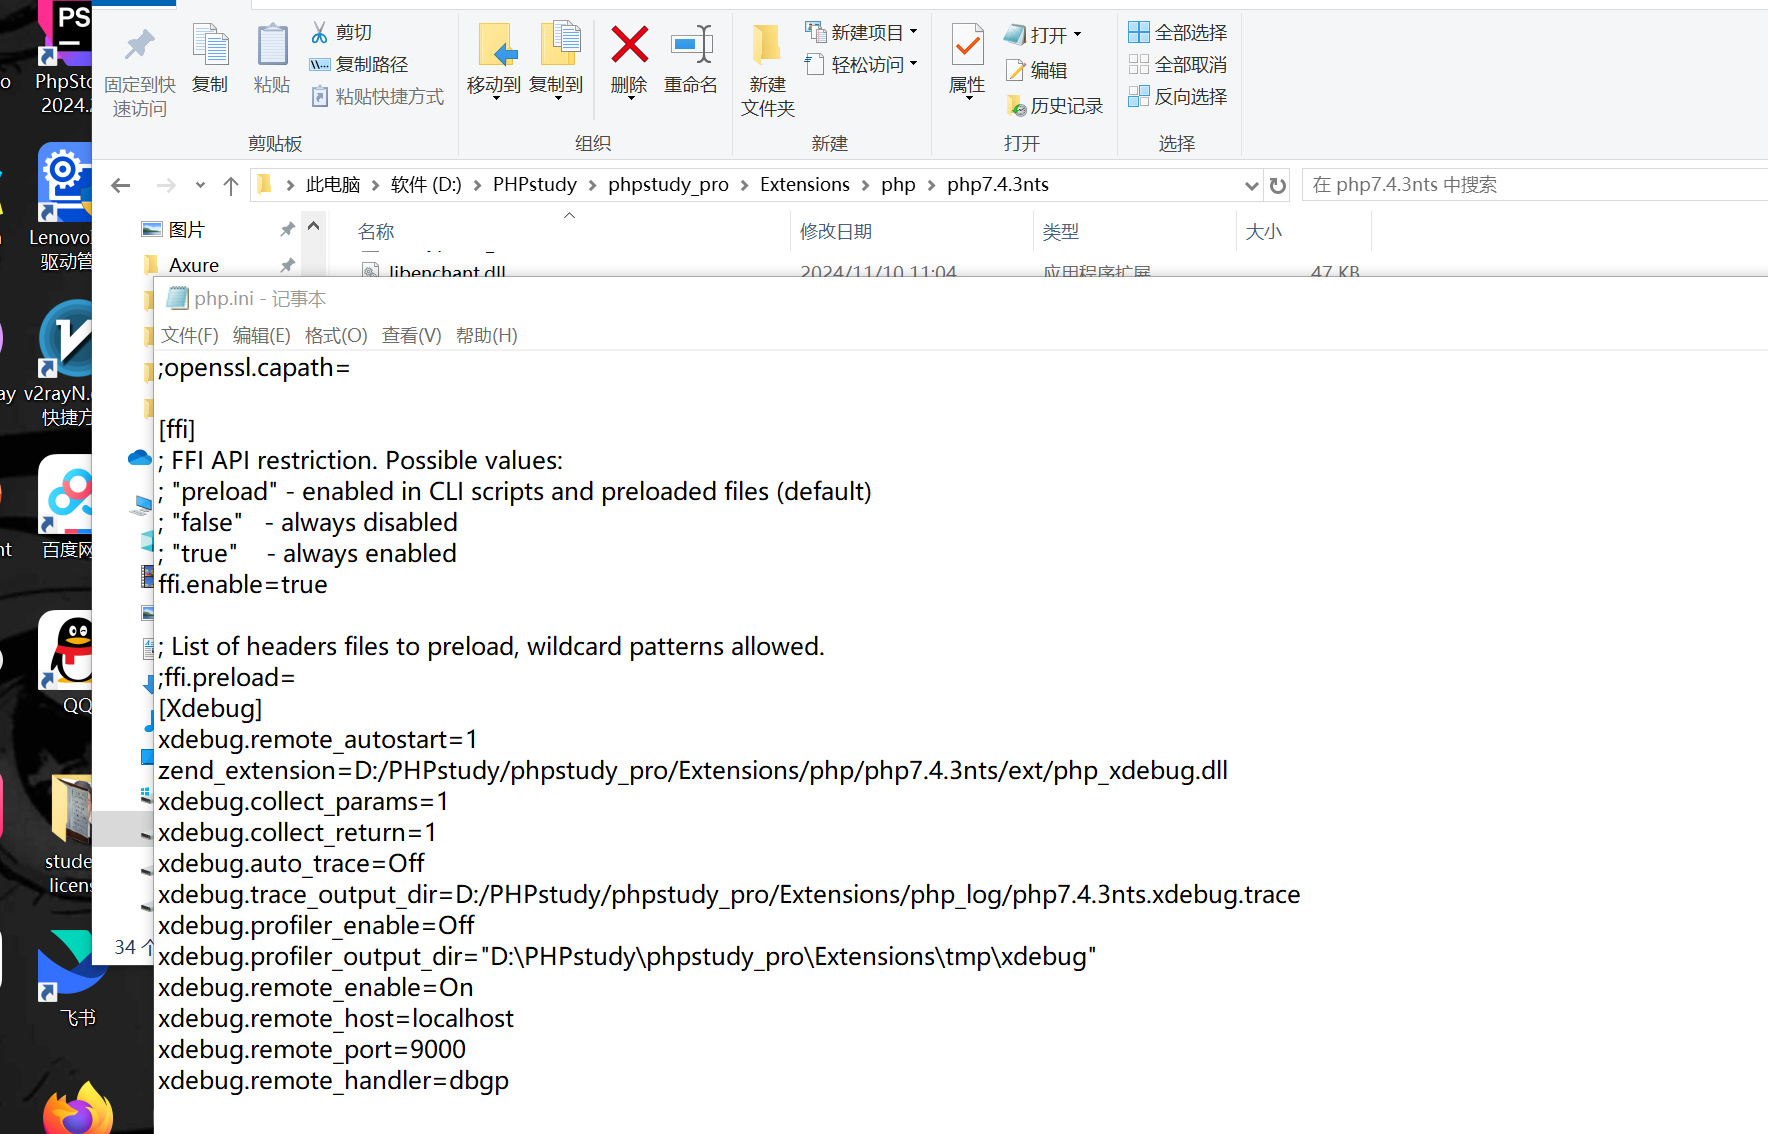
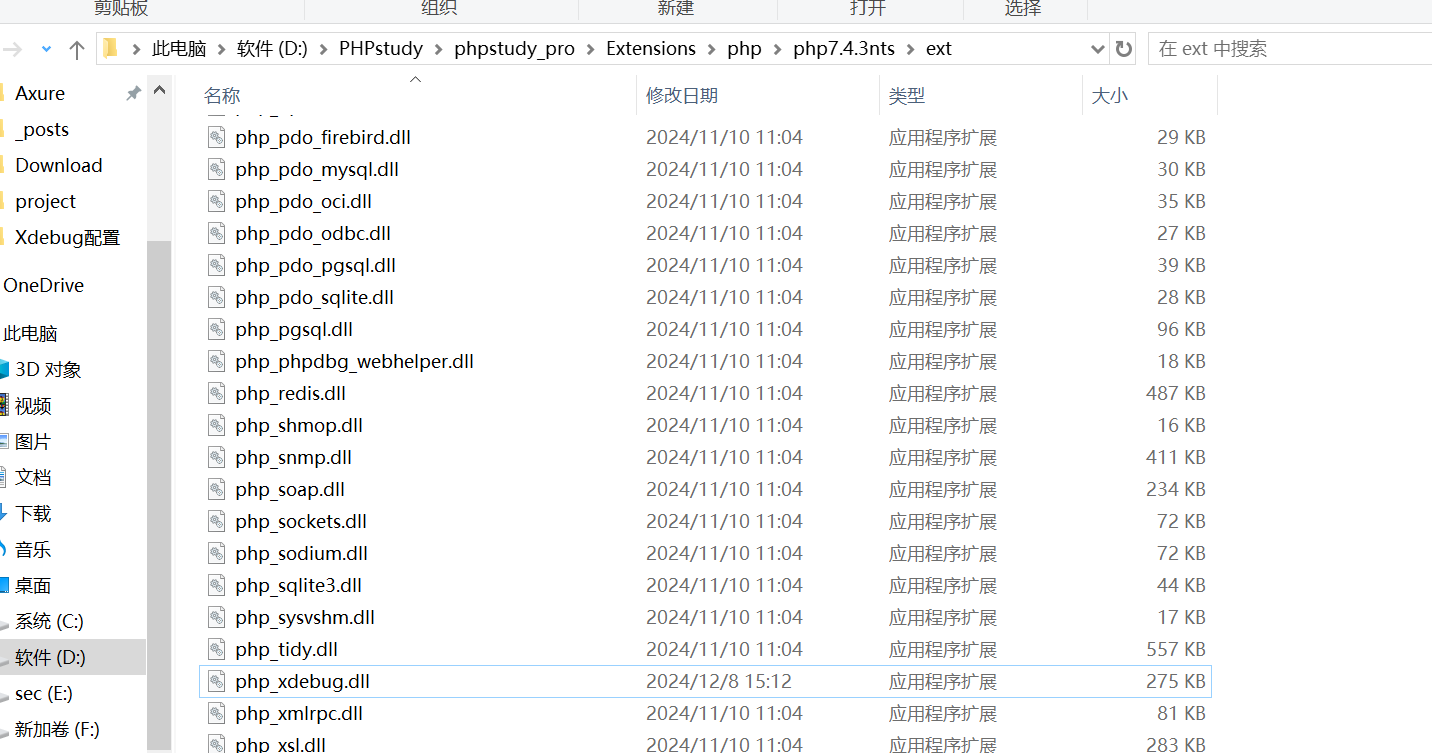
最简单的东西就安装好了,然后随便安装一个php这里选择php7.4.3,把Xdebug调试组件弄上,但是有可能这样子不能保证有xdebug.dll,所以我们要去Xdebug官网上面自己安装一下,同时打开php.ini
1
2
3
4
5
6
7
8
9
10
11
12
13
| [Xdebug]
xdebug.remote_autostart=1
zend_extension=D:/PHPstudy/phpstudy_pro/Extensions/php/php7.4.3nts/ext/php_xdebug.dll
xdebug.collect_params=1
xdebug.collect_return=1
xdebug.auto_trace=Off
xdebug.trace_output_dir=D:/PHPstudy/phpstudy_pro/Extensions/php_log/php7.4.3nts.xdebug.trace
xdebug.profiler_enable=Off
xdebug.profiler_output_dir="D:\PHPstudy\phpstudy_pro\Extensions\tmp\xdebug"
xdebug.remote_enable=On
xdebug.remote_host=localhost
xdebug.remote_port=9000
xdebug.remote_handler=dbgp
|
其实复制上去就可以但是要注意这个端口要与刚才在小皮中的一致,并且Xdebug组件存在,如果报错说不存在,那么先写一个
然后访问网页
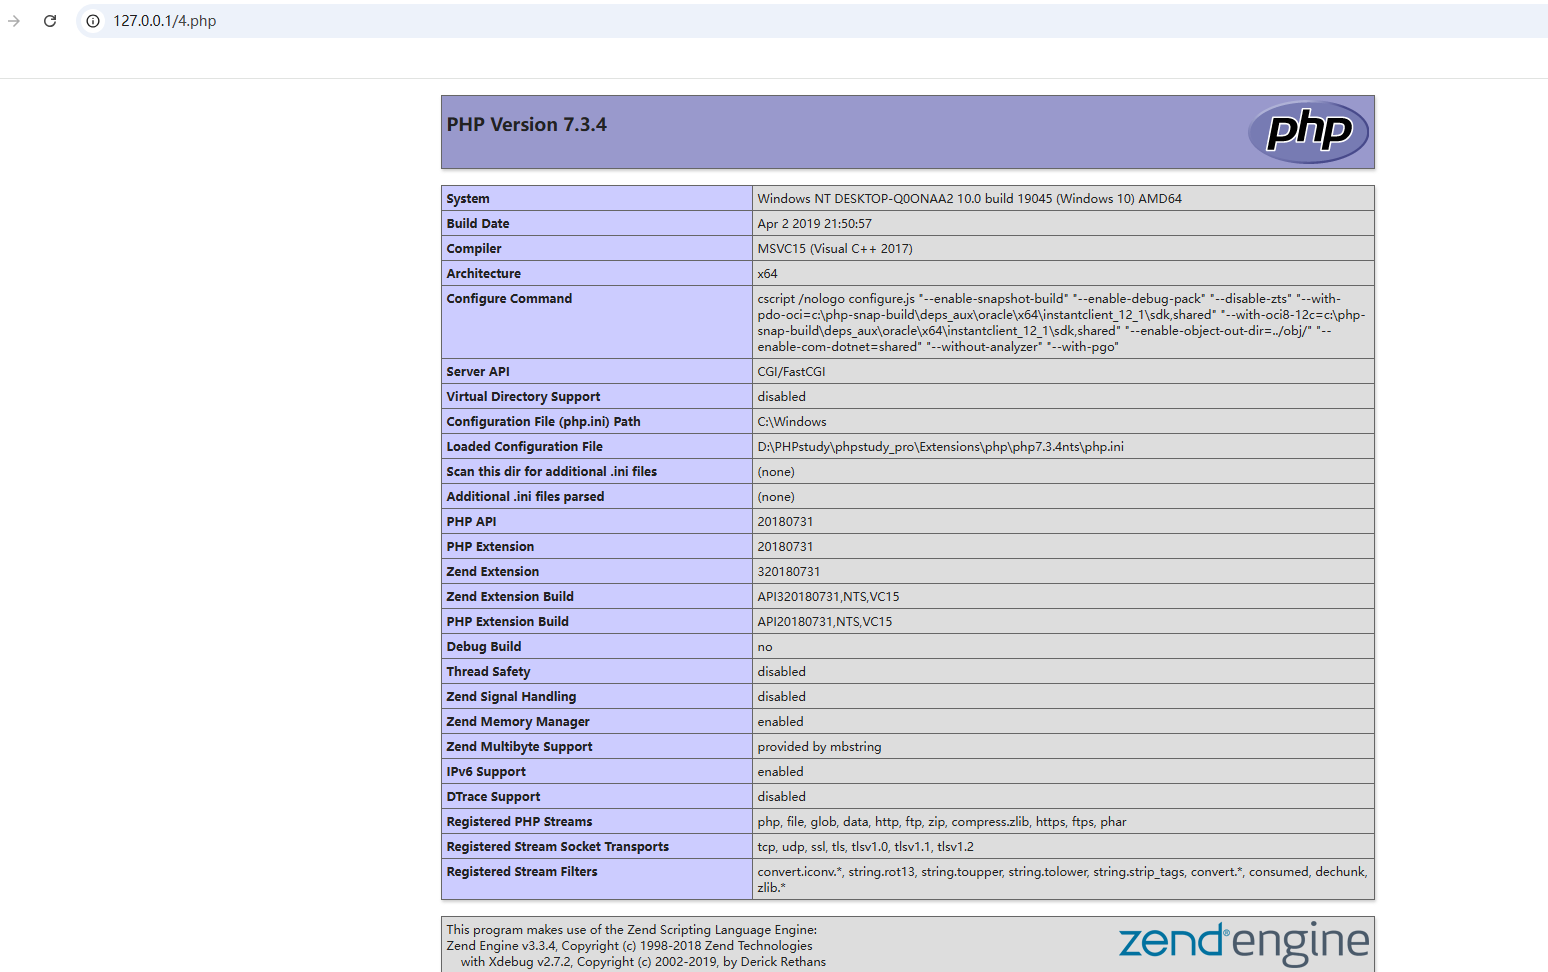
全部复制下来,拿到网站xdebug
放进去然后下载组件即可

下载好之后把这个东西放在我们刚才ini里面的路径
那么现在我们转战VSCODE,下载一个拓展
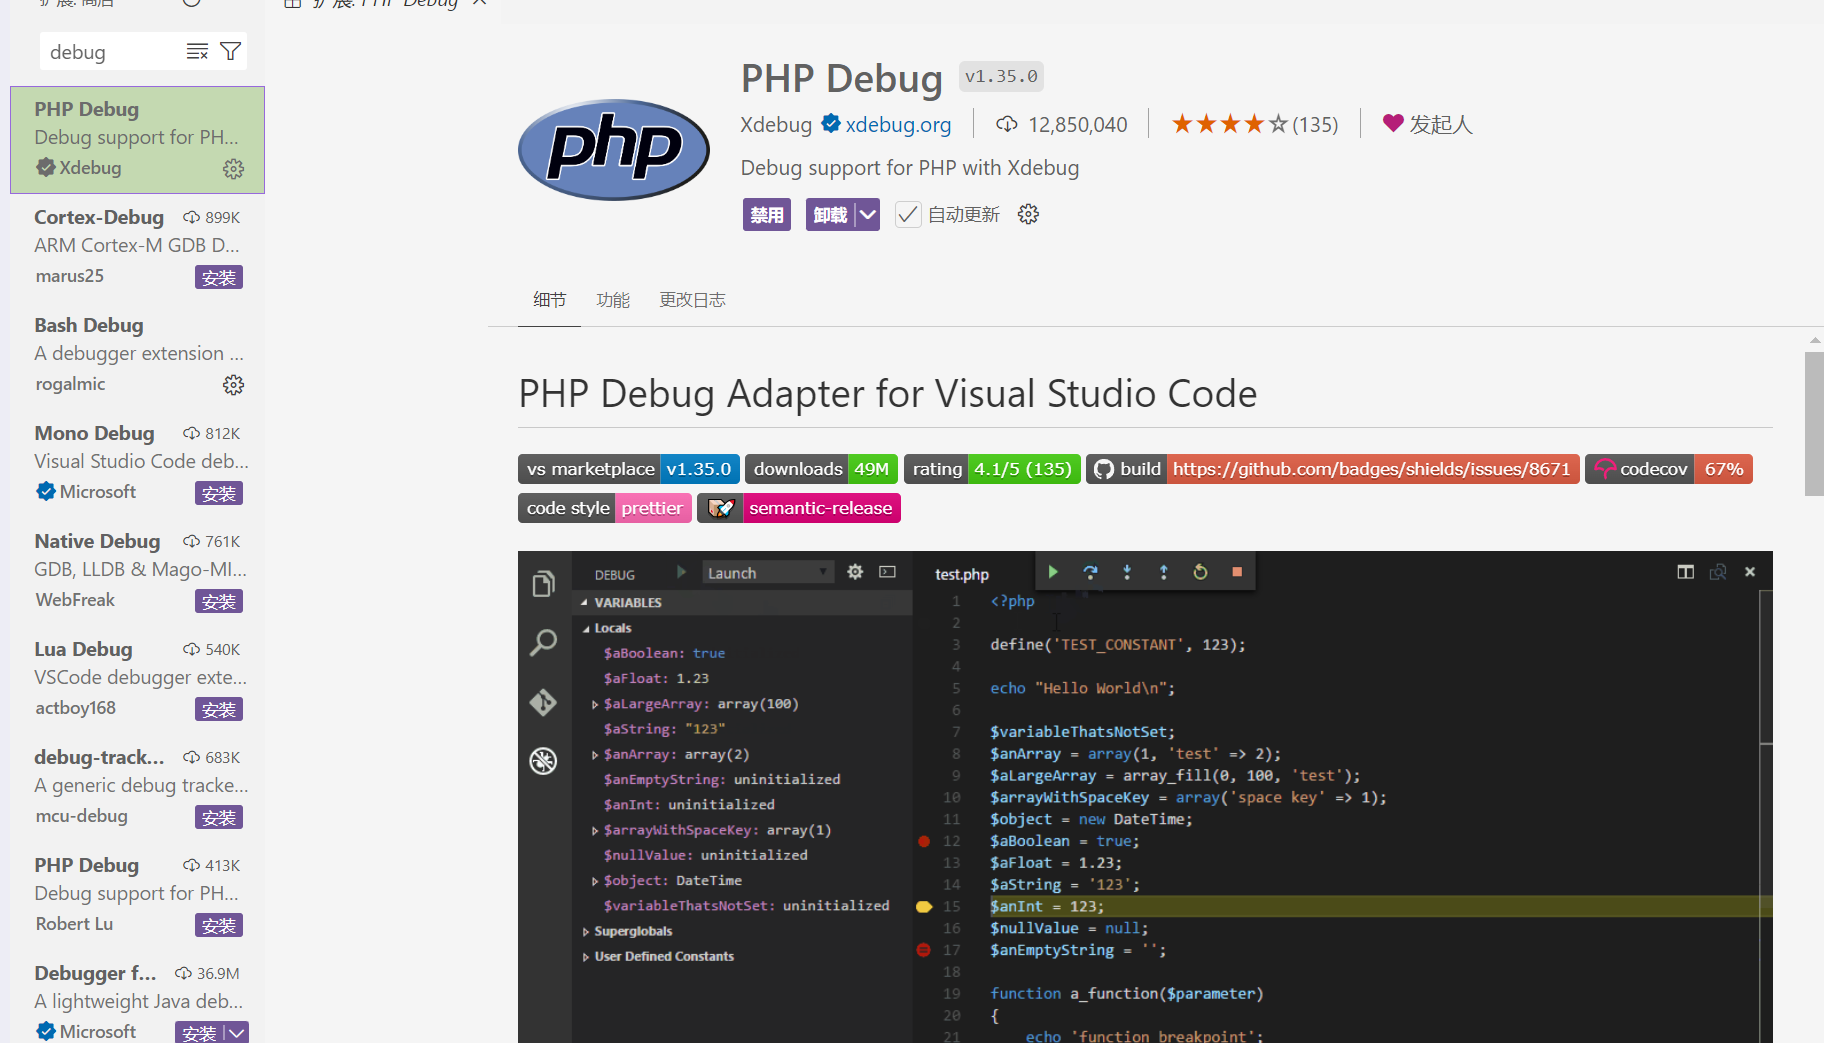
下载好之后打开设置,搜索php,然后我们再选择PHP Debug
进入settings.json增加一项
1
2
| "php.validate.executablePath": "D:\\PHPstudy\\phpstudy_pro\\Extensions\\php\\php7.4.3nts\\php.exe",
"php.debug.executablePath": "D:\\PHPstudy\\phpstudy_pro\\Extensions\\php\\php7.4.3nts\\php.exe"
|
进入那个虫子一样的按钮选择Xdebug然后打开launch.json
1
2
3
4
5
6
7
8
9
10
11
12
13
14
15
16
17
18
19
20
21
22
23
24
25
26
27
28
29
30
31
32
33
34
35
36
37
38
| {
"version": "0.2.0",
"configurations": [
{
"name": "Launch built-in server and debug",
"type": "php",
"request": "launch",
"runtimeArgs": [
"-S",
"localhost:8000",
"-t",
"."
],
"port": 9000,
"serverReadyAction": {
"action": "openExternally"
}
},
{
"name": "Debug current script in console",
"type": "php",
"request": "launch",
"program": "${file}",
"cwd": "${fileDirname}",
"externalConsole": false,
"port": 9000
},
{
"name": "Listen for Xdebug",
"type": "php",
"request": "launch",
"port": 9000
}
]
}
|
这里直接就配置好了,为了好玩一点这里放一个我当时经过Debug才做出的题目,
2024强网杯password game
1
2
3
4
5
6
7
8
9
10
11
12
13
14
15
16
17
18
19
20
21
22
23
24
25
26
27
28
29
30
31
32
33
34
35
36
37
38
39
40
41
42
43
44
45
46
47
48
49
| <?php
function filter($password){
$filter_arr = array("admin","2024qwb");
$filter = '/'.implode("|",$filter_arr).'/i';
return preg_replace($filter,"nonono",$password);
}
class guest{
public $username;
public $value;
public function __tostring(){
if($this->username=="guest"){
$value();
}
return $this->username;
}
public function __call($key,$value){
if($this->username==md5($GLOBALS["flag"])){
echo $GLOBALS["flag"];
}
}
}
class root{
public $username;
public $value;
public function __get($key){
if(strpos($this->username, "admin") == 0 && $this->value == "2024qwb"){
$this->value = $GLOBALS["flag"];
echo md5("hello:".$this->value);
}
}
}
class user{
public $username;
public $password;
public $value;
public function __invoke(){
$this->username=md5($GLOBALS["flag"]);
return $this->password->guess();
}
public function __destruct(){
if(strpos($this->username, "admin") == 0 ){
echo "hello".$this->username;
}
}
}
$user=unserialize(filter($_POST["password"]));
if(strpos($user->username, "admin") == 0 && $user->password == "2024qwb"){
echo "hello!";
}
|
那么其实我们用这个东西的话更好的还是为了调试整体框架这里以最优美的CTFshow为例子,先下载一个工具
composer 下载好了之后,本地打开终端看看
安装好之后再新建一个网站,在其中根目录文件夹里面新建一个composer.json
1
| composer require topthink/thinkphp:3.2.3
|
我们这里再把网站的根目录选择成thinkphp的即可,这里把其中控制器的代码切换为
1
2
3
4
5
6
7
8
9
10
11
| <?php
namespace Home\Controller;
use Think\Controller;
class IndexController extends Controller {
public function index($n=''){
$this->show('<style type="text/css">*{ padding: 0; margin: 0; } div{ padding: 4px 48px;} body{ background: #fff; font-family: "微软雅黑"; color: #333;font-size:24px} h1{ font-size: 100px; font-weight: normal; margin-bottom: 12px; } p{ line-height: 1.8em; font-size: 36px } a,a:hover{color:blue;}</style><div style="padding: 24px 48px;"> <h1>CTFshow</h1><p>thinkphp 专项训练</p><p>hello,'.$n.'黑客建立了控制器后门,你能找到吗</p>','utf-8');
}
}
|
这里就要做个小科普了,之前我一直以为VSCODE是不能跟进的,其实是我不会用😋
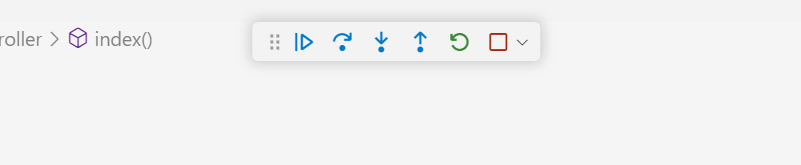
这六个按钮,第一个是逐断点,第二个是逐过程(不跟进),第三个是单步调试(跟进),第四个是单步退出,第五个是重新连接,第六个是退出调试
那么接着我们调试这个框架,poc为
1
| http://127.0.0.2/index.php/Home/Index/index/?n=<?php system("whoami");?>
|
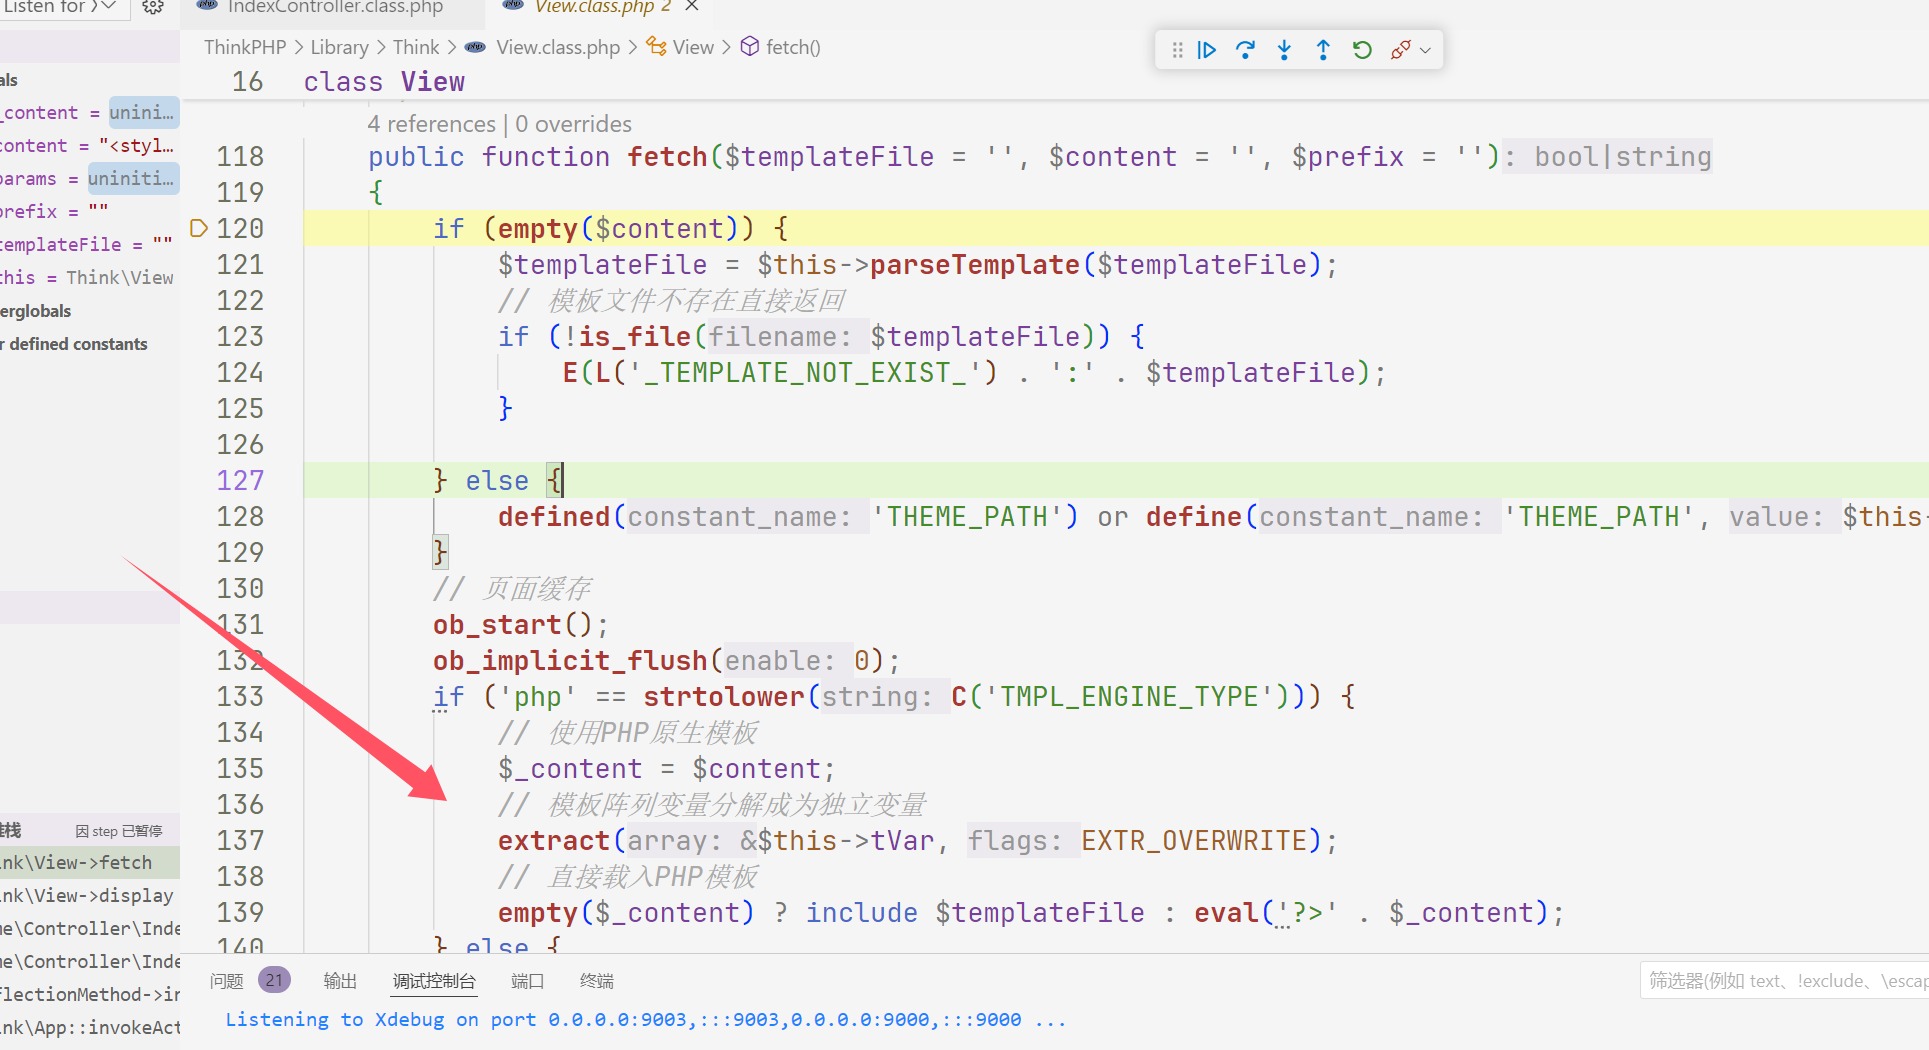
首先进入到show方法之中然后进入view中的display,由于其中只有一个赋值的函数
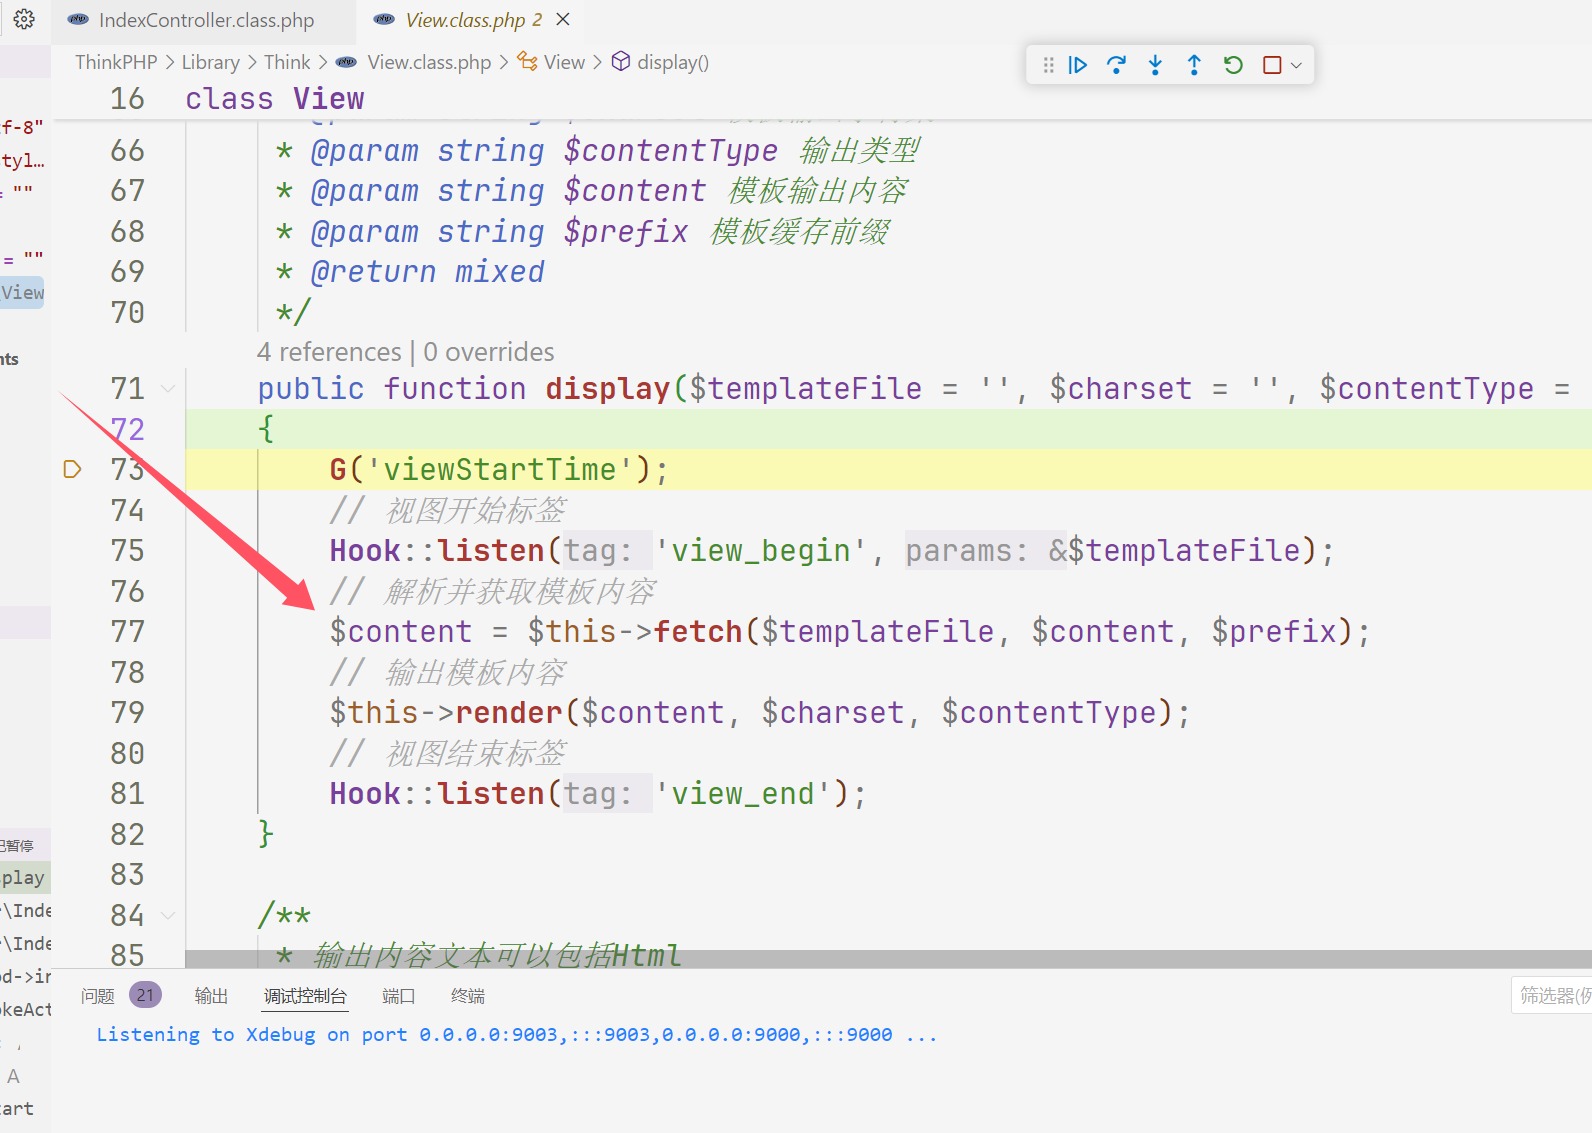
所以我们跟进fetch即可,然后继续观察发现这里没有黑名单直接就把变量解析了,那么我们就猜就是这里的问题跟进即可,
我们会进入C方法,然后监视一下会发现是think
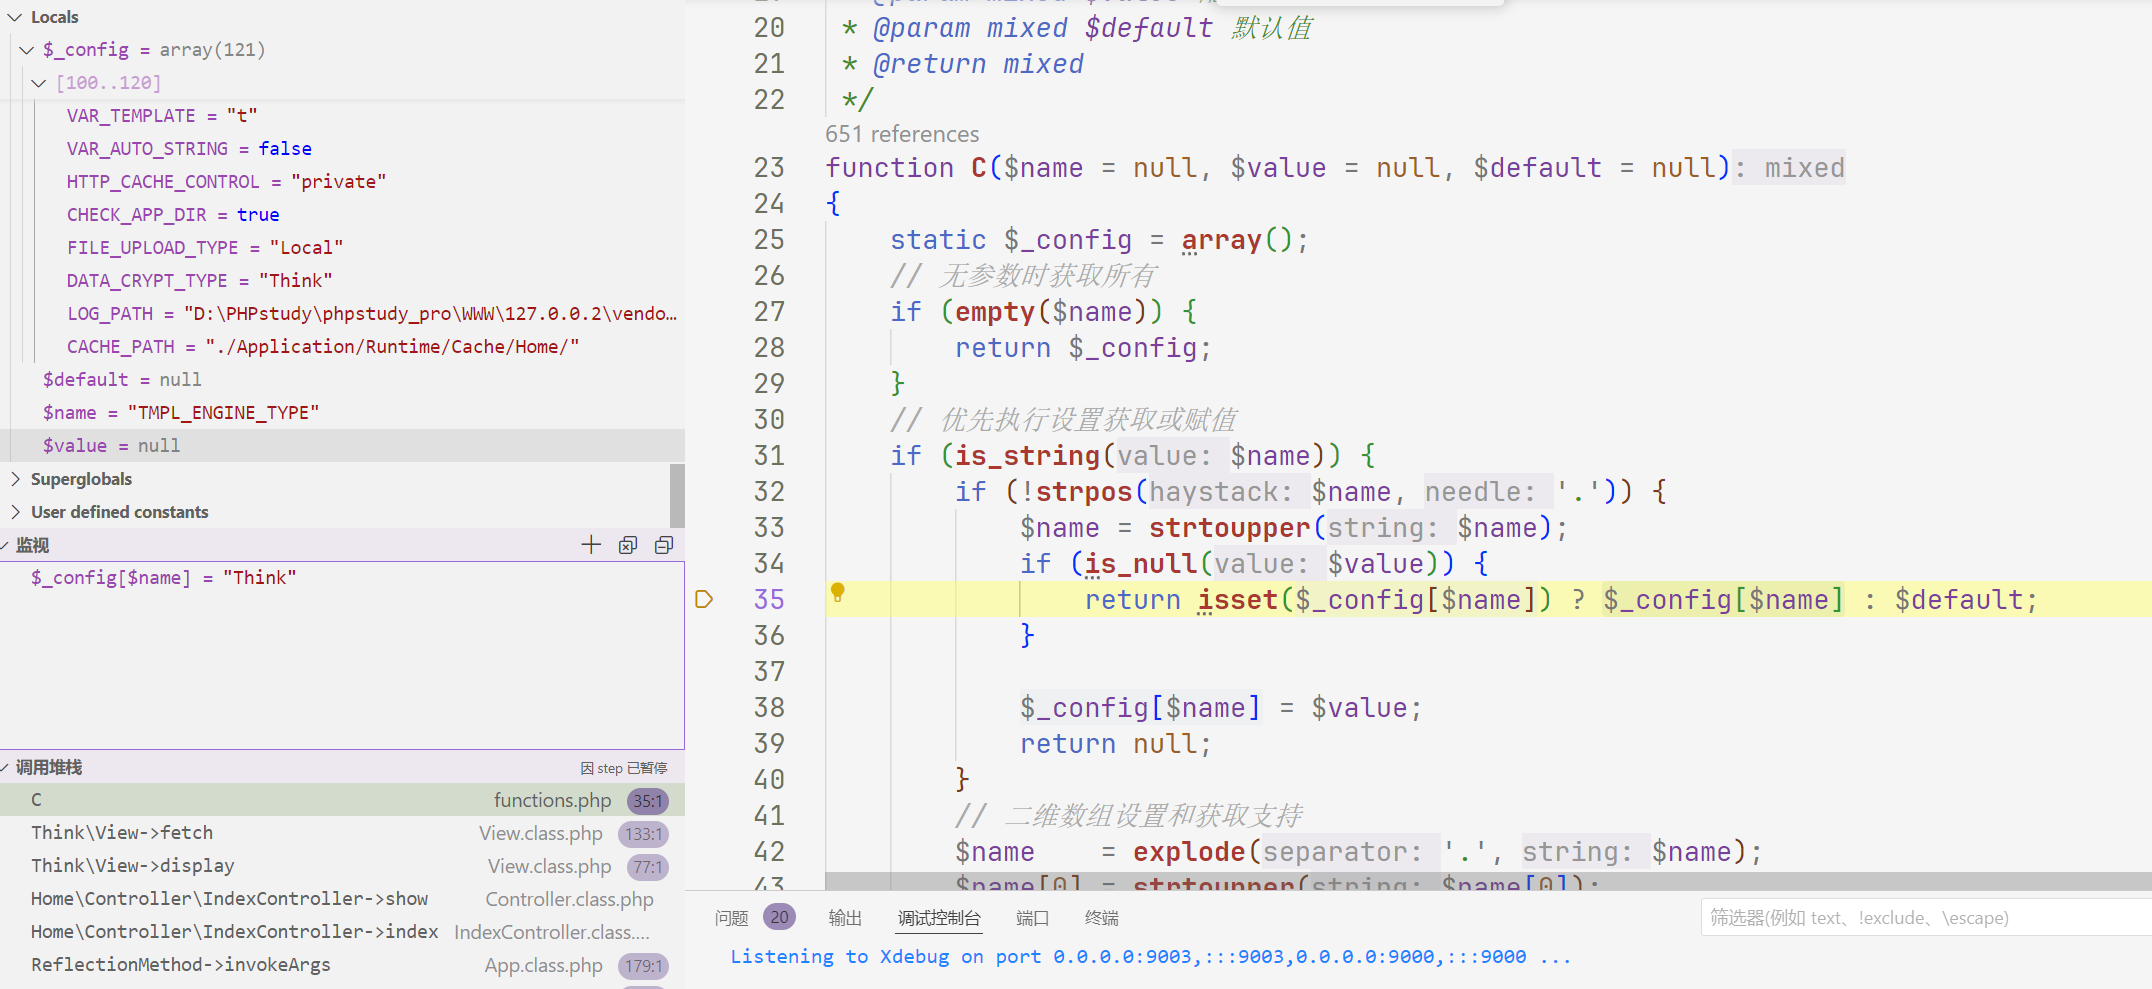
那么理论上来说,他就不会进入if而是来到了else,但是Ctfshow的题目是php,就直接RCE了,不过我们本地不是,所以走的else,这里跟进Hook::listen 到exec
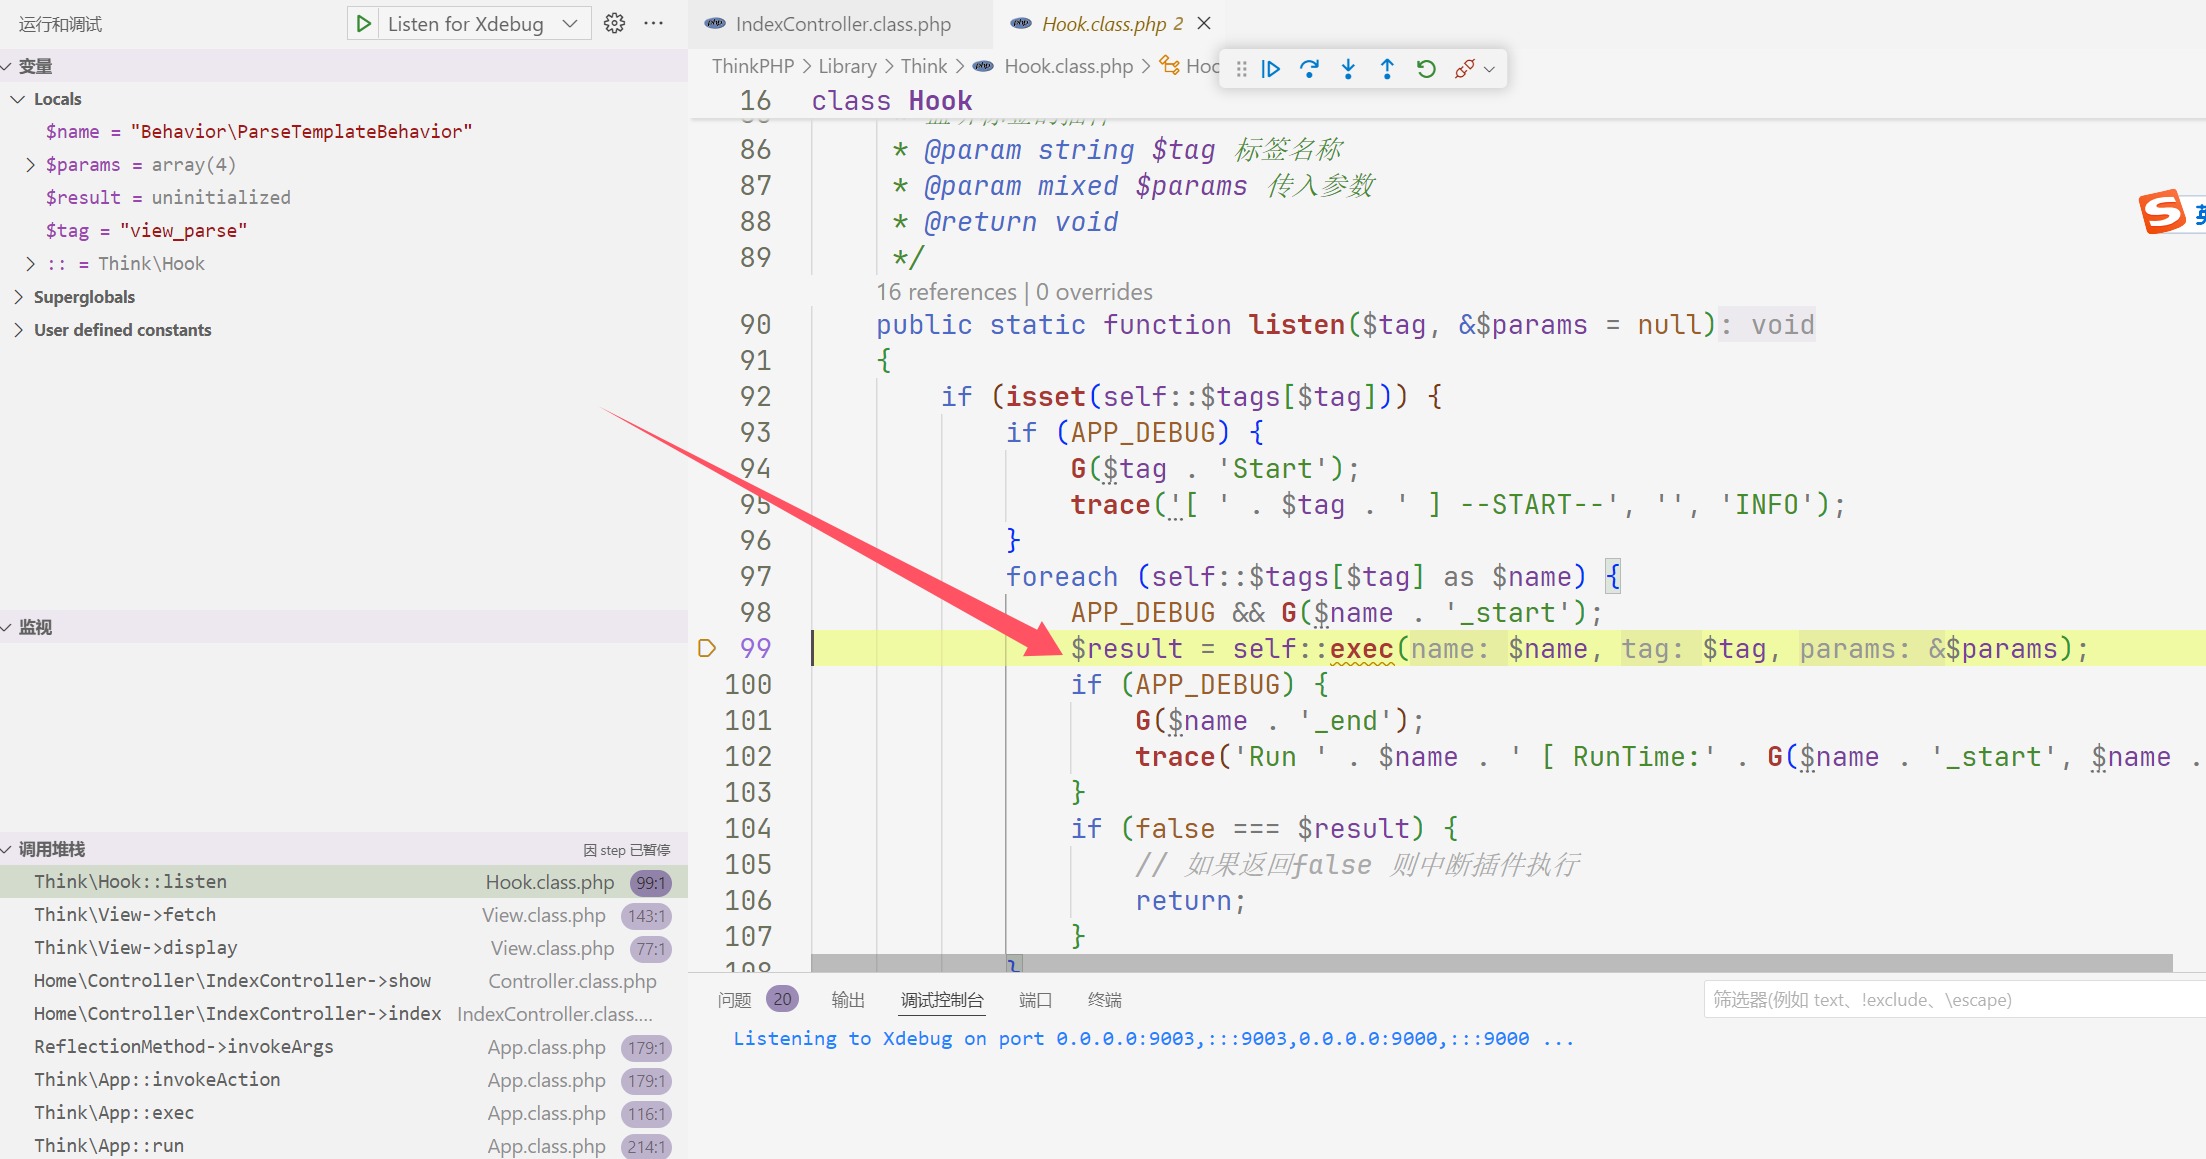 exec
exec
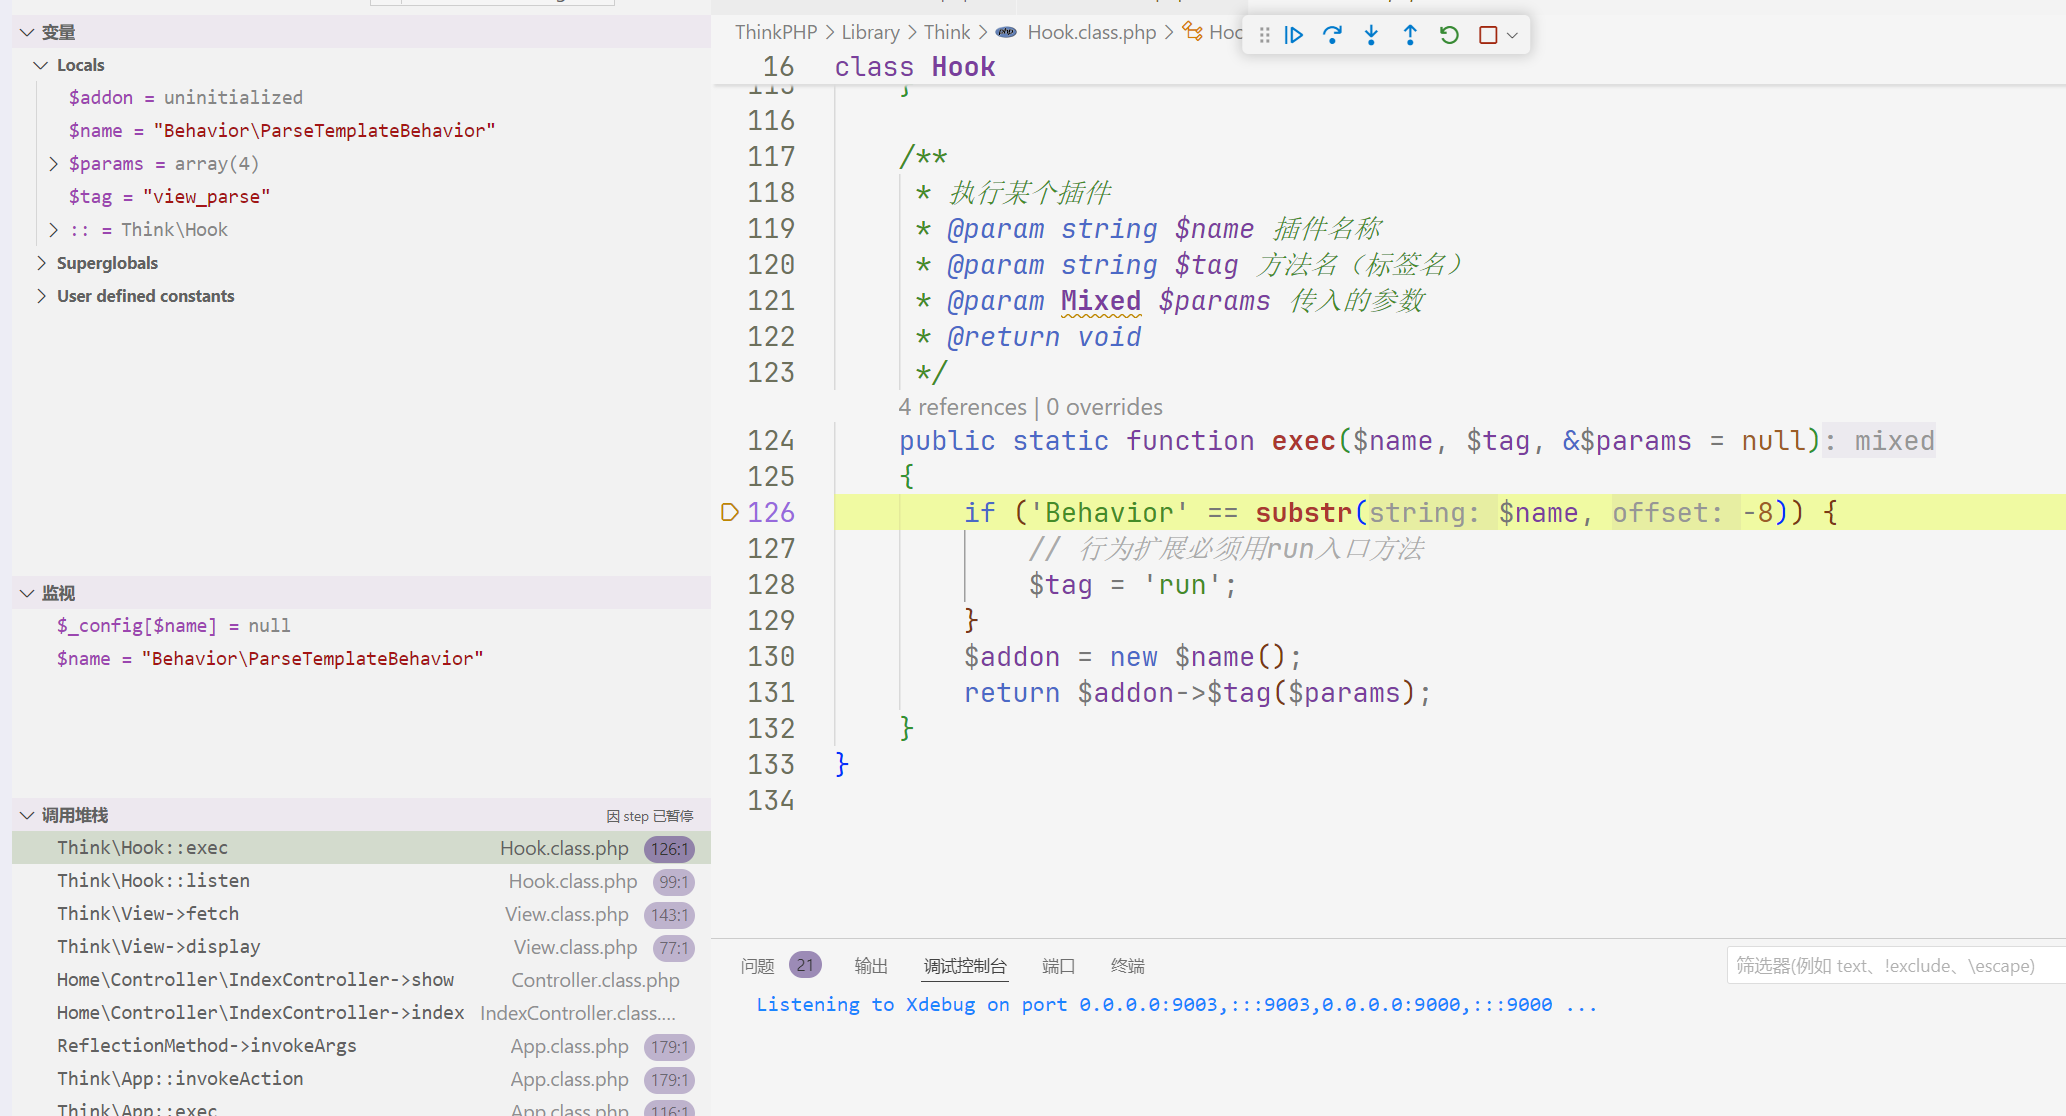
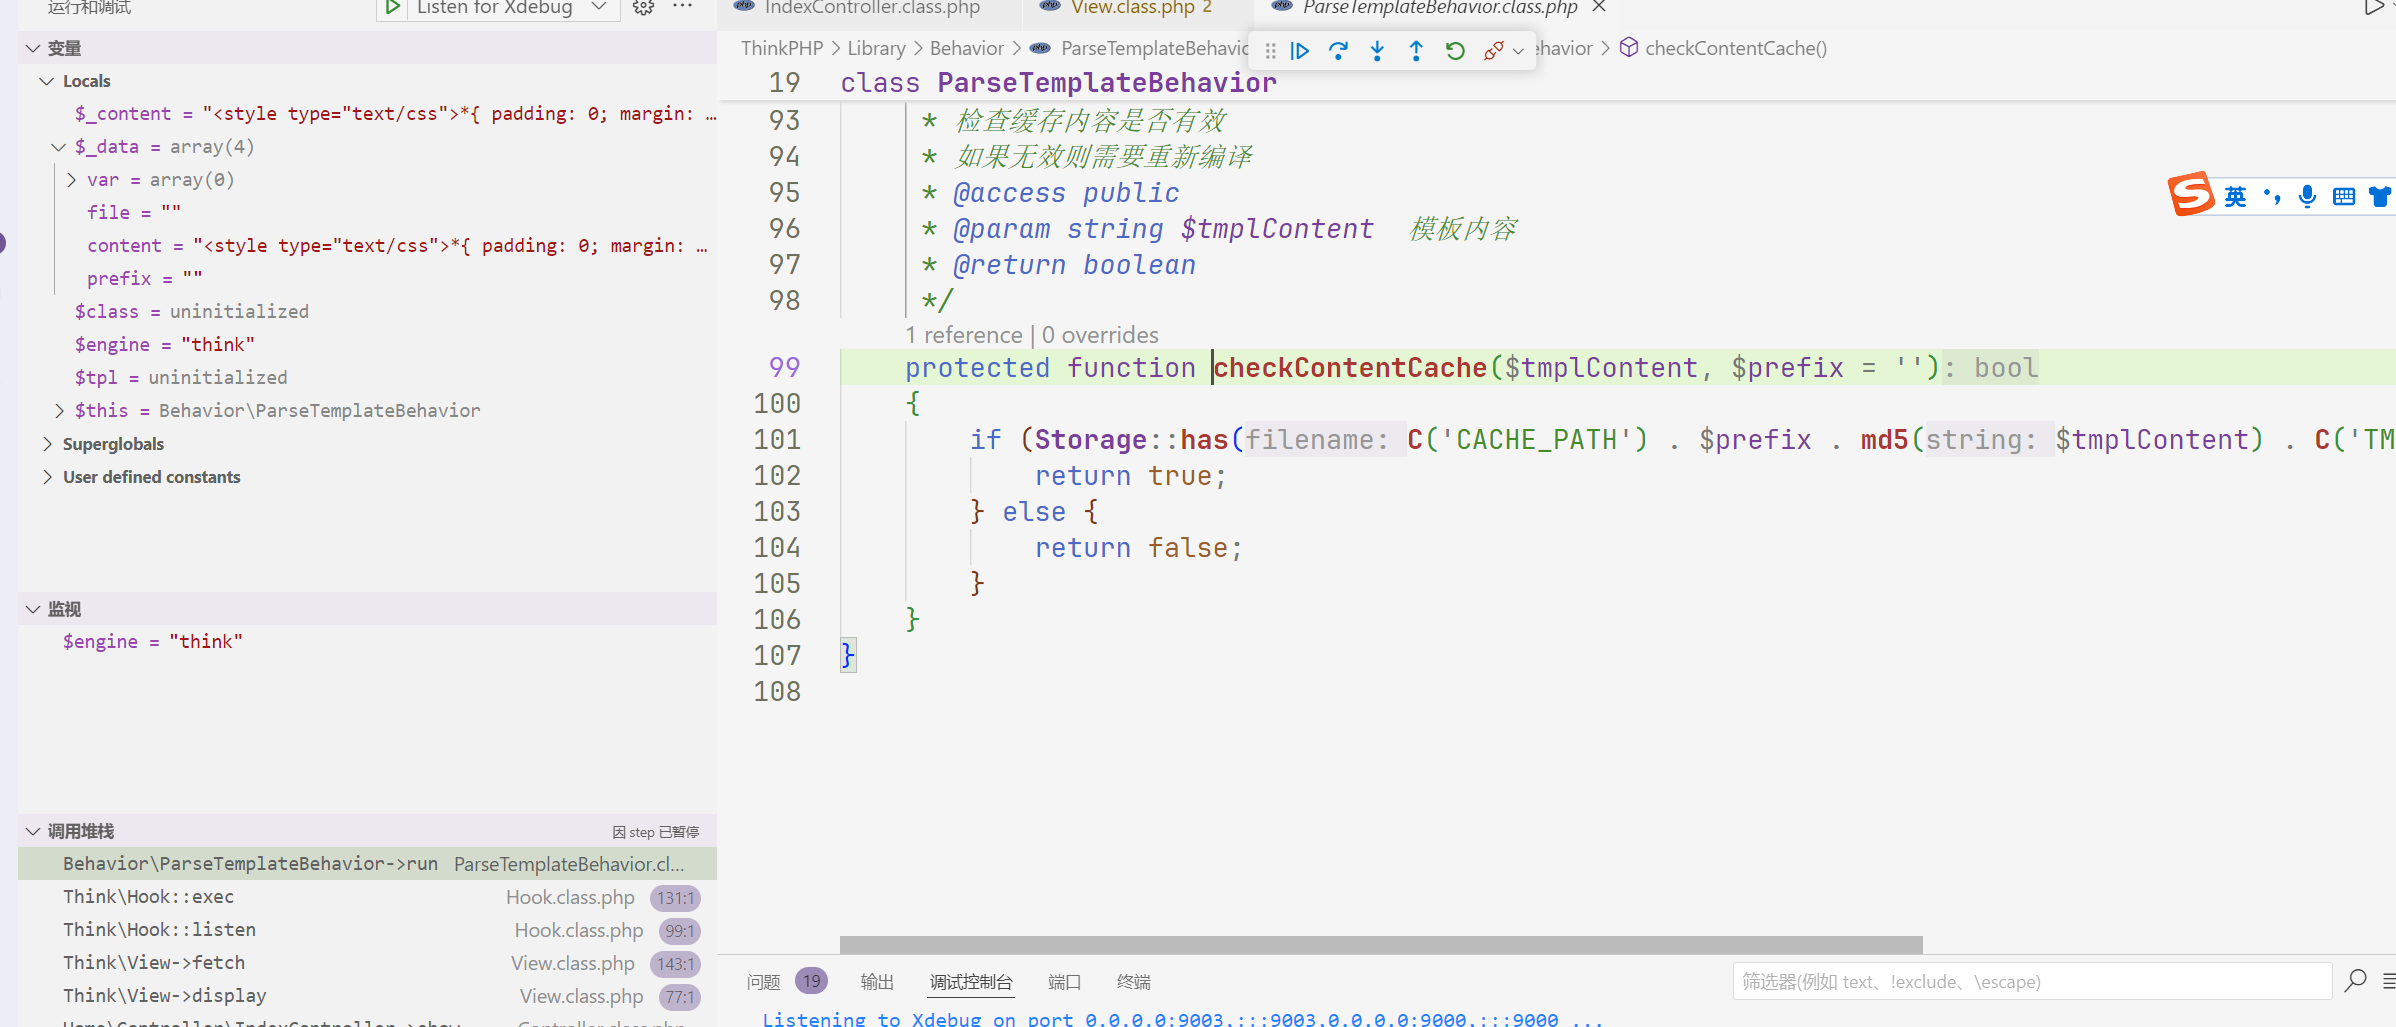
那么下面应该是会到run,从run方法到这里面发现通过生成缓存文件名的方式来保存我们的$content(恶意代码)
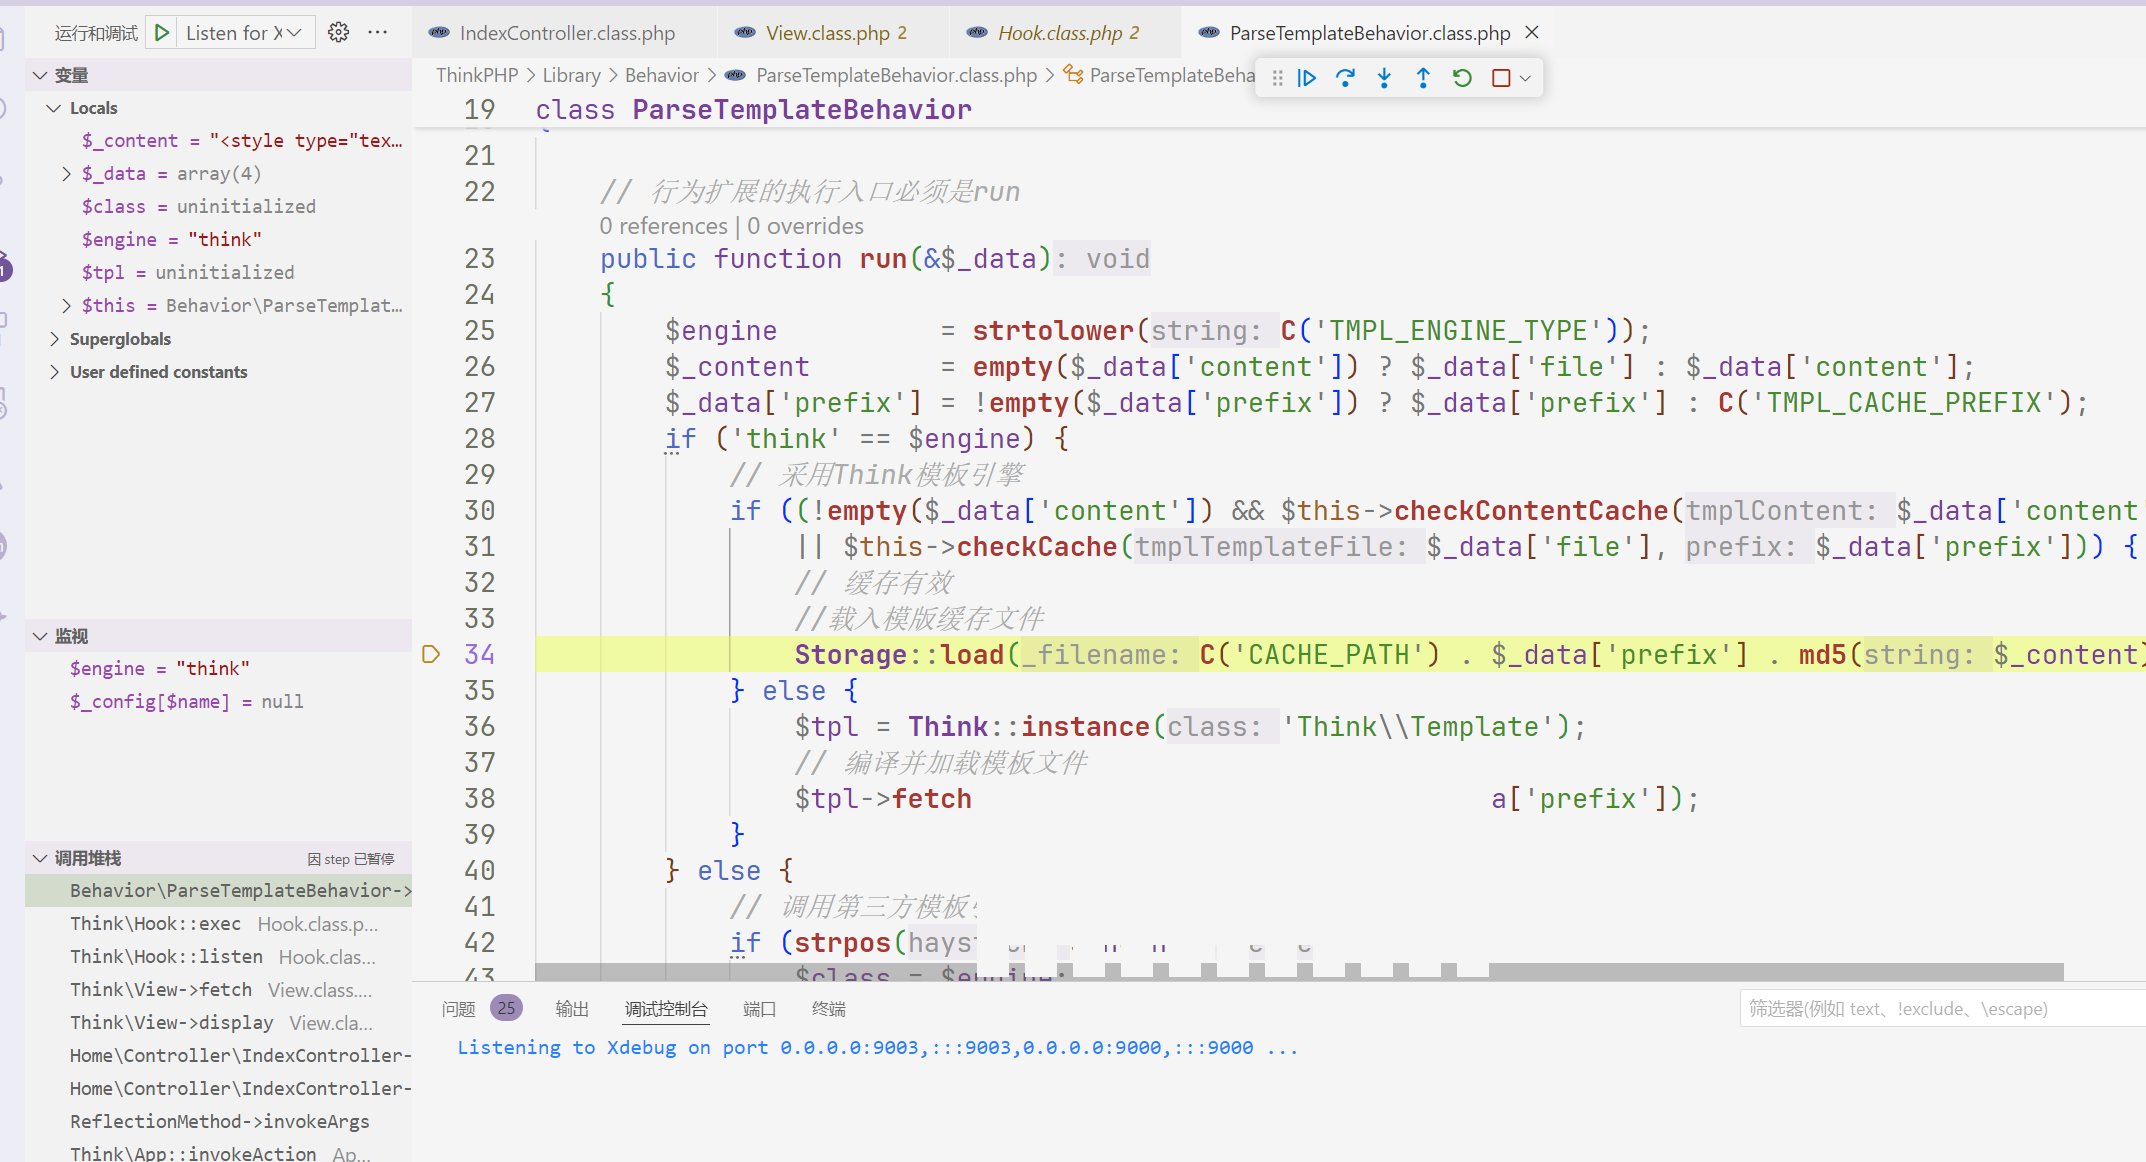
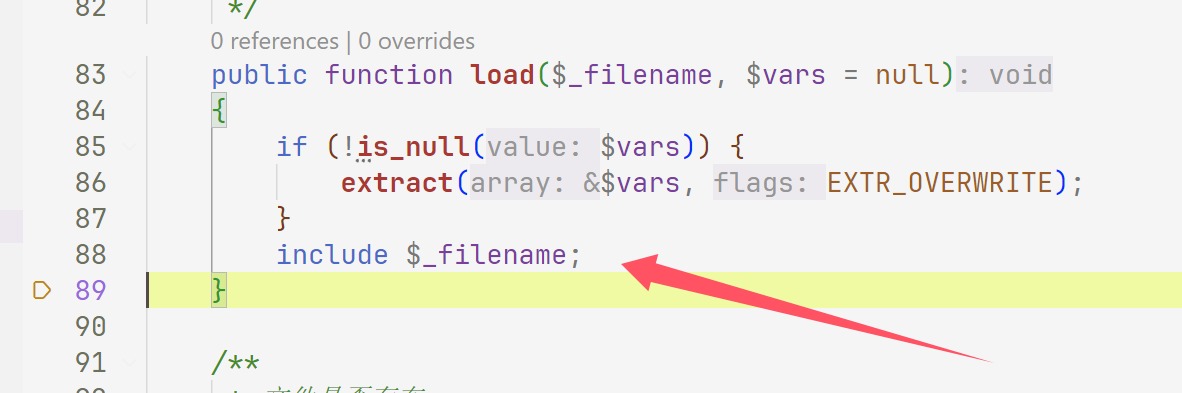
再而会到Storage::load 通过include来载入缓存文件也就是我们的恶意代码,形成RCE
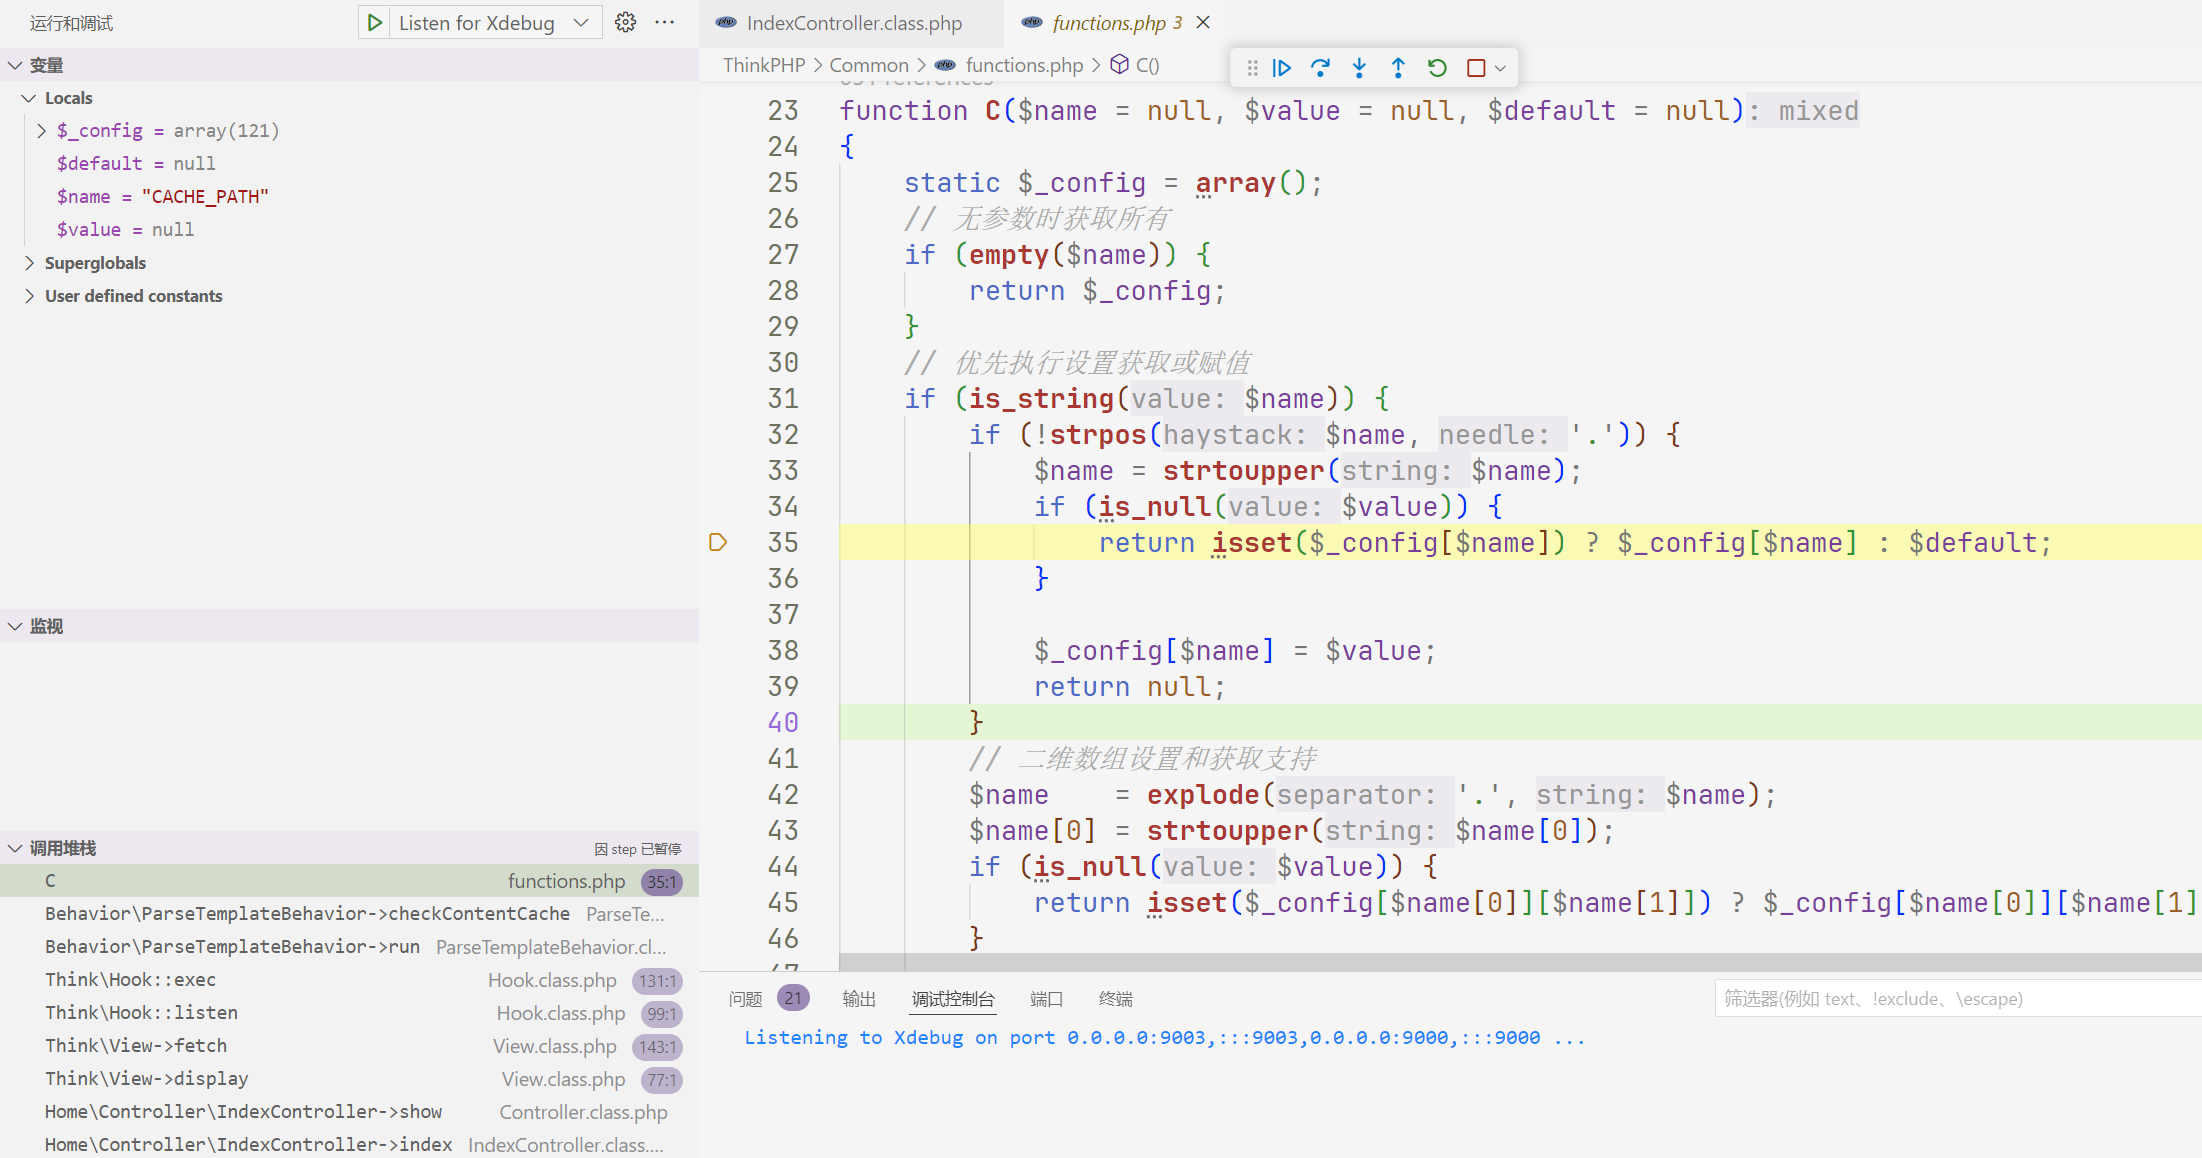
其中调试的过程中我发现经常进入function C
1
2
3
4
5
6
7
8
9
10
11
12
13
14
15
16
17
18
19
20
21
22
23
24
25
26
27
28
29
30
31
32
33
34
35
| function C($name = null, $value = null, $default = null)
{
static $_config = array();
if (empty($name)) {
return $_config;
}
if (is_string($name)) {
if (!strpos($name, '.')) {
$name = strtoupper($name);
if (is_null($value)) {
return isset($_config[$name]) ? $_config[$name] : $default;
}
$_config[$name] = $value;
return null;
}
$name = explode('.', $name);
$name[0] = strtoupper($name[0]);
if (is_null($value)) {
return isset($_config[$name[0]][$name[1]]) ? $_config[$name[0]][$name[1]] : $default;
}
$_config[$name[0]][$name[1]] = $value;
return null;
}
if (is_array($name)) {
$_config = array_merge($_config, array_change_key_case($name, CASE_UPPER));
return null;
}
return null;
}
|
而且一般都是从这里跳出
其实这个函数看着复杂,就是为了设置一些配置项,比如
1
2
3
| C(['DB' => ['HOST' => '127.0.0.1', 'USER' => 'root']]);
C('DB.HOST', '127.0.0.1');
$dbHost = C('DB.HOST', null, 'localhost');
|
而一般$_config 是一个静态数组,用于存储配置项。所以一般的跳出都是从这里
phpstorm
然后这个的话,其实就不用小皮了,相对方便一点,但是等我有空再写
OK,今天不想学习,那就来把这个写了,其实很简单后面发现,和之前知道的不同,同样需要进行小皮的配合,不然框架是进不了网页(会很麻烦),那么就进入设置
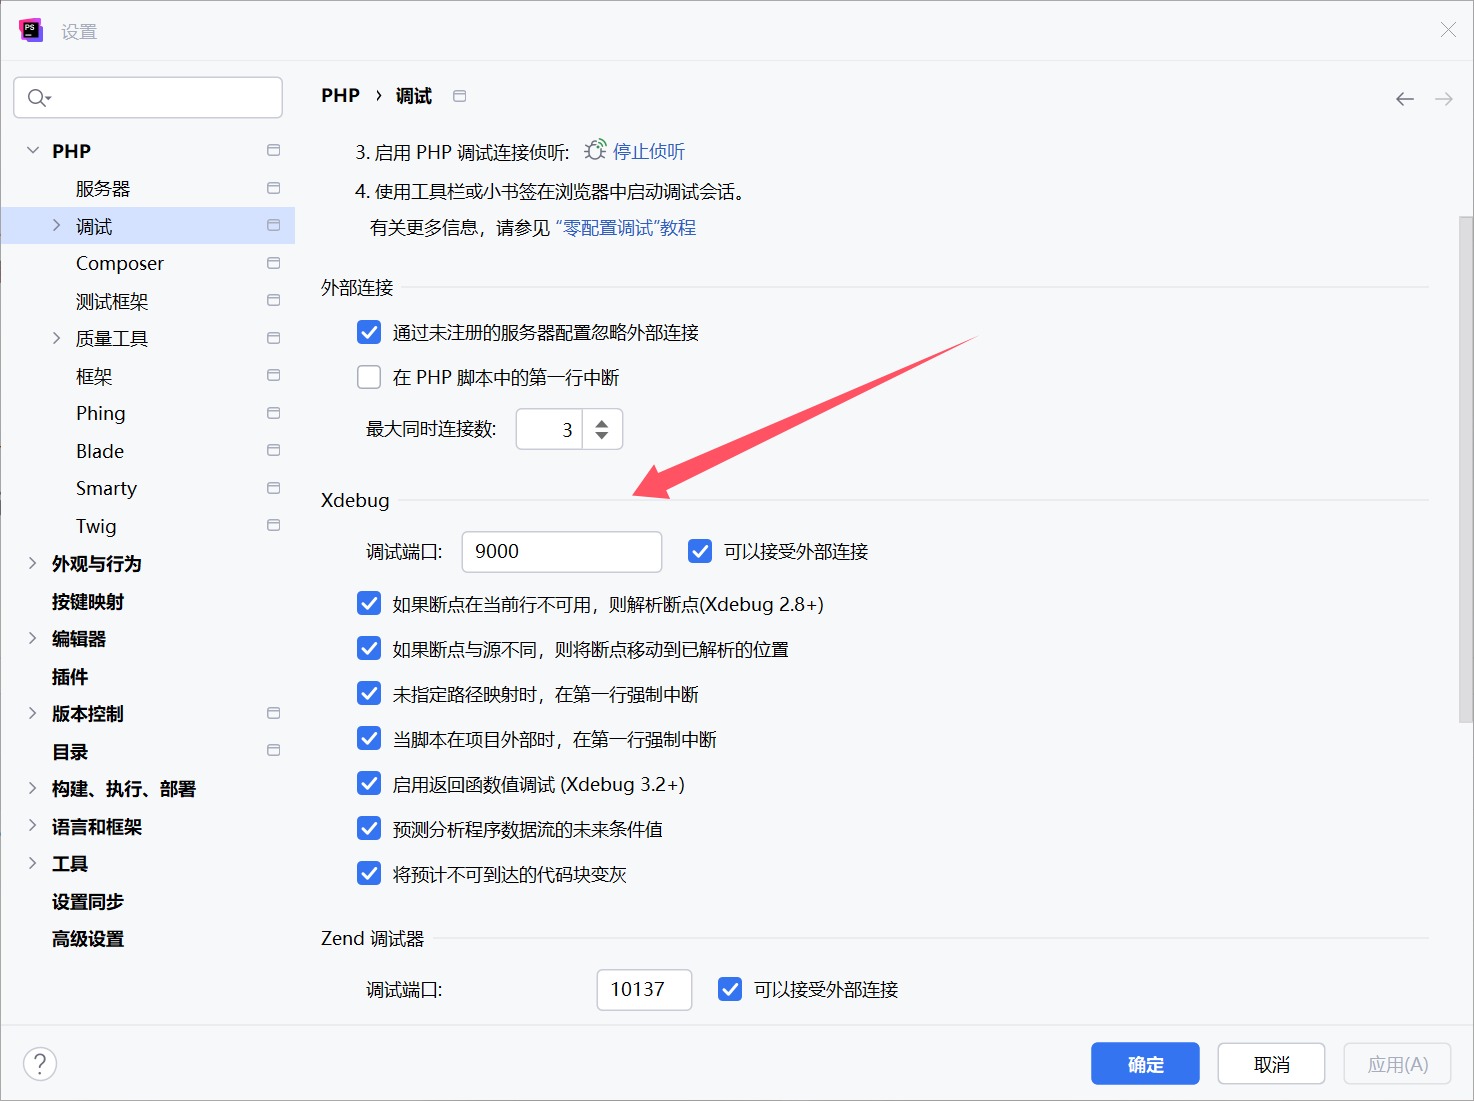
设置于ini里面一样的端口,并且PHP设置也一定要和配置好Xdebug插件的版本一致,然后设置一个服务器,与phpstudy里面的一致,
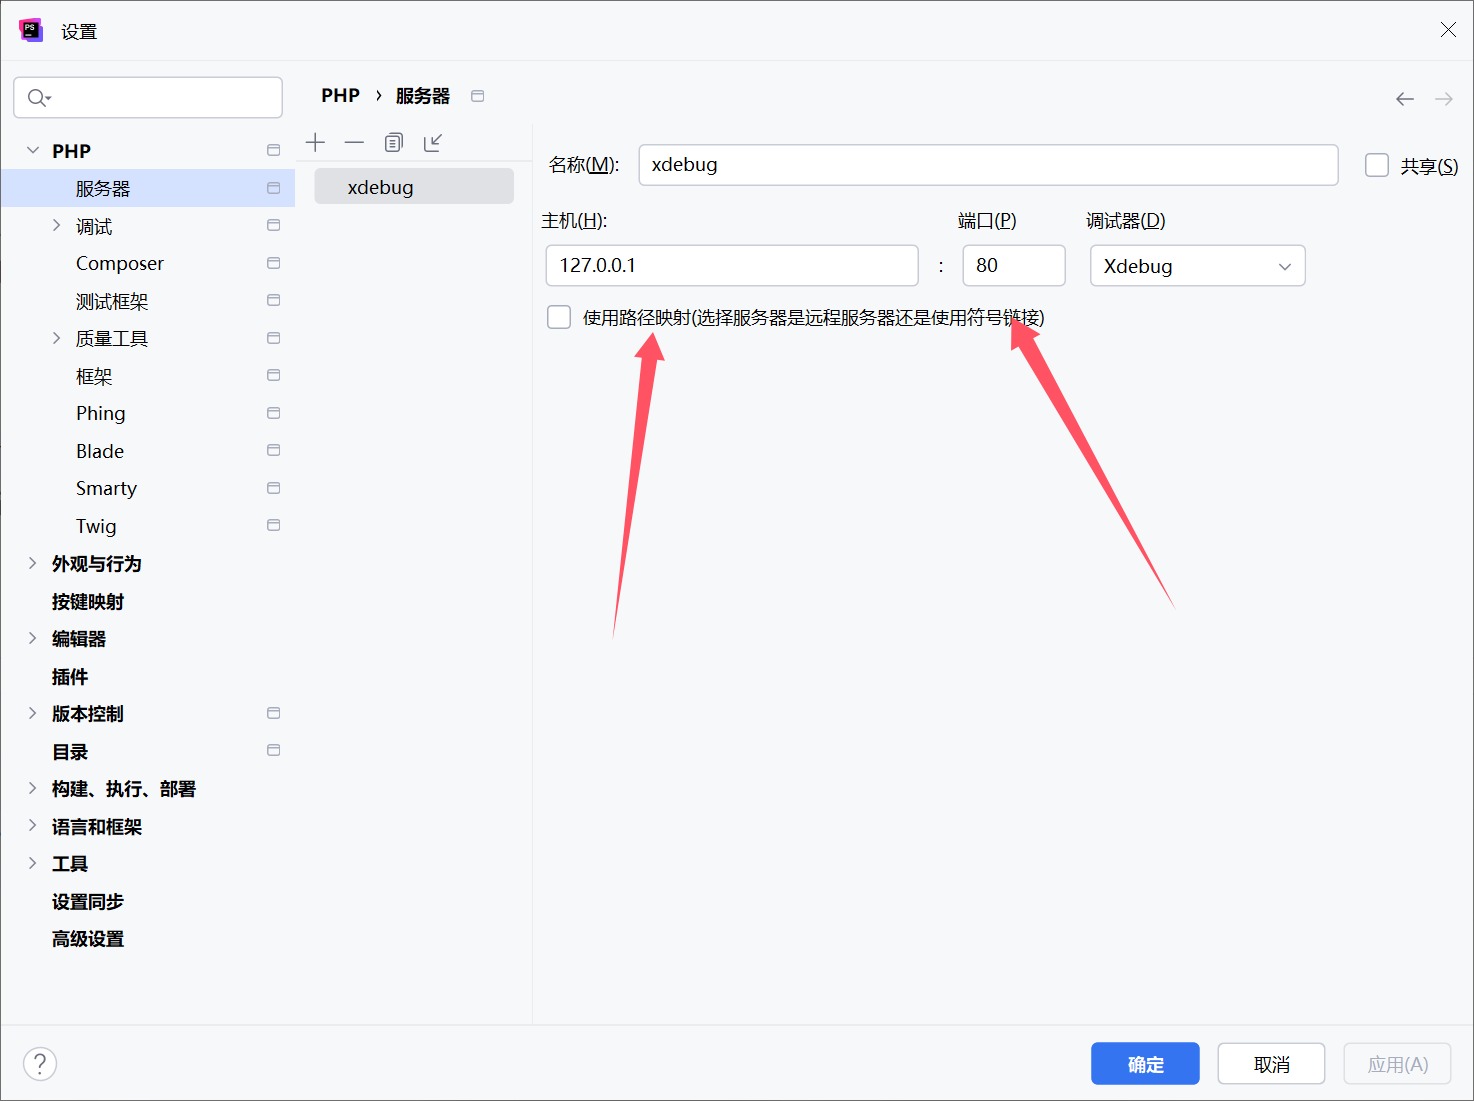
端口和IP都要和小皮里面的一样,
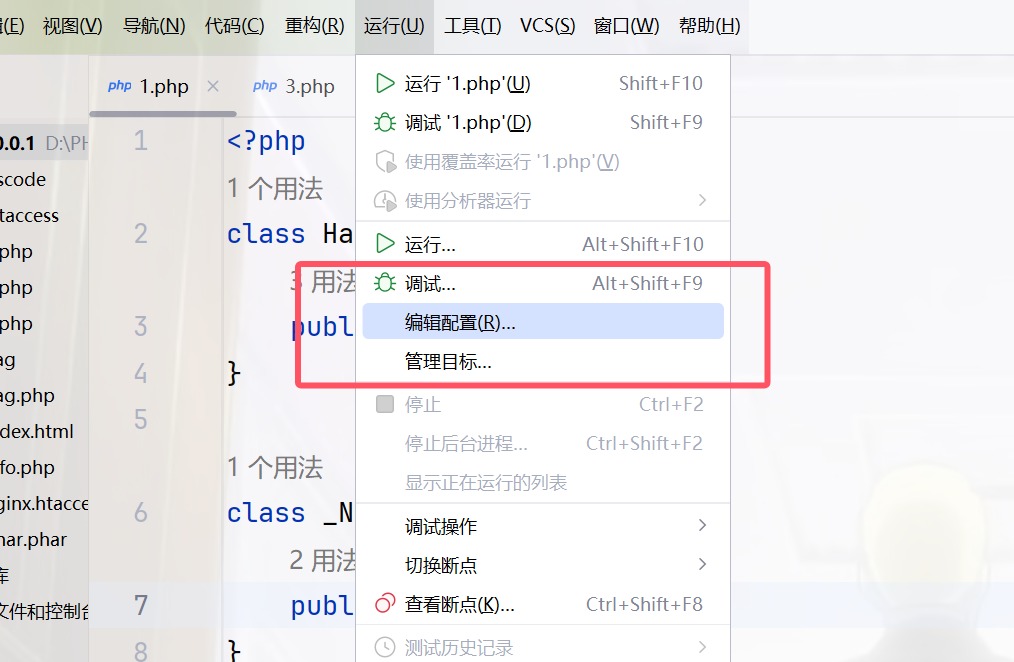
添加PHP网页
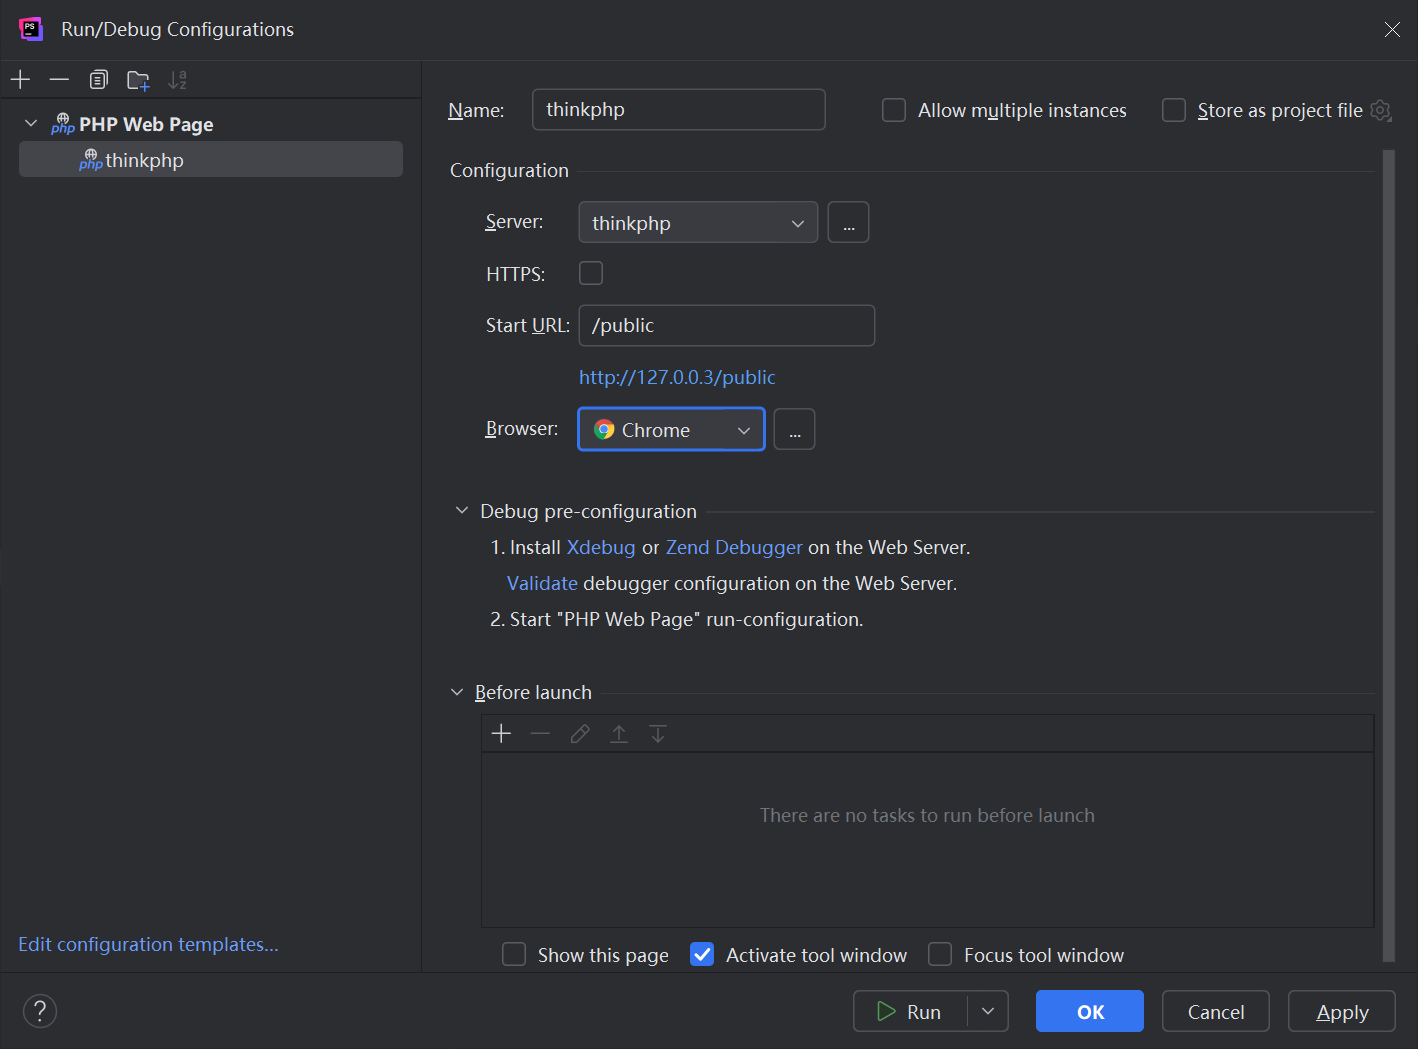
点击Validate就可以验证
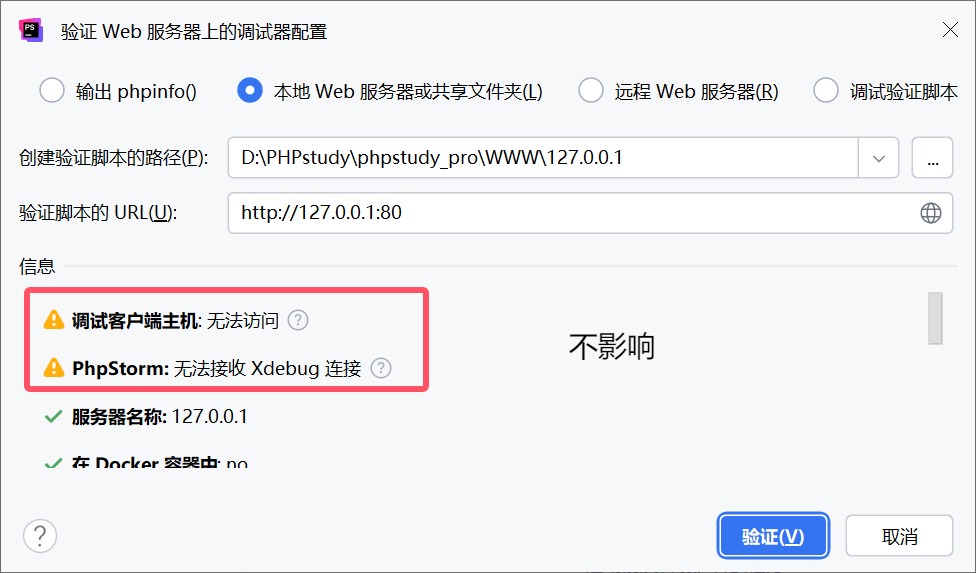
就可以成功进行调试了,记得一定要把监听给打开,然后在网页访问即可
PyCharm
既然说了php的Xdebug,那顺便把python和Java的一起说说哈哈,毕竟动态调试确实是非常实用的
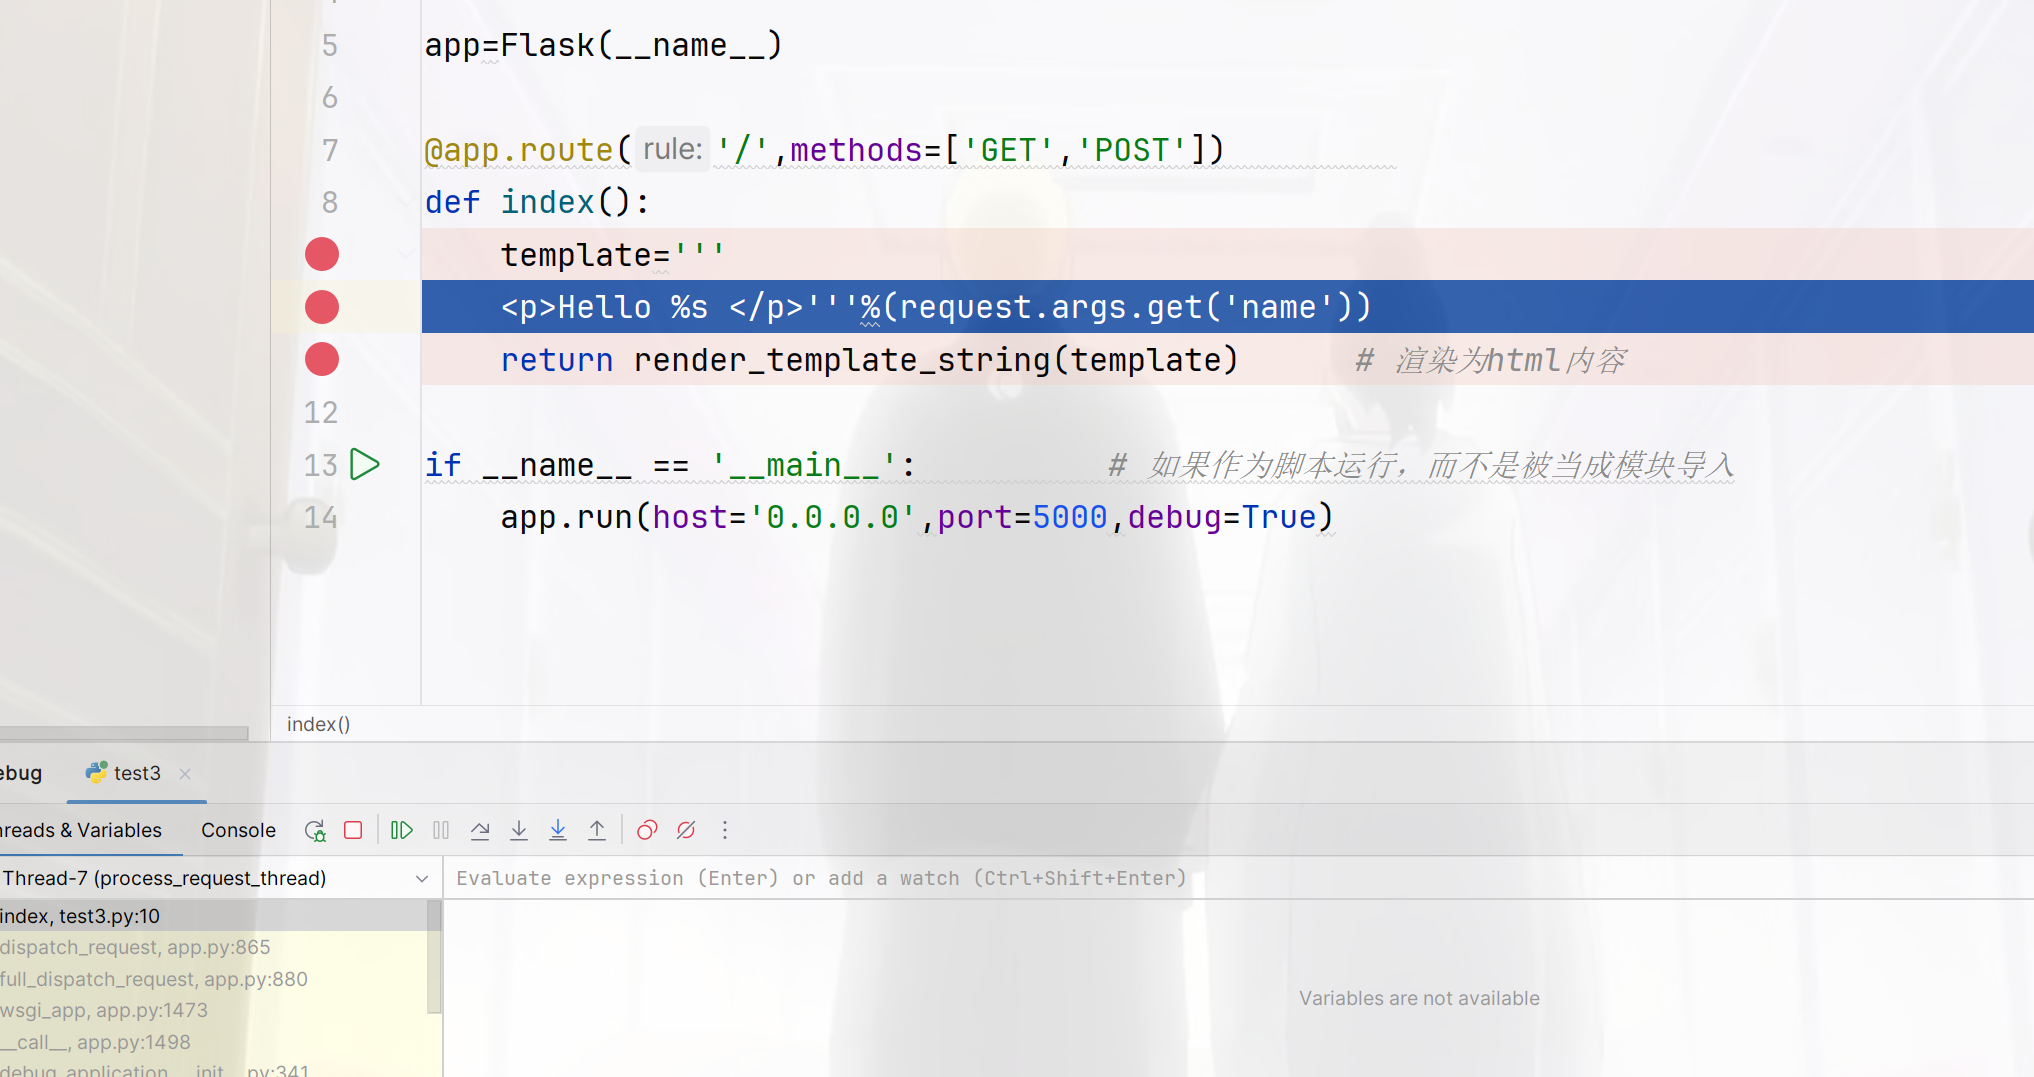
我们就以最为简单的SSTI常用程序,模版渲染来进行跟进吧
1
2
3
4
5
6
7
8
9
10
11
12
13
14
| from flask import Flask
from flask import request
from flask import render_template_string
app=Flask(__name__)
@app.route('/',methods=['GET','POST'])
def index():
template='''
<p>Hello %s </p>'''%(request.args.get('name'))
return render_template_string(template)
if __name__ == '__main__':
app.run(host='0.0.0.0',port=5000,debug=True)
|
其实环境都不用配置,不过有个注意点就是不要有中文路径也不要有空格那么开始,我们先不传参的情况下打一遍断点,**右键Debug程序,然后浏览器访问http://127.0.0.1:5000/**此时你的PyCharm就会变的红闪红闪的
我们这里慢慢看,先看request.rgs.get是怎么赋值的再看是怎么进行渲染的,到第二行进行跟进
args 是 werkzeug.datastructures.ImmutableMultiDict 的一个实例,代表了请求 URL 中的查询参数。所以跟进的预期我们应该是得到GET方法,跟进的结果也确实是这样
1
2
3
4
5
6
7
8
9
10
11
12
13
14
15
16
17
18
19
20
21
22
23
24
25
26
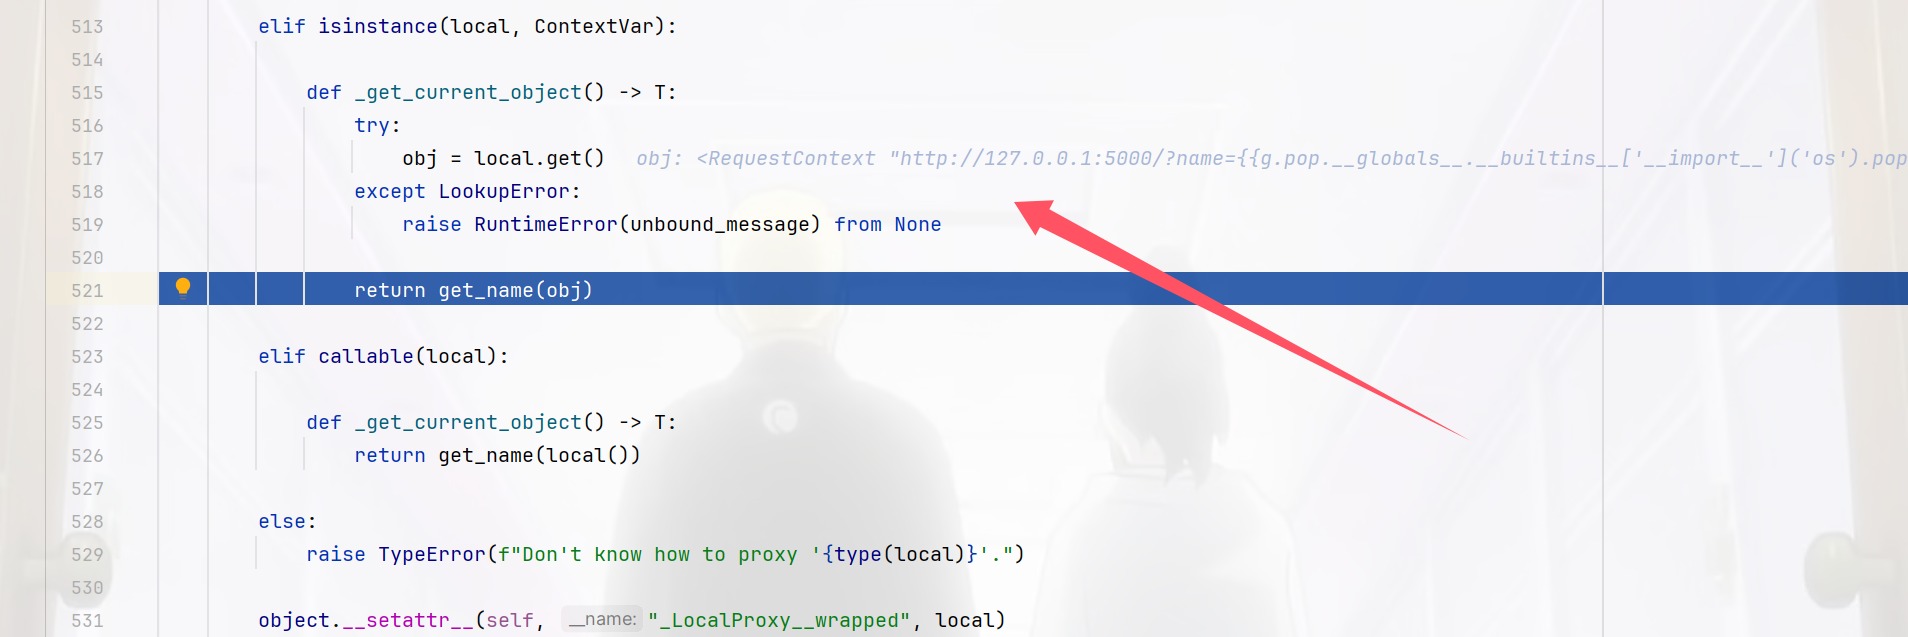
| def __get__(self, instance: LocalProxy[t.Any], owner: type | None = None) -> t.Any:
if instance is None:
if self.class_value is not None:
return self.class_value
return self
try:
obj = instance._get_current_object()
except RuntimeError:
if self.fallback is None:
raise
fallback = self.fallback.__get__(instance, owner)
if self.is_attr:
return fallback()
return fallback
if self.bind_f is not None:
return self.bind_f(instance, obj)
return getattr(obj, self.name)
|
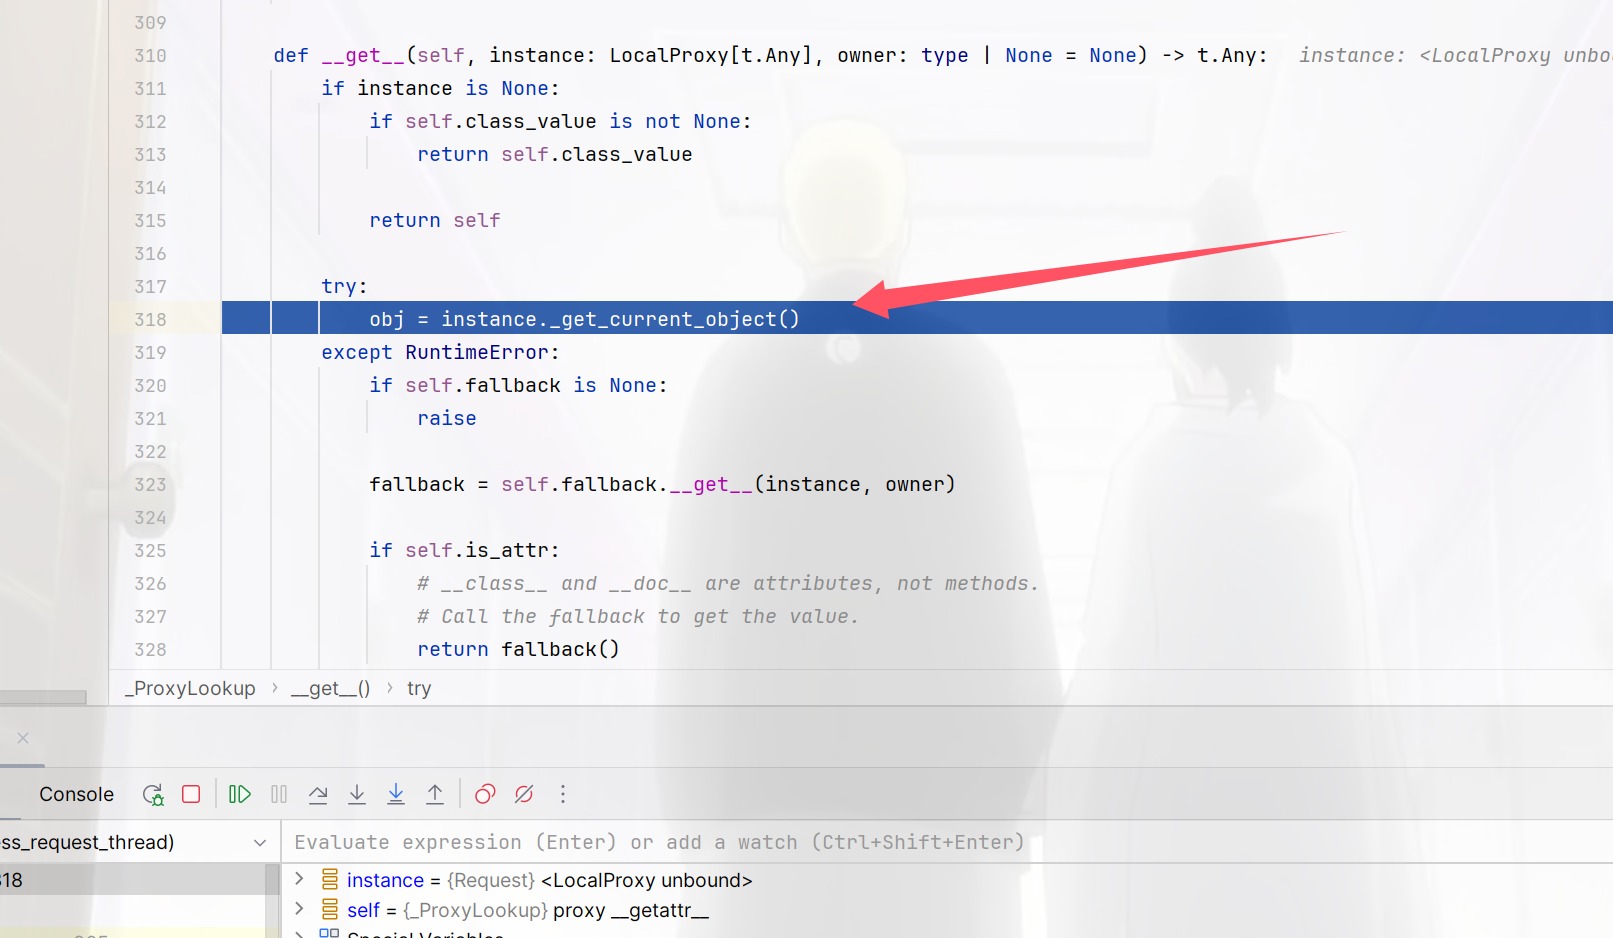
这里会进行一个obj的赋值
然后跳出再到bing_f函数
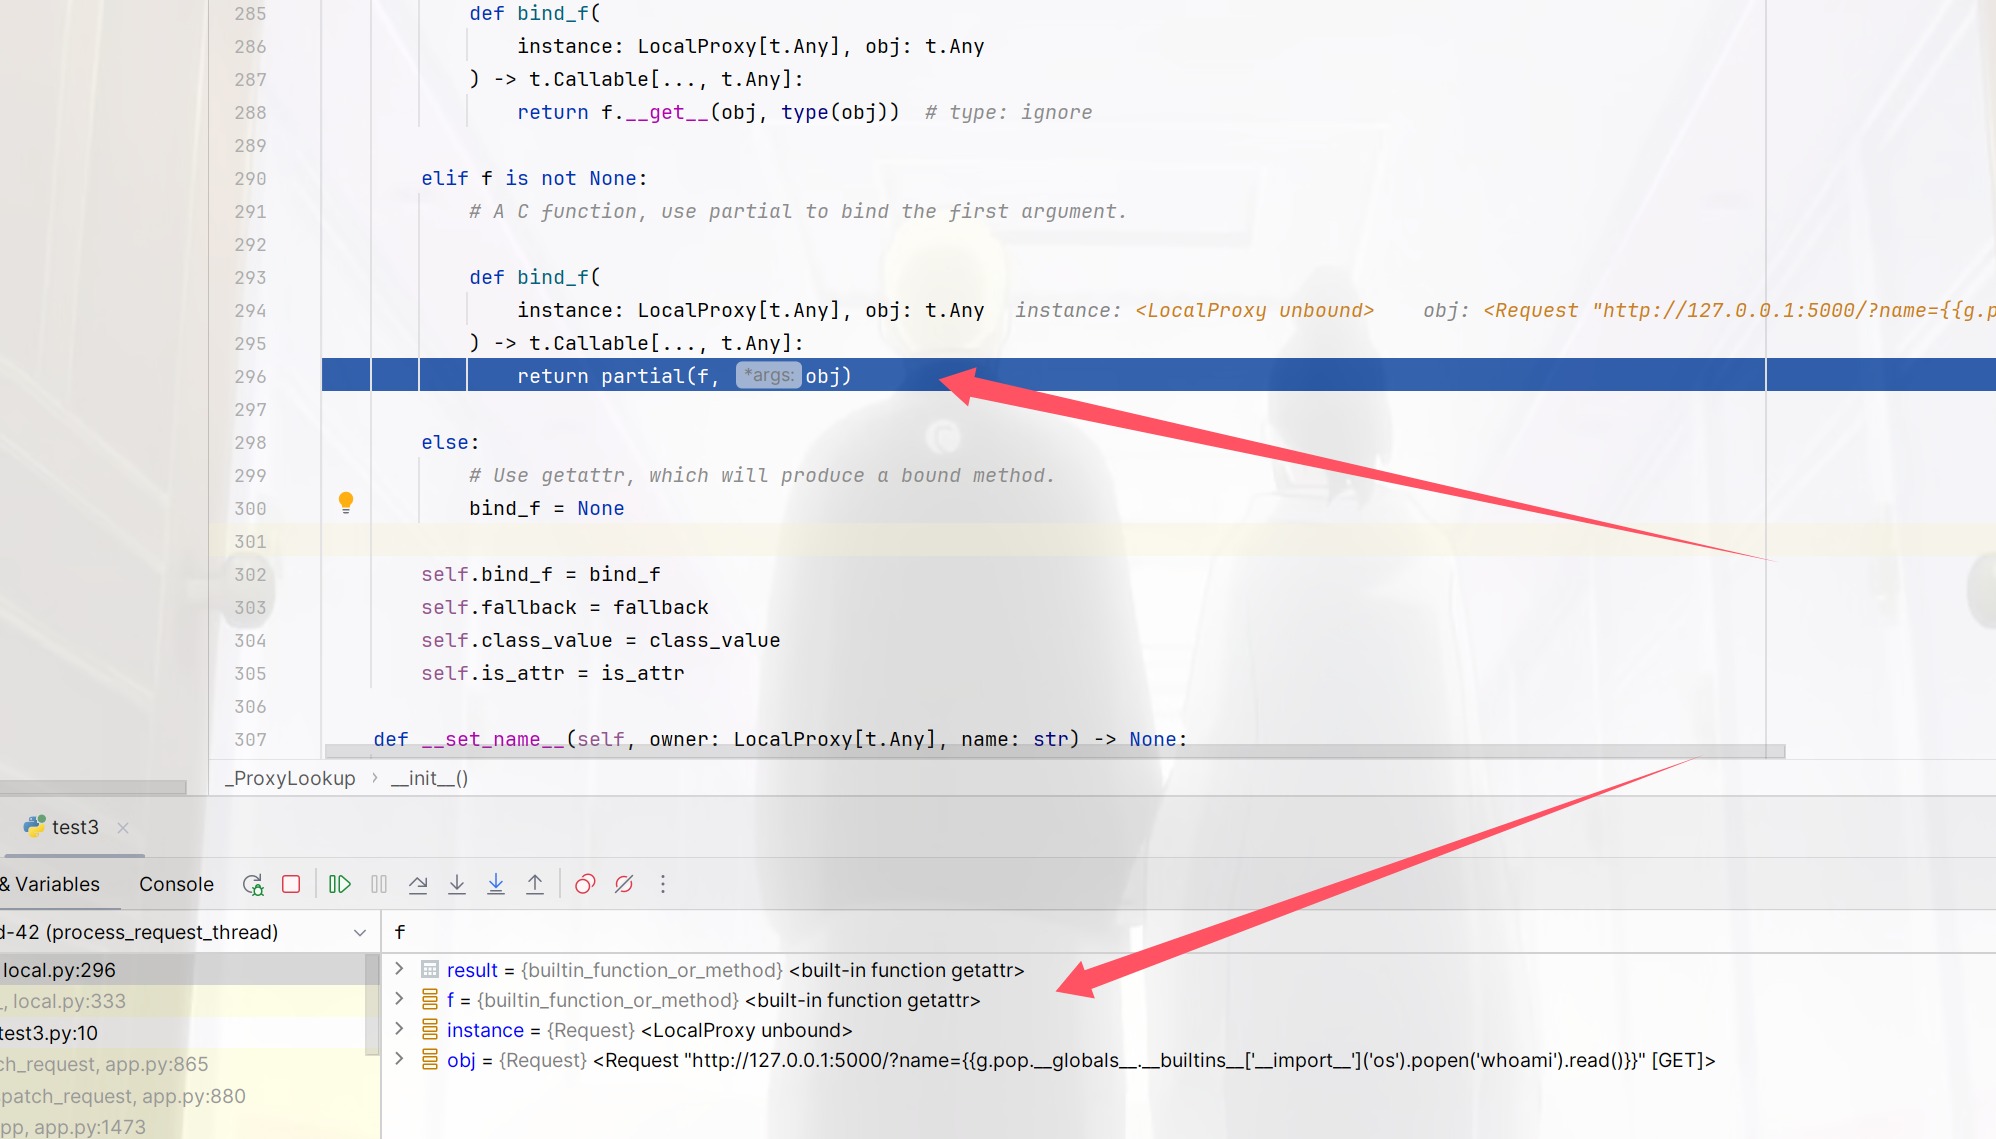
这个partial函数是一个调用函数的所以跳到__get__,然后利用value = self.fget(obj)来进行赋值
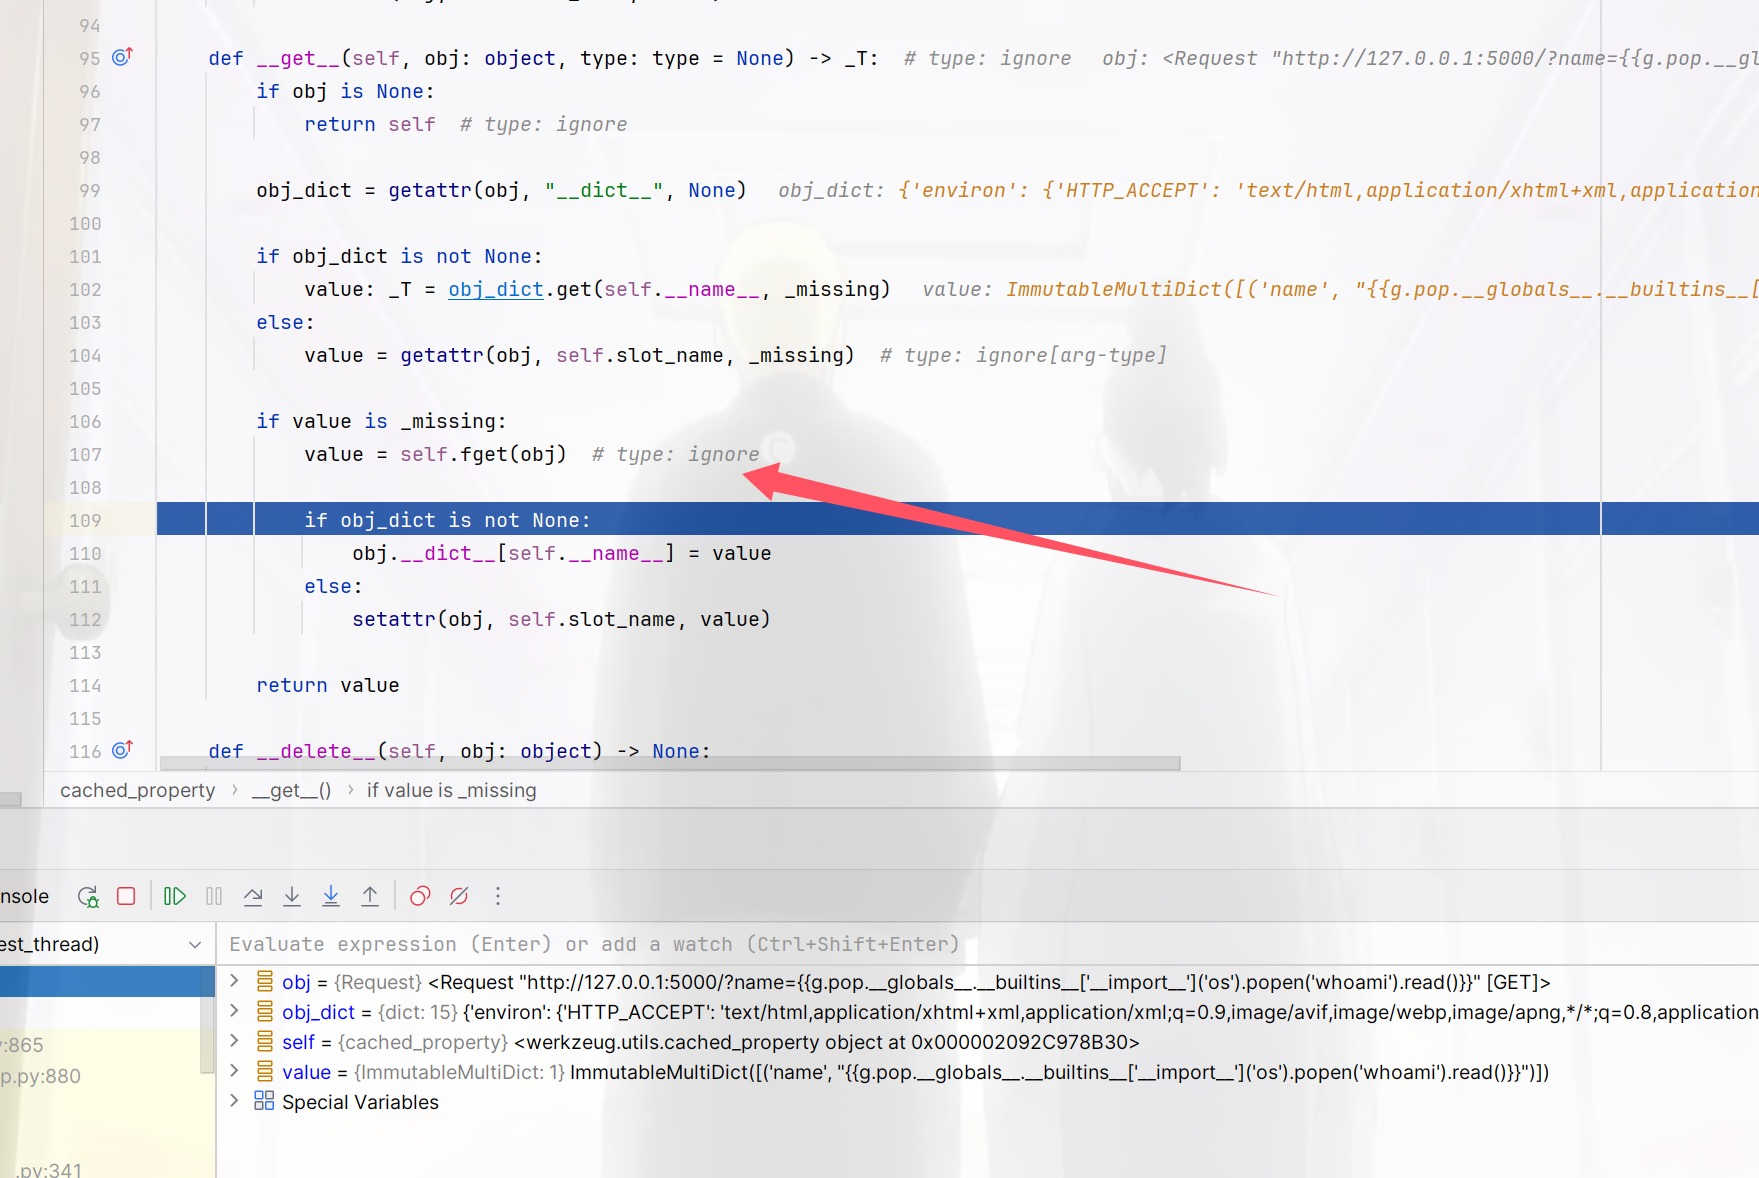
然后就是把值赋值给键的过程
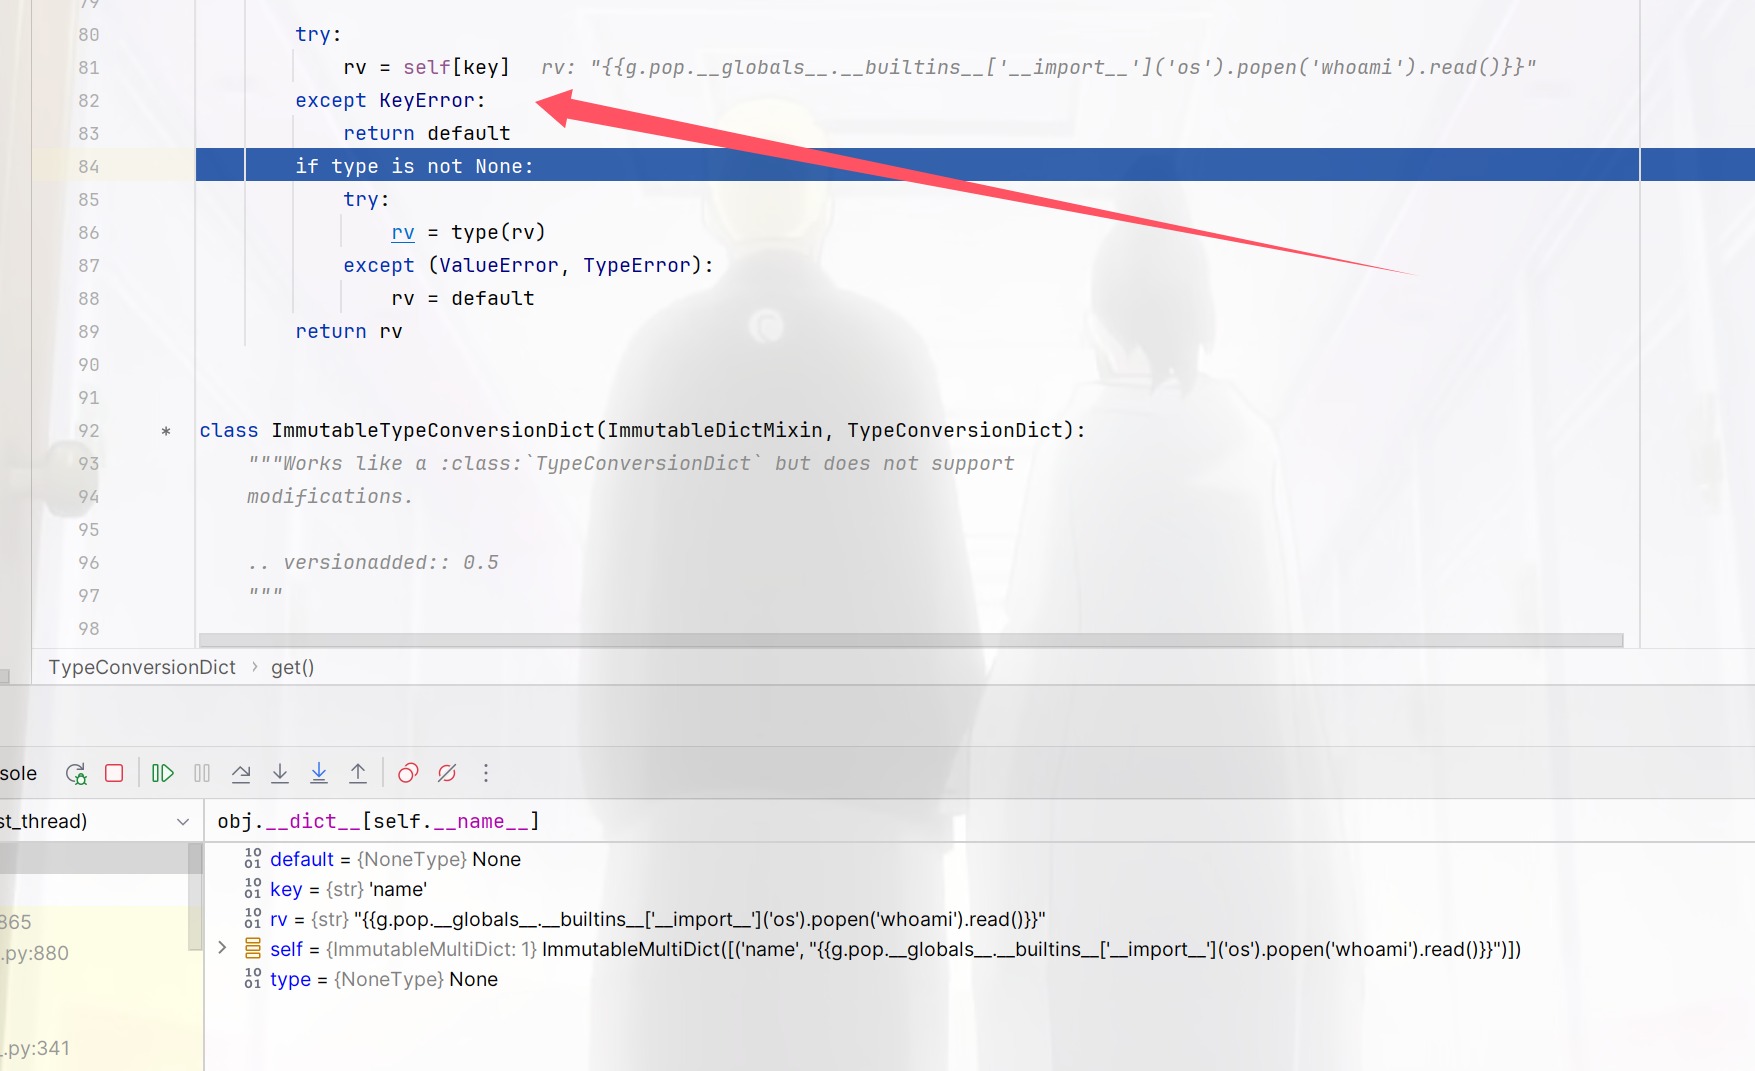

然后跳出来进行return rv也就是我们在url传入的值,我们再看看模版渲染的部分
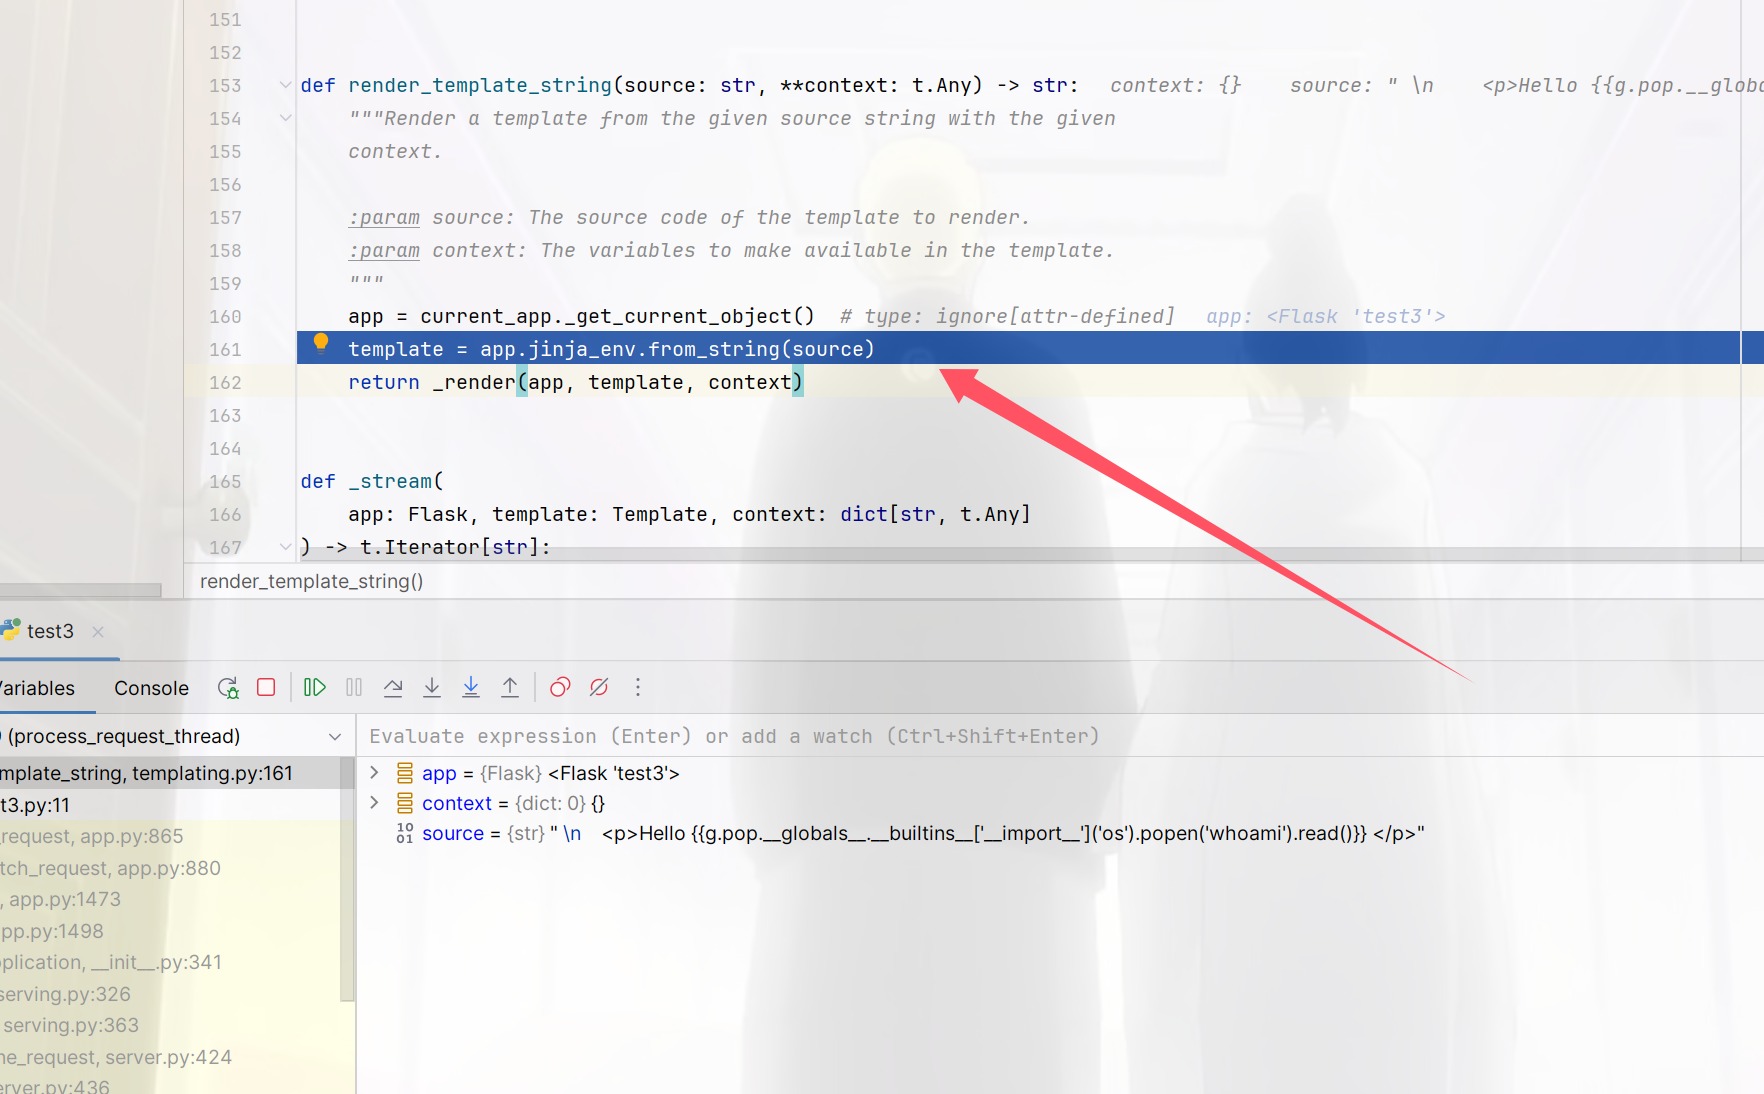
看到这里让我一下就想到了国城杯,其实

这玩意本质上就是render_template_string啊

一样的赋值方法不过这次是从这里进行赋值了,然后就是返回value的时候进行了跟进,首先是定义一个全局变量然后选一个cls再在里面进入
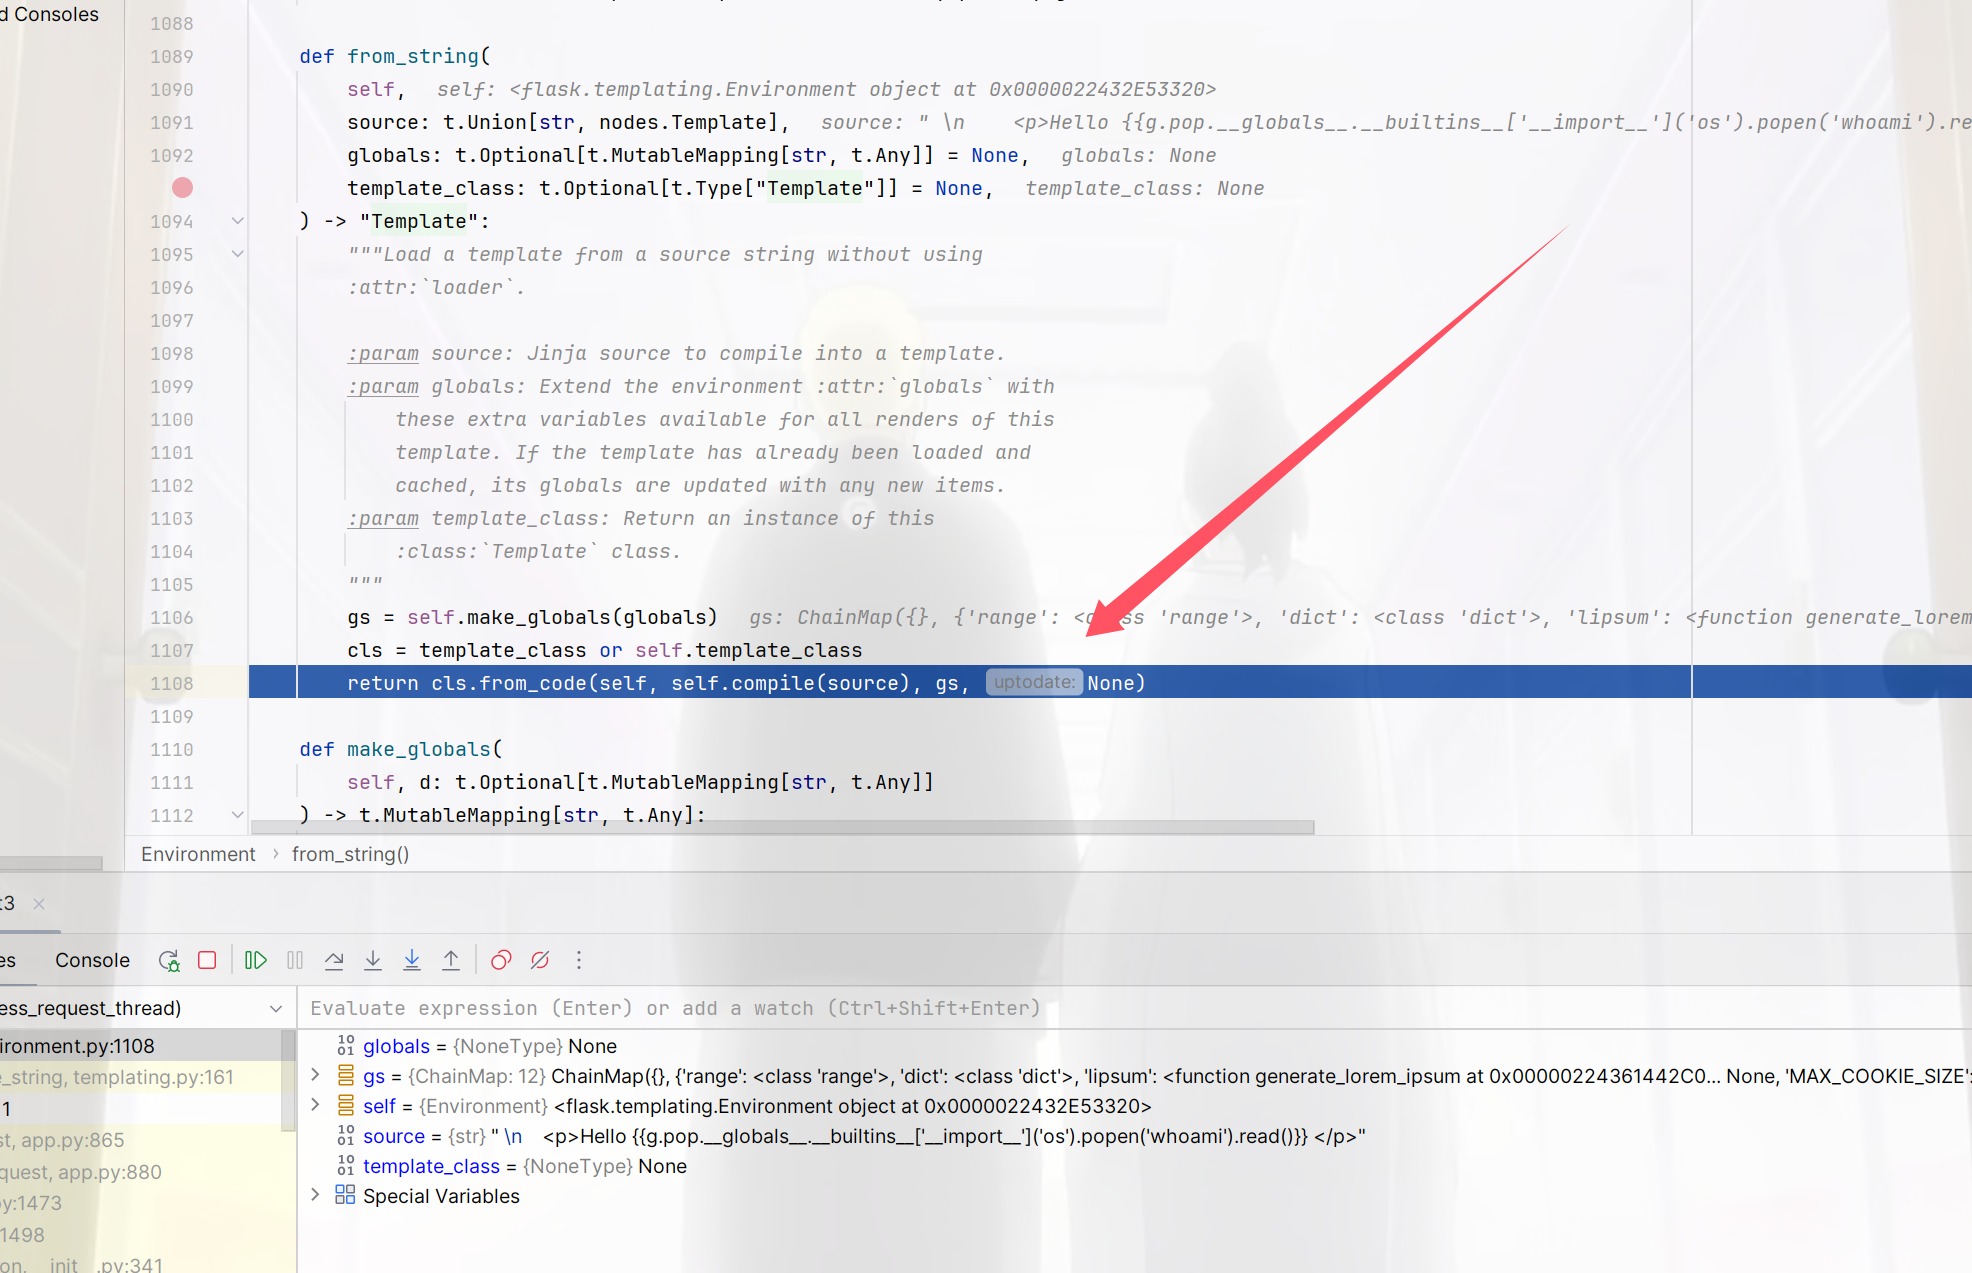
通过了_parse变成了下面的一段代码
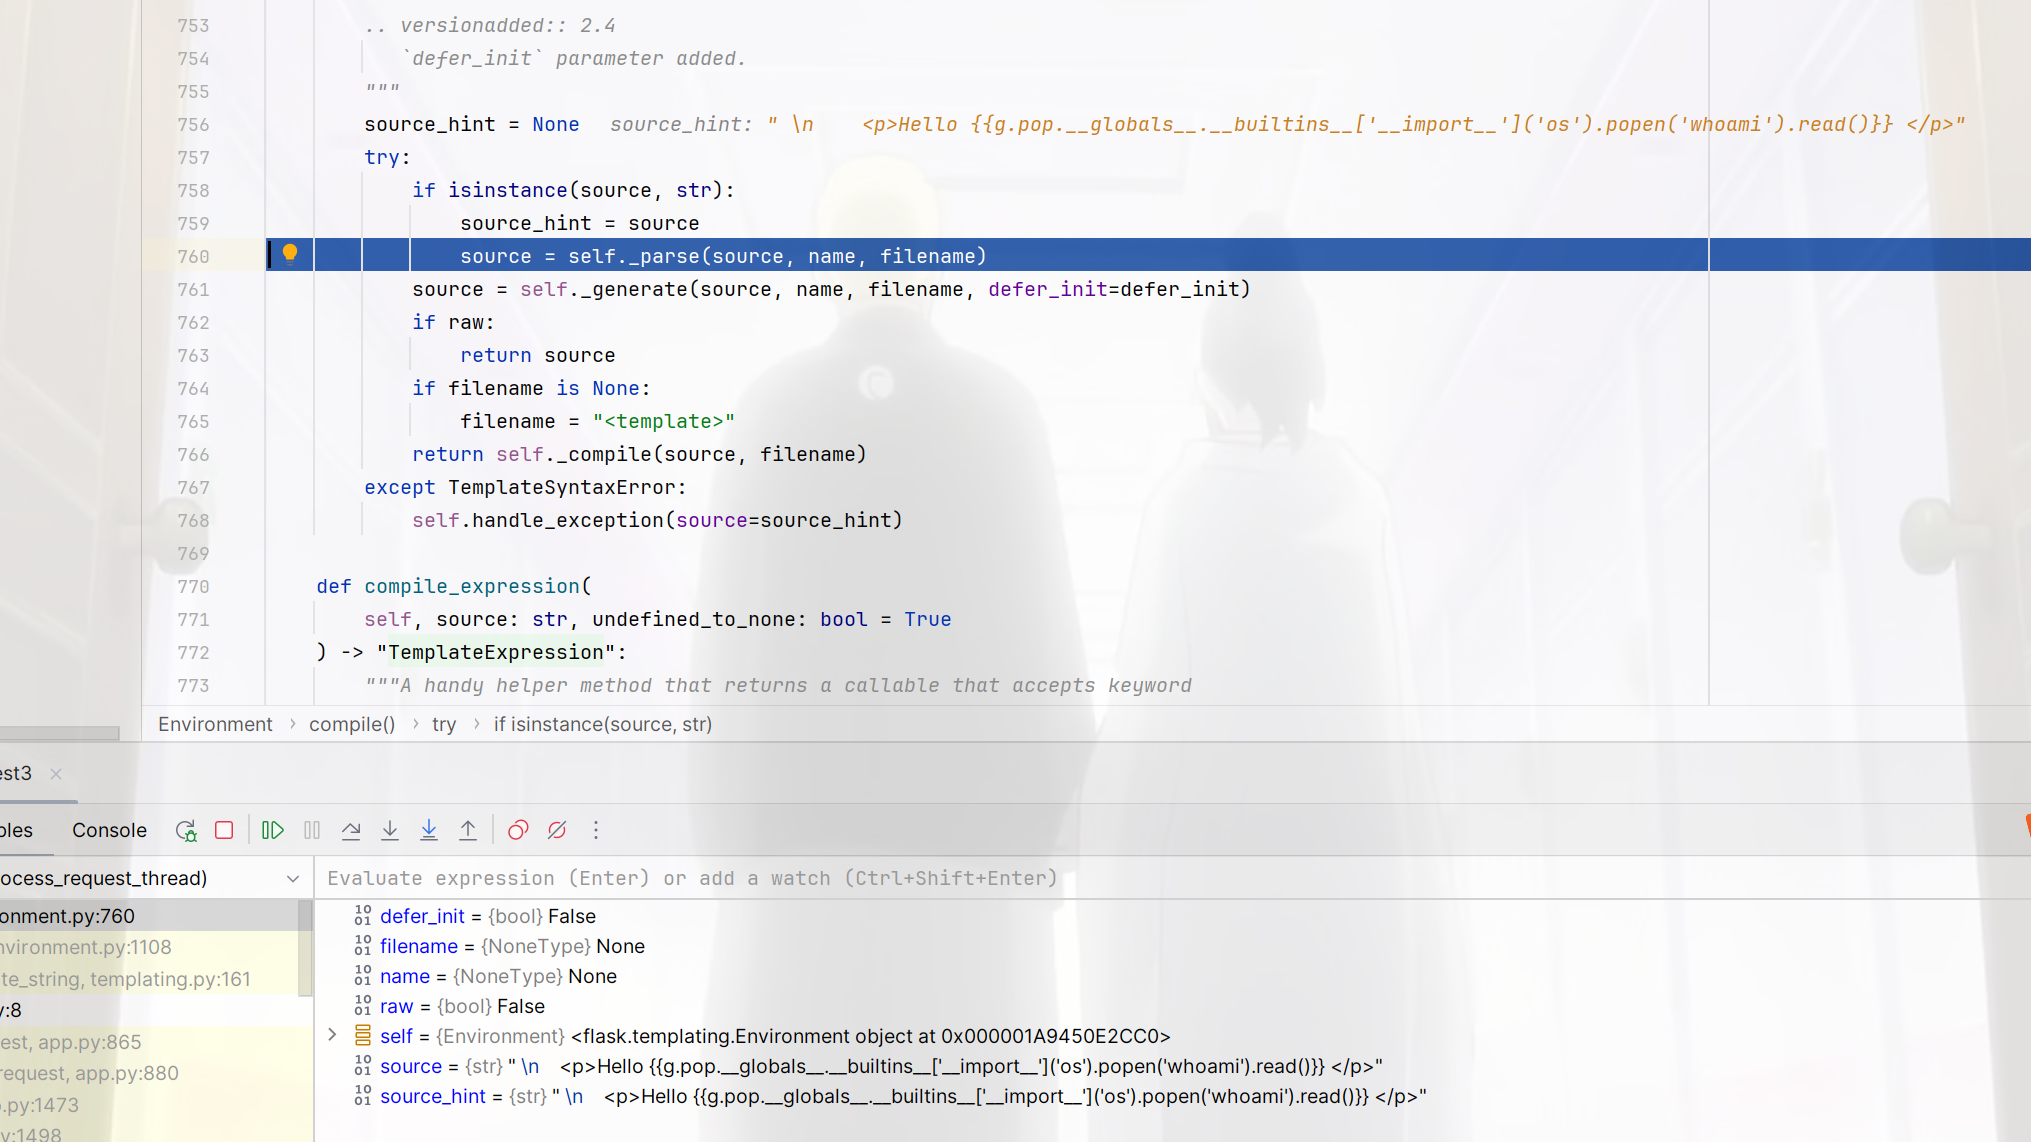
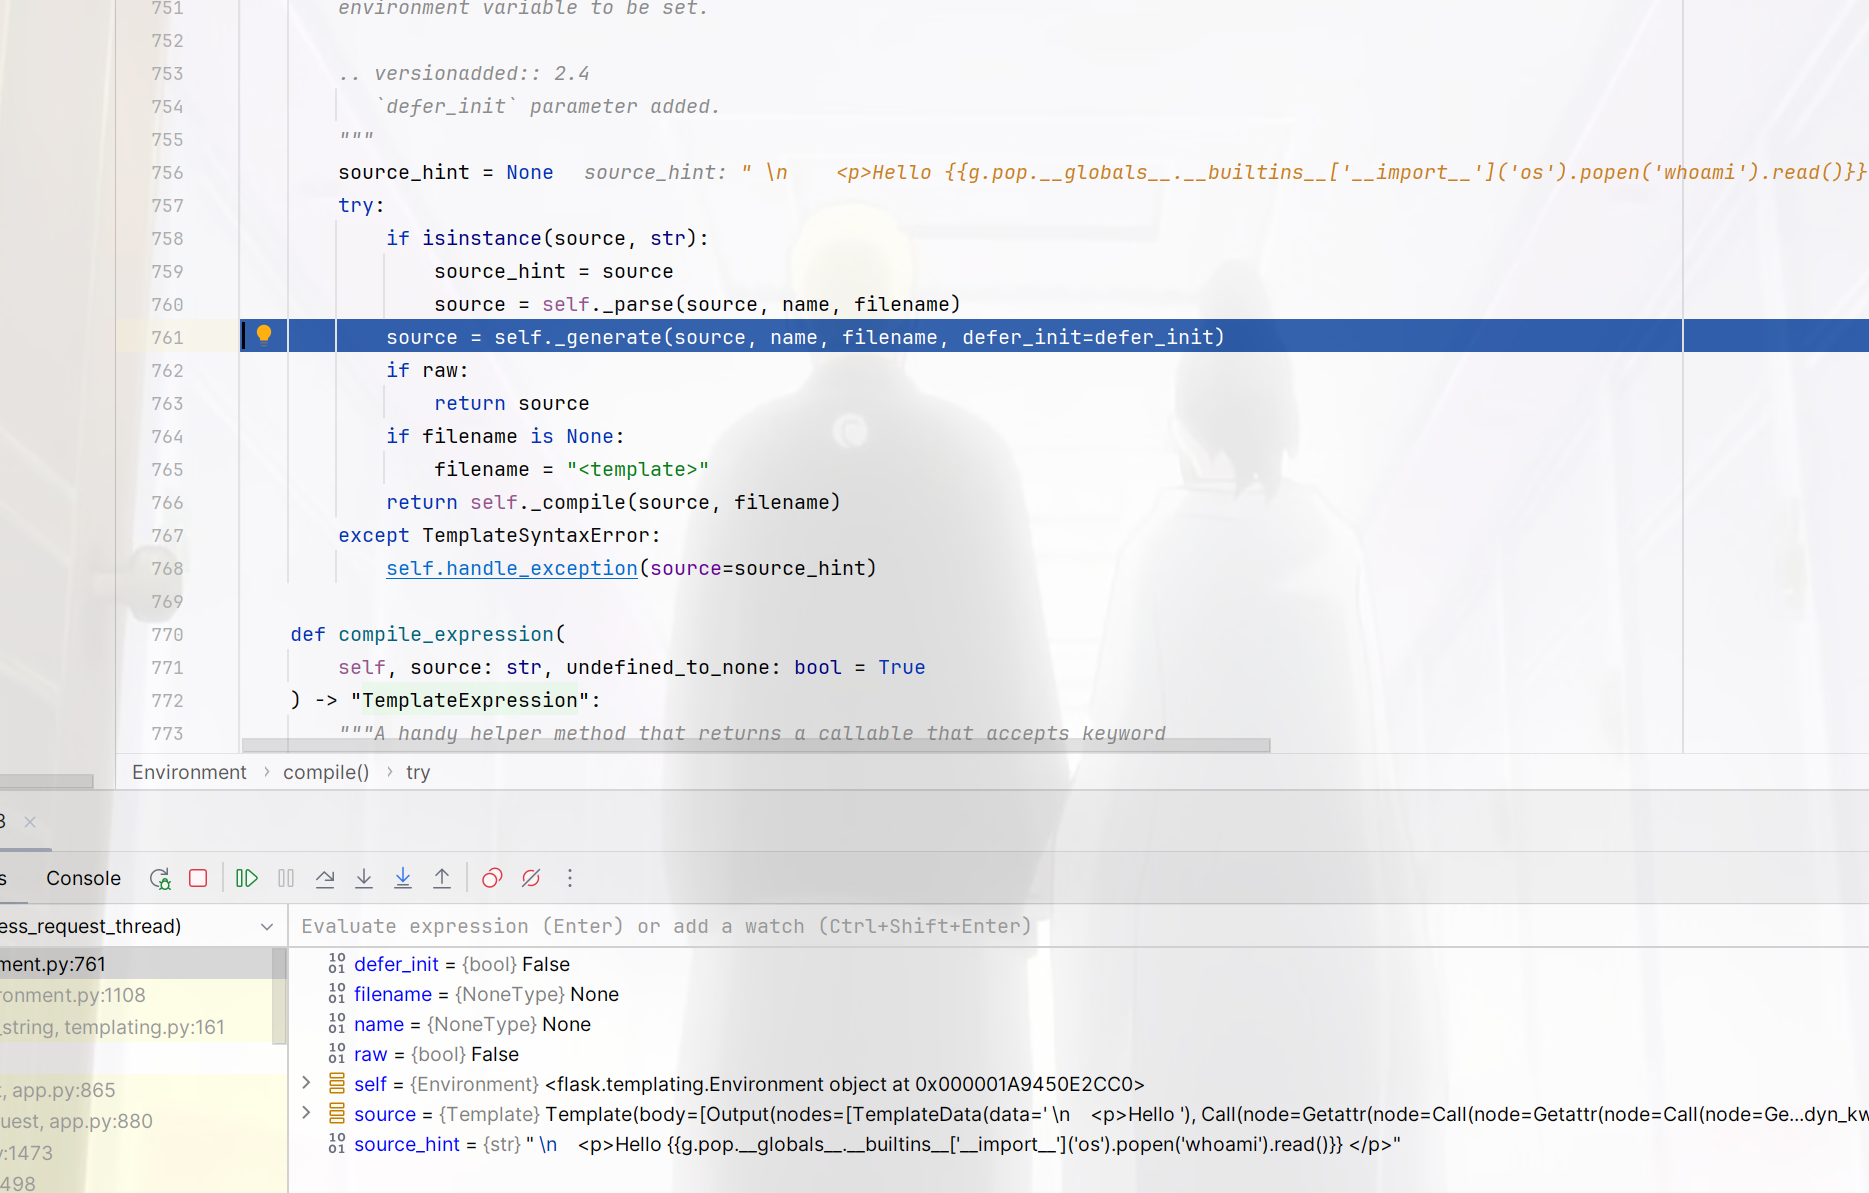
1
2
3
4
5
6
7
8
9
10
11
12
13
14
15
16
17
| from jinja2.runtime import LoopContext, Macro, Markup, Namespace, TemplateNotFound, TemplateReference, TemplateRuntimeError, Undefined, escape, identity, internalcode, markup_join, missing, str_join
name = None
def root(context, missing=missing, environment=environment):
resolve = context.resolve_or_missing
undefined = environment.undefined
concat = environment.concat
cond_expr_undefined = Undefined
if 0: yield None
l_0_g = resolve('g')
pass
yield ' \n <p>Hello '
yield escape(context.call(environment.getattr(context.call(environment.getattr(context.call(environment.getitem(environment.getattr(environment.getattr(environment.getattr((undefined(name='g') if l_0_g is missing else l_0_g), 'pop'), '__globals__'), '__builtins__'), '__import__'), 'os'), 'popen'), 'whoami'), 'read')))
yield ' </p>'
blocks = {}
debug_info = '2=13'
|
这里也就是在进行html的生成,当有权限时进行了命令执行
idea